Wooden window sills, window sill installation, step by step instructions. Proper installation of the window sill under the existing plastic window Fabrication and installation of wooden table sills
Successful window installation means more than just a successful installation. window frame, but also correct installation window sill.
Only in this case it is possible to give the external attractiveness of the entire structure, to ensure maximum comfort in the room. You will have a comfortable seating area small items interior, the issue of heat transfer regulation will be solved.

From this article you can learn how to organize a technologically correct installation of wooden window sills.

Functional features of wooden window sills
The window sill is not just decorative element that complements the window system. This is one of the most important building blocks that performs many utilitarian functions: If the technical standards and rules for the installation of wooden window sills are observed, they guarantee the thermal protection of the room, eliminating the risk of drafts.

- Used as a convenient and compact shelf where you can place flower pots, children's toys, stationery.
- On the wide window sill you can leave a book, use it as a comfortable seat to enjoy the view from the window.
- A wide window sill will allow you to place a computer monitor on it, table lamp and use as a desk.
- Creating a miniature on the balcony winter garden by placing flower vases at different levels.
Properly selected and installed window sill will give completeness to everything home interior, will provide you with an additional workplace or a comfortable seating area.

Varieties of window sills and their specifics
The existing variety of window sill shapes and material allows you to choose best option solutions for any design idea. Based on the approach to installation, there are designs:

- Wide type with a size of 40 cm or more, which allows you to successfully produce a decorated cover for heating systems, and also saves space in the room. This option can be used in the presence of wide supporting walls.
- Narrow type (width up to 10 cm) - used for window systems installed on balconies.
- Sloping, when the window sill is replaced by part of the window slope.
- With a launch on the wall, when part of the slab goes deep into concrete structure at 17-20cm.

Along with a straight window sill that can fit into any type of interior, there are also more original arched options. They give a designer freshness to the arrangement of residential premises.

The use of wood in production is a universal and quite popular solution. However, such a material is subject to moisture and temperature changes, and therefore often deforms and cracks.

To eliminate these problems, glued or milled wood is used, the moisture content of which does not exceed 10%. In this regard, pine, beech or oak wood is taken, followed by treatment with special protective compounds.

To reduce the cost of construction, you can use chipboard. This material has an external appeal and is strong enough, however, with prolonged exposure to moisture, it will collapse. Finishing with lamination will partially solve this problem, but the possibility of moisture penetration from the ends will remain.

What you need to know when installing a wooden window sill
significant portion common success in installation depends on the correct measurements. The penetration of the front part and sides into the wall is at least 40 mm, and in addition, it is also necessary to provide for an exit on one side of more than 60 mm beyond the concrete.

If you calculated everything correctly, then you need to process the structure. To do this, use a variety of moisture-protective compounds and solutions. Thanks to them, the material will not deteriorate, and the service life will be significantly extended.

It is necessary to process not only the upper and lower surfaces of the plate, but also the end parts, especially at the point of contact with the wall.

The installation site must be free of dust and dirt. It is also necessary to remove some of the loose concrete. The surface on the wall should be additionally primed. In addition, the base on which the structure will be installed must be leveled. Installation is carried out in accordance with the level indications.

To successfully complete the task, you need to follow these tips:

- in a panel or brick house two-level fixation is required. First, fix it with mounting foam, and then use self-tapping screws to make a through fixation with the window frame from the outside.

- For wide window sills, additional support in the form of metal corners or wooden bars that are attached to the surface of the wall. The fixing of the structure on the basis is carried out with the help of foam.
- In wooden houses, it is desirable to take into account the design features when planning the opening. Fastening is done with carpentry glue or self-tapping screws.

Production of window sills from wood
When choosing a material for a structure, it is necessary to focus on the following requirements:
- high degree of wood drying;
- increased rock strength;
- homogeneity of the material without knots or darkening.

The presence of resin in the pine material makes such structures more durable, additionally endowing them with healing properties.
Oak wood is characterized by high impact resistance and protection against mechanical damage. At the same time, experts recommend using glued laminated timber, and not solid wood.

The prepared material must be carefully processed. The ends must be sanded and polished. From below it is required to provide grooves for fastening. The window sill is treated with varnish or paint, and the lower part must be treated with antifungal compounds.

For insulation, the bottom of the window sill can be covered with felt, which is fixed with nails. During installation, it is advisable to prepare the surface of the wall in advance by treating it with lime and gypsum. The boards will be installed from above, taking into account the entry into the corresponding recesses in the walls.


When installing under a beam, it is necessary at the initial stage to fix the plate with nails without hats. It is necessary to fix the nails at the bottom of the beam, and then put the structure itself on them.
During installation, it is important to ensure that there is no tilt. And after fixing, it is necessary to remove the excess solution and foam the voids that have arisen.

Window sill installation
The size and shape of the structure slab are determined individually. The width can vary from 30 cm to 50 cm, but it is important to remember that two-thirds of the window sill must be attached to a solid wall surface or special fasteners. Also, you should not indent more than 7 cm behind the wall, since heat transfer performance can be degraded.

Mounting technology:
- When preparing the base, the lower surface of the opening is leveled, and the side walls are knocked out a few centimeters along the height of the window sill plate for its subsequent insertion into the depths.
- Installing wedges will help level the surface of the structure horizontally in level.
- When installing the sill plate, the wedges are adjusted to ensure accurate horizontal guidance.

- In the place where the slab is deepened into the slopes, foaming is performed, followed by processing of the board from its lower side.
- Security flat surface to install a window sill, it is possible either by preliminary concreting according to the level, or by using foam plastic.

This material will not only additionally insulate the installation site, but also prevent possible shrinkage, provide insulation and contribute to thermal control.


A properly installed window sill will provide not only an attractive interior in the room, equip the room with an additional workplace, but also solve problems with thermal control.

Photo ideas for installing a wooden window sill


Installation wooden window sill do-it-yourself will not take much time even for a beginner, if you have at hand detailed instructions. It is for this purpose that this article was written, let's proceed to the study.
Obviously, installing a window sill in wooden house will be produced using high-quality natural boards, but what makes you use this product in the "stone jungle", where synthetic materials play a leading role in interior decoration? Indeed, today plastic has practically replaced everything natural from our apartments, because it is easy to maintain, significantly cheaper and quite durable. BUT modern man there is no time to think about a healthy atmosphere in the house and constantly take care of the safety of natural elements of decoration.
But, time began to turn back, synthetic chemistry is less and less satisfying to the consumer, and wood is the most accessible from natural materials for window sill decoration. Of course, there are also fans of natural stone, for example, but still the price category of such a product is closer to “gold”. Besides modern options window sills made of wood are not as clumsy as in the USSR, they already have their own style, quite elegant and restrained, which allows them to organically fit into both a modest interior and a very sophisticated one.
Installing a wooden window sill will give you many advantages, even if your windows are made of PVC profile. Natural material will definitely get rid of the external "coldness" of plastic, even such a small detail will bring a good share of comfort to the room. In addition, the tree has long been known for its "smart" mechanism for regulating heat and moisture in the room, it is not for nothing that even entire houses have long been built from this material. Therefore, such a window sill is not afraid of severe cold and wet autumn, it always remains relatively warm, and the radiator located under the window will not cause the release of toxins that the plastic fellow “sinned”, according to some scientists.
Many will object that natural material capricious in operation, you can’t pour anything on it or put it hot. These are relics of the past modern technologies allow you to process the tree in such a way that it is not afraid of such accidents, however, if you are not going to deliberately check this daily. Well, we have already mentioned a word about the aesthetic side, there are many styles of such window sills. You can traditionally make this fixture of the correct shape and polished to a shine, and for lovers of interesting designs, the option of unhewn wood is suitable.
If you do not want to buy a finished product, you can make it yourself. You will need a well-dried, carefully planed board without knots and chips. Choose which side will be outside and which will lie on the wall. Here on the inner surface you will need to make a drip to remove moisture from the wall. This is a regular groove 5 mm deep and about 8 mm wide, which is made about 2-3 cm from the front edge of the board. It remains to cut the board to the length you need (this parameter should be 15 cm larger than the window opening).
But you choose the width yourself, the option is considered optimal when the protrusion into the room is about 7 cm. The tree is also treated with compounds against the harmful effects of dampness and open fire. The choice of the finished product should be carried out in the same way, focusing on the geometric data of the window frame and opening. It remains to find out how to put a wooden window sill, we will talk about this later.
How to install a wooden window sill quickly and reliably?
Now let's proceed directly to the installation, the natural material is complicated in that it is very sensitive to errors in this process, so we will be more careful than ever.
How to put a wooden window sill - step by step diagram
Step 1: Preparing the Walls
To figure out how to install a wooden window sill, you need to start not at all from the board itself, but from the place where we place it. The base on which the object of our attention will be located is thoroughly cleaned of dust and debris, because this was preceded by the installation of a window profile. Next, you should thoroughly moisten it with water, because in most cases cement mortar is used to fix the window sill. If the base is not solid, that is, there is a recess with heating communications under the window, then you will need to put wooden or metal horizontal supports on top of this niche so that the window sill does not hang in the air. And for reliability, the board itself can be "dressed" around the perimeter in a metal profile.
Step 2: Leveling the window sill
With rare exceptions, the walls that serve as the base are located on the same level, so you will first need to set the window sill evenly using wedges. In addition, you need to set the plane of the board so that it falls slightly towards the room. It will help to determine these small degrees. Once you have obtained the desired slope in all directions, fix the wedges with several portions of the solution so that this position will not change again by any chance, and remove the board from the seat.

Unlike other operations required for the installation of windows, the installation of a window sill in a wooden house is often considered an operation performed as part of an interior design project.
This fact determines a fairly large number of installation options, as well as an extensive list of materials from which a window sill can be made.
Given the high versatility given element window frame, the building materials market offers several dozen alternative solutions, making a choice among which is quite difficult.
In this review, we will consider the most popular models of window sills, their installation technology, as well as the main criteria used to select materials and installation methods.

It is impossible to unequivocally recommend one or another type of material for the manufacture of a window sill for windows in a wooden house, since its choice is influenced by various factors, including those due to the characteristics wooden structures.
Recall that a tree is construction material, which, for all its merits, has one significant drawback - susceptibility to moisture and variability in size.
To compensate for this shortcoming in the design wooden house there is such an element as a casing frame, the task of which is to ensure constant dimensions inside the frame, when the size of the window opening changes.
The complexity of manufacturing the finished product depends on the type of workpiece material, as well as on the configuration of the window sill.
Recall that in the manufacture of window sills, the following modifications of their design are used:
- with launch on the wall;
- without running on the wall;
- with a simple edge;
- with curly edge;
- wide;
- narrow.
The easiest to manufacture is the option without running on the wall, which is most often used in cases where the window sill is made of a plastic profile.
In general, the manufacturing cycle of a window sill board consists of the following steps:
- determination of the type and drawing of the contour;
- cutting out the mounted block;
- edge forming (for wood)
- grinding and polishing (for wood);
- preparation of fittings for sealing ends (for plastic)
Please note that the installation scheme of a PVC window sill may differ significantly from the same operation for a wooden window sill. This is due to the fact that the preferred method of installing the lower casing bar is on a spike, therefore, in some cases, when manufacturing a wooden window sill, it is necessary to provide for milling a groove on the lower plane.
Installation technology
Considering the methods of installing window sills, it should be noted that there are two different approaches to solving this problem.
Installing a window sill as a casing element
As mentioned above, in this case, the window sill is in direct contact with the external environment (the thermal insulation created by the platbands is not taken into account). Therefore, the landing of the window sill on the frame is carried out according to the same scheme as the vertical posts - “thorn - groove - jute sealant”.
Please note that in this case the window sill is installed before the window is installed.
Installation begins by checking the compatibility of the groove and the tenon.
Further, a heater is laid on the lower end of the log house, after which a window sill is laid. Fixing with self-tapping screws in this case is not needed, since the lower casing bar will be pressed by vertical posts.
Separately, we note that the operation of installing a window sill should be considered in conjunction with the installation of window sills, since without drainage, the outer end of a wooden window sill will quickly collapse.
Installing a window sill in a casing with a straight quarter
In cases where the window sill is not part of the casing (for example, when installed on windows in a T-shaped pigtail with a straight quarter), the window sill is mounted after installing the window.
The board or profile is cut in such a way as to fit closely with the window frame. At the same time, the height of the window sill should be sufficient to close the compensation gap (if the installation is made on plastic windows).
Before fixing the board, it is necessary to carefully align its position in the horizontal plane. If necessary, the position of the board is adjusted using wedge-shaped pegs.
For fixing, you can use self-tapping screws, the length of which should be such that they do not enter the logs of the log house.
At the end of the review, we list some features of the window sill installation process, the knowledge of which will help to avoid mistakes and unforeseen expenses.
bias
The traditional technology for mounting window sill panels suggests that the installed board should be slightly tilted towards the room. When installing window sills in wooden houses, this rule has to be ignored, since landing on a spike assumes only the horizontal position of the board to be mounted.
Antiseptic protection
If a wooden window sill is installed, it must be remembered that of all the elements of the casing, it is the lower bar that is subjected to the greatest impact. external factors(moisture during cleaning, dripping condensate from windows, etc.). Therefore, careful in this case is not only desirable, but necessary.
Degree of drying
Even a narrow window sill is a fairly wide board, which is always at risk of warping due to changes in its internal moisture.
To prevent this from happening, lumber used for the installation of wooden structures in contact with the internal environment of the room must be dried to a level of 12% residual moisture.
The company "Master Srubov" will provide professional finishing of a log or square log cabin to a state of complete readiness for finishing, including the installation of window sills and slopes. You can clarify the details of cooperation and order a specialist visit via e-mail or by calling the numbers posted in the section.
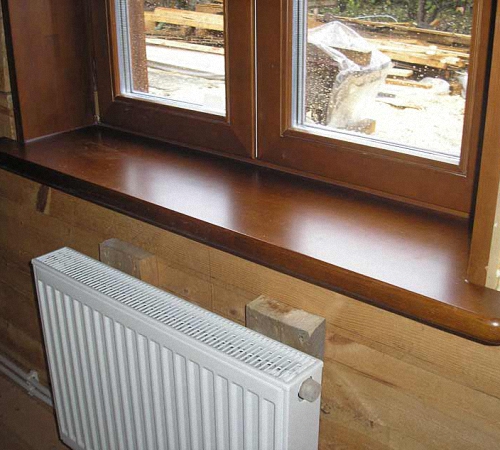
After installing a wooden window, the next important process begins - the installation of a wooden window sill. It is the execution of this operation that gives the window a more finished and attractive look. appearance. In addition, a properly installed wooden window sill keeps the heat in the house, makes the window tidy and is a place to install different kind items. How to properly install a wooden window sill, we will consider further.
The main functions and varieties of wooden window sills
One of the main elements located on the window is the window sill. It performs a large number of functions, and in particular:
1. Provides reliable protection from cold and drafts. This condition is observed if during the installation of the window sill all technological nuances and subtleties were observed.

2. Performs the function of a shelf. The window sill is a great place to place flowers, books, and other items.
3. A place of rest or reading - extensive window sills often serve as a seat or sofa, from which it is pleasant to watch the view from the window.
4. Winter garden - if you harmoniously arrange flowerpots on the surface of the windowsill, you will be able to achieve the effect of a winter garden that will delight everyone around you.
5. The use of a window sill as an additional place to work is possible if its width is more than 30 cm. A computer or laptop, a table lamp and other items are installed on such a window sill. At the same time, it is possible to achieve maximum space savings.
6. If you choose and install the window sill in the room correctly, it will make it more cozy and comfortable.
There are many types of window sills. In relation to the method of their installation, window sills are divided into:
- wide-type window sills - their width is 40 cm or more, the installation of such a window sill is possible if there are wide supporting walls, in addition, this type of window sill helps save usable space and decorates the battery;

- window sills narrow shape assume a width of not more than ten centimeters, this type of window sill depends on the design and individual properties of the building and is less common than the previous one;
- the formal type of the window sill is its almost complete absence, in which case a small section of the window slope acts as a window sill, which practically does not perform any functions;
- a window sill launched onto a wall is a classic option for mounting window sills, the average launch width is 15-20 cm;
- the absence of launching on the wall in the window sill is a more economical option for its installation, since the length of the window sill is reduced, and, accordingly, the cost of its manufacture is reduced.
In relation to the shape, window sills are:
- straight or classic - perfectly fit into any interior of the room;
- arched - these types of window sills are characterized by the presence of curved lines in the form of an arc or wave, they are distinguished by originality and innovation in the interior.
Wooden window sills photo:

Depending on the material from which the window sill is made, they are:
- plastic - the most affordable, less expensive, although not practical and not durable, due to instability to scratches and high temperatures;
- window sills with acrylic coating - improved type plastic window sill, which is resistant to high temperature and various kinds of chemical compositions;
- window sill covered artificial stone- suitable for a certain type of interior, characterized by high cost, instability to abrasives and high temperatures;
- the most expensive, but not entirely practical, is a window sill trimmed with natural stone;
- a cheaper option for a wooden window sill is a window sill made of MDF, its quality characteristics much worse than wood;
- plasterboard or plastered window sill involves its further finishing with putty, ceramic tiles or artificial stone;
- wooden window sill - is environmentally friendly, practical and versatile, although the manufacture of this kind of window sill requires care when choosing high-quality materials, observing the installation technology and caring for it, since wood is unstable to moisture, it must be processed by special means, which will prevent it from cracking, swelling or deformation.
How to install a wooden window sill: features and installation technology
In order to install a wooden window sill, you must have the window sill itself and auxiliary tools in the form of:
- square;
- measuring tape;
- building level;
- brushes;
- soil tank;
- foam gun;
- window sill installation regulators in the form of a peg.

First, you should clearly determine the size of the future window sill, on which the method and technology of its installation will depend.
First of all, it is necessary to process the window sill with the help of moisture-proof compounds that will prevent its premature damage and increase the duration of operation. Pay special attention to the areas where the window sill meets the wall.
The window opening on which the window sill is being installed should be cleaned of dust and dirt, covered with a primer.
The installation of the window sill itself is carried out in accordance with the level of the bubble or laser type. In addition, it is possible to install the window sill on a pre-leveled base.

If the walls of the house are made of panels or bricks, then the window sill is fixed to them with foam. For additional fixation outside the window, the window frame with the window sill is fastened with self-tapping screws. The length of the self-tapping screw should allow it to pass through the surface of the entire box and the window sill.
If the width of the window sill is too large and it protrudes significantly beyond the surface of the window, then it will need to be additionally strengthened with durable steel corners, wood bars or metal pins that are installed directly into the wall. Next, the window sill is installed on the wall surface using mounting foam.
If it is planned to install a window sill in a house made of wood, then all work is carried out during the planning of the window opening itself.
If the owner of the house has a woodworking machine High Quality, then the window sill, in this case, is constructed from the opening itself. If a wooden window sill is being installed, then it is fixed with wood glue or self-tapping screws, depending on the width of the product.

Production and installation of wooden window sills
For the manufacture of a high-quality window sill, you should choose a tree of good drying, which is characterized by high strength and a uniform structure. It should not have knots or darkening. Wooden window sill pine - has high strength characteristics, due to the presence in this material a large number resin, which has an antiseptic effect. Another quality material oak is used for the manufacture of the window sill. Its strength characteristics ensure the durability of the window sill. Solid wood window sills have good impact resistance and resistance to mechanical stress.
The end sections of the boards are carefully ground and polished, and special grooves are applied to the lower part, the size of which depends on the width of the product.
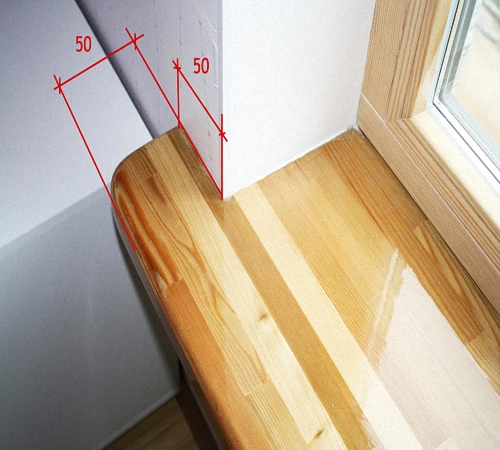
In the process of determining the size of the window sill, please note that two of its side and one front part are installed in the wall with a minimum depth of 40 mm, so this value should be added on three sides. In addition, on the other hand, the window sill should protrude beyond the wall by at least 60 mm.

Before installing a wooden window sill, it should be treated with varnish or paint, which will increase the service life of the product. The lower part of the window sill is treated with antiseptic compounds that will prevent the appearance of fungus or mold and provide protection from insects.
To insulate the window opening, it is recommended to cover the lower part of the window sill with felt. It is fixed to the tree with nails. Pre-prepared boards are laid on a surface made of brick and treated with a solution of lime and gypsum. At the same time, the board is immediately installed in the recesses that are made in the walls near the window.
First, the window sill is gradually installed under the lower section of the beam, and its fixation is carried out with pre-prepared nails, the length of which is more than 10 cm and which have cut off hats. To simplify the task of fixing the window sill, it is recommended to first install the nails in the lower part of the beam, and then put the window sill on them.
In addition, the installation of the window sill should not be tilted. Although if there is still a slope, then it should be located in the inner residential part. For its arrangement, you will need the presence of small wedges, which are set in the desired position and poured cement mortar. They install the window sill with their own hands.
After fixing the window sill, excess mortar is removed and all gaps are filled with mounting foam. Further, the slopes and seams are plastered, and the window sill is prepared for operation, which seems possible after the cement mortar has dried.

Installing a wooden window sill in a wooden house
Installation process wooden windows in a wooden house, the window space should be finished, namely, the installation of a window sill, low tide or platbands. For a window sill, it is better to give preference to hardwoods, in the form of oak or beech, since they are the least susceptible to mechanical stress.
The size of the window sill depends on the individual preferences of the room and on the functions assigned to it. The most optimal window sill width is from 25 to 50 cm, and its length depends on the size of the window.
Please note that during the installation of the window sill, one two thirds of its part should be on a solid surface, and one third should hang down. The maximum protrusion of the window sill beyond the wall is 7 cm. If you make the protrusion larger, then the heat transfer in the room will be disturbed and condensation will form on the windows.
In addition, it is better to choose not solid sections of wood, but glued beams, which are characterized by higher strength, resistance to deformation and moisture. A window sill made of glued laminated timber can serve its owners for more than fifty years.
We offer you to read the instructions for installing a wooden window sill:
1. Preparation of the landing base is the initial stage of the installation of the window sill. The lower part of the window opening is leveled, and the side ones are knocked out a little to bring the slope a few centimeters deep into the wall. This will improve the appearance of the window, and the window sill will be firmly fixed in the wall.
2. To level the board in a horizontal position, install the wedges, which will perform this operation.
4. In those places where the window sill enters the slopes, it is fixed with mounting foam. When the foam hardens, the bottom of the board is processed. Thus, reliable fastening of the window sill on the surface of the opening is ensured.
In order not to make a concrete perfectly even base under a wooden slope, it is possible to install foam on it - modern insulation, which quickly and efficiently levels the surface. In addition, it is characterized by resistance to shrinkage, temperature difference, low moisture absorption, resistance to mechanical stress, good insulation.
A properly installed wooden window sill has a number of features, namely:
- lack of a snug fit of the board to the window opening, there should be a small gap between them, which is sealed with a sealant;
- the slope of the window sill should be directed towards inside building;
- if the window sill extends beyond the wall surface by more than ten centimeters, then its fixation is carried out using metal elements.
Installation of wooden window sills video: