Folding table workbench do-it-yourself drawings. Workbench: design rules, manufacturing for all kinds of carpentry and locksmith work
Every home craftsman knows that a well-equipped workshop with a stable and reliable carpenter's workbench equipped with all kinds of tools for processing parts is half the success in the manufacture of wood products. Of course, the desktop can be bought in the distribution network. However, we recommend making it yourself. First, it will allow you to get the product right size and functionality. Secondly, when building a workbench optional equipment can be placed in the most rational way. Thirdly, the cost of the machine will be much lower than the factory version, which will allow you to buy a quality tool with the money saved. If these arguments gave you a reason to think about making a desktop with your own hands, then our drawings, instructions and recommendations will help you build a solid, reliable and functional carpentry workbench.
Purpose and design of a typical carpentry workbench
Sturdy and reliable carpentry workbench will provide convenience and comfort during long work with wooden parts
Carpentry workbench, in fact, is a massive, reliable table for processing wooden products any size. The main requirements for this type of equipment are strength and stability. In addition, the machine must be equipped with at least minimum set fixtures for fixing and holding workpieces. The dimensions of the working table are selected depending on the size and weight of the parts to be processed, as well as free space in the workshop or garage. By the way, there are designs of compact workbenches that can be placed even on the balcony.
The design of a carpentry workbench with a type-setting worktop. In the figure: 1 - base or bench; 2 - workbench; 3 - miter box; 4 - coupler; 5 - vice; 6 - support beam
Since the work that is carried out on the carpentry machine is carried out with the help of manual and electric tools, the workbench is made of massive timber and thick boards. By the way, the work surface, or in another way the workbench, is assembled only from hardwood. In the manufacture of countertops, dry oak, beech or hornbeam boards with a thickness of at least 60 mm are used. If the countertop is made of pine, alder or linden, then its surface will wear out quickly and will require periodic updating. Often, a bench cover is assembled from several narrow and thick boards, placing them on edge.
A number of holes made on the working surface of the table allows you to install stop elements for the convenience of processing long wooden workpieces.
In order to facilitate the construction, the supporting legs of the desktop, on the contrary, are made of soft wood. Between themselves, the vertical supports are connected longitudinally installed timber to increase the stability of the product.
Typical scheme of a carpentry workbench
A specially designed vise is hung on the front and side of the workbench for fixing workpieces. In addition, on overall machines, separate clamping devices for large and small parts are mounted. The optimal location for the carpentry vice is the left side of the front apron and the near part of the right sidewall.
In the workbench - the space between the supports, under the table top, they often equip convenient shelves and drawers for storing tools and accessories.
For convenience, a recess is made in the back of the countertop for fittings and small parts. Often, a recess that is difficult to manufacture is replaced with a frame knocked down from wooden slats.
Types and design
All home-made desktops for carpentry can be divided into three types:
- Mobile workbenches have a weight of up to 30 kg, dimensions of less than 1 m in length and up to 70 cm in width, are equipped with one vice and are made partly from metal elements. Such machines are designed to work with small, light workpieces or minor repairs of wooden products. A mobile desktop is an excellent option when there is not enough space and can be installed in any room in the country house or on the balcony. Often, mobile workbenches have a folding design.
Homemade carpentry workbench mobile design
If there is no need for a stationary, professional workbench, then for small repair work or making small parts you can refurbish an old desk.
- A stationary carpentry workbench is made with reference to a specific place and is not intended to be moved during operation. Equipment of this type allows you to process parts of any size and weight.
The stationary carpentry workbench is a reliable, stable structure, equipped in accordance with the preferences of the owner and the features of the room.
- Composite type machine - the most difficult to manufacture. Nevertheless, this design, due to its variability, is the most practical and functional structure. If necessary, individual parts of the workbench can be easily replaced, since the elements of the desktop are bolted together.
The composite workbench is a structure that can be adjusted to any requirement.
Project and drawings
When designing a carpentry workbench, the most important criteria are height, configuration and equipment. In addition, it is necessary to take into account who will operate the desktop - left-handed or right-handed.
Considering that it will take a long time to work at a carpentry workbench, the height of the future structure should be given the most close attention. For people of average height, experts recommend making a table no higher than 90 cm.
Drawing of a carpentry workbench
When determining the distance from the floor to the countertop, it is best to focus not on the average parameters, but on the features of your own anatomy. It is optimal if the upper cut of the legs is on the same level with the hands. If you calculate this parameter taking into account the thickness of the countertop, then you can work at such a workbench tirelessly for several hours.
The cover of the machine can be made of boards, solid wood or plywood and is a type-setting structure. It is not recommended to use chipboard or OSB for these purposes. Professional carpenters have long determined the optimal size of the countertop - a maximum of 2 m in length and 0.7 m in width. On such a workbench, with the same convenience, you can make a team wooden door, and a small window.
When designing a structure, do not forget about the strength of the supporting frame. For supporting structural elements, a bar with a section of at least 100x100 mm is used. As longitudinal and transverse reinforcing elements, it is allowed to use rails and beams with a smaller section - from 50 - 60 mm or more. The joints of the parts are mounted on spikes or dowels, furniture corners and other fittings are used for strength, and all connections are made using bolts and self-tapping screws. Nails will not be able to provide the required stability and fundamental nature of the structure.
Joiner's workbench. View from above
Often the frame, or otherwise the frame of the workbench, is made of metal. Despite the fact that this material allows with less labor to make a design with adjustable height, professional carpenters prefer all-wood construction.
Next, consider the project of a carpentry table¸ made of plywood, or rather, from two plywood sheets 1.8 mm thick glued together. The dimensions of the lid are 150x60 cm. The edges of the tabletop are reinforced with plywood strips, which increases its thickness to 72 mm. By the way, the presented dimensions are not a dogma and can be adjusted, if necessary, in accordance with the needs and characteristics of a particular room used as a workshop.
Necessary tools and materials
Plywood with a thickness of 18 mm is a rather expensive material (the price of one sheet measuring 1.5x1.5 m is more than 700 rubles, excluding shipping costs). Our project will require at least two sheets of this material. You can save a little if you buy one, larger sheet with dimensions of 2500x1250 mm. Additionally, if possible, try to purchase scraps of plywood with a width of at least 300 mm, which will be used to reinforce the workbench cover around the perimeter.
Additionally, for the construction of a carpentry machine, you will need:
- wooden beam with a section of at least 100x100 mm - for supports;
- timber or slats with a cross section of at least 60x60 mm - for frame reinforcement elements;
When choosing lumber for a carpentry workbench, carefully inspect the workpieces for knots and cracks. Remember that these parts will work under continuous load; - electric drill with a set of conventional and feather drills;
- pieces of boards with a length of at least 1.5 m for laying under the clamps;
- wood glue. Good result can be obtained using the domestic adhesive "Moment Joiner";
- furniture bolts with nuts and self-tapping screws;
- Circular Saw;
- joiner's square;
- long rule (at least 2 m);
- construction level;
- a notched trowel with a size of cut sectors of at least 3 mm;
- carpentry clamps.
Clamps required for compressing plywood sheets during gluing must be strong and reliable. If you are a non-professional carpenter and do not have a quality tool, then you can get by with inexpensive Chinese-made jigs. Of course, the number of such devices should be doubled.
Manufacturing instructions
- To make a countertop, cut two blanks with a circular saw. If you managed to purchase a plywood sheet of maximum length, then you need to saw off one blank 1520 mm long from it. By cutting it in half, you will get two parts 1520x610 mm. After that, as a rule, check the concave and convex sides of each sheet. This will make it possible to correctly orient the sheets when gluing.
High-quality gluing provides clamping of tabletop parts with clamps
To properly glue the plywood sheets, they are folded, turning the convex sides to each other.
- After laying one blank on three parallel-laid boards, apply wood glue to its surface. To do this, use straight and notched trowels. Remember that the work must be carried out very quickly, otherwise the composition will begin to set prematurely. The glue manufacturer Moment Stolyar recommends joining the parts no later than two minutes after the start of applying the composition. Therefore, if you are not sure about the speed of your work, use wood glue, which has no time limits. Of course, the strength of the connection will be slightly reduced, however, even the PVA furniture mix good quality provide an acceptable degree of bonding.
To prevent damage to the workpiece, support boards are placed under the clamps.
- Having laid the second workpiece on top of the first, place support boards around the perimeter of the future table cover and begin to tighten the tabletop with clamps. At the same time, do not forget to control the flatness of the part using the rule. It will not work to tighten the center of the workpiece with clamps, so in this part you can install a load weighing at least 15 - 20 kg.
It is possible to glue plywood sheets into a shield without clamps, if you can find a perfectly flat surface for laying them, as well as a load of sufficient mass.
- After the glue dries, the clamps are removed and proceed to reinforce the side surfaces of the countertop. To do this, strips of plywood 15 cm wide are glued around the entire perimeter of the cover in two layers. When doing this work, be sure to make sure that the top layer completely covers the joints.
Reinforcement of the side parts of the bench table with additional plywood strips
- A circular saw is used to trim the side surfaces of the table. The parquet is carried out smoothly, slowly. It is convenient to use the same rule as a guide. The tabletop is given a size of 1500x600 mm in compliance with right angles, for which they use a joiner's square or a factory corner of a plywood sheet.
- Workbench supports are made of timber with a section of 100x100 mm, connecting them with prolegs and drawers, for which lumber is used cross section not less than 60x60 mm. In our case, the height of the machine is 900 mm, however, you can adjust this size to suit your height.
Making a carpentry workbench frame
- The legs are assembled “in a spike” or using dowels, be sure to apply carpentry glue to the parts to be joined.
- When assembling the upper and lower frame of the underlay, scrupulously maintain 90-degree angles between the parts. It will be easier to fulfill this requirement if, at the stage of preparing the parts, their edges are correctly trimmed. The width of the frame of our structure is 900 mm, and the height of the frame is 830 mm, taking into account the distance from the floor to the lower prong of 150 mm.
Holes made in the parts with a pen drill will help to hide the bolt heads and washers.
If desired, a shelf can be built in the underlay. To do this, a plywood panel is cut out to the size of the lower space, in the corners of which rectangular cutouts are made for the legs of the machine.
Installation of additional equipment
A real carpentry workbench cannot be imagined without fixtures designed to fasten workpieces. For this purpose, a vise is attached to the finished tabletop in such a way that their jaws are flush with the surface of the lid. To properly install the fixture on the workbench, a vice is applied to the machine and the attachment points are marked. After that, holes with a diameter of 12 mm are drilled and the tool is mounted on the machine using bolted connection with M12 thread. When performing this operation, be sure to mill the holes for the washers and bolt heads.
View of the finished product with the vise installed
If it is not possible to install a stationary vice, you can do without them by using bench clamps or clamps.
In addition to the vise, stops are provided on the desktop. To do this, a series of holes are drilled in the countertop. Parts made of wood are considered the best stops, since metal fixtures can damage the workpiece. Nests for supporting elements are located at a distance equal to half the stroke of the vise. This will allow you to securely fix the workpiece of any size.
Video: DIY carpentry workbench
Building a carpentry workbench is a rather difficult task. However, a self-assembled machine will allow you to work in a convenient, comfortable environment. This requires not only to think over the ergonomics of the workspace and properly prepare the construction project, but also to perform the work in full accordance with the recommendations of professional carpenters. Only then will the resulting product be durable and stable, delighting its owner for years services.
It is not difficult to assemble a carpentry workbench with your own hands.
A good workbench should be in the household of everyone who works with wood, performs carpentry.
Before we analyze the drawings and start assembling the workbench, let's get acquainted with its device and the nuances of manufacturing.
The workbench consists of a workbench and a base (bench).
The board has a vise - one or two, in which the master clamps the parts with screws.
It is possible to place the stop directly on the workbench board with wedges that are inserted into the holes in the board itself, thus you can adjust the length of the stop according to the length of the workpiece.
The workbench is made of dry wood or plywood up to 8 cm thick. The workbench is made of bars with a thickness of 6 cm or more.
The underlay rests on 2 racks, which are transversely fastened to each other with bars with screws / wedges.
This is necessary so that the workbench does not “walk” from side to side when planing, sawing.
Workbench device in detail:
- Worktop - made of solid wood / plywood with a thickness of 6 to 8 cm;
- Vice in front of the tabletop;
- Workbench legs are made from solid wood/plywood, joined with cross battens for stabilization;
- Shelves, a tool box can be installed on the supports;
- Holes for wedges are drilled in the tabletop to support the workpieces;
- On the side or back of the working board, you can make a recess for storing tools.
The complete workbench is shown in the photo below.
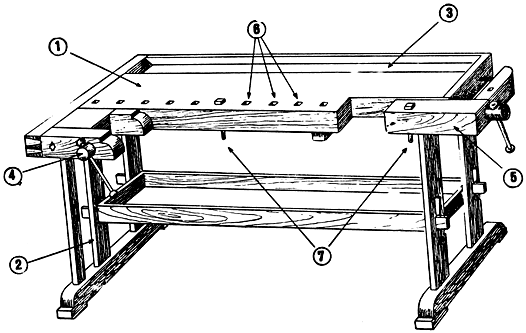
1 - cover; 2 - bench; 3 - tray; 4 - front clamp; 5 - rear clamp; 6 - nests; 7 - adjustable wedges (combs)
Workbench dimensions
Here we meet the first important nuance, which cannot be ignored when making a workbench with your own hands - its height and length.
The minimum allowable height of the workbench is 130 cm, the length is no more than 260 cm.
The height of the workbench is adjusted to the height of the person working on it:
- too high will not allow you to rest strongly, which is important when planing;
- a low workbench will make you constantly hunch over, which will have a bad effect on the health of your back in a couple of months;
- the height will be normal if you stand straight, straightened in your back and can put your hands on the board without bending your elbows.
Manufacturing nuances
The manufacture of a workbench has its own nuances, the observance of which guarantees the manufacture of a workbench that will perform its functions flawlessly.
There are a lot of nuances, therefore we structure them in relation to each stage of the future assembly process:
- Initial stage of work. You need to start from the working board. Someone will rush to look for an expensive solid array of wood, and not anyhow, but as in science - oak, beech or ash. Experts will advise you to take a finished wooden tabletop, which will cost an order of magnitude less;
- Work with the future work surface of the workbench. The surface must be made smooth, therefore any wood prepared for the role of a bench board must be properly sanded. Varnish or not - you decide;
- An important point - a workbench is a kind of table. Your task, in fact, is to make a table on which they cut not a sausage, but a tree. Therefore, having assembled the workbench, fasten it thoroughly to four legs and then connect them with transverse rails to each other for stability;
- Drawers are an important element of comfort. Remove the drawer from the nightstand and pay attention to how it is installed: there are a pair of guides in the shape of the letter "P" along which the side rails of the drawer slide. Nail two guide rails at a distance from each other equal to the width of the drawer and you're done;
- Need a saw table if you're sawing. The table is carried out 20-30 cm beyond the board itself. It is a small board that is attached to the desktop with screws (see photo);
- The workbench should be straight. Planing, sawing, burning, carving and other manipulations can be carried out strictly on flat surface and nothing else;
- Don't forget wedges! Wedges are needed in order to make an emphasis when planing the workpiece. In the table at a certain step (10-15 cm), you need to drill a series of holes (several rows in a row are possible), into which you will then insert rounded wedges. If possible, use a nozzle for drilling square holes - square wedges hold the stop better due to their shape than rounded ones, prone to deviation of the applied load vector - the workpiece will fly out of the stop every now and then.
Practical instructions for creating a workbench
So, it's time to make your own carpentry workbench. Each stage of the assembly is accompanied by a description and a photo of the process.
In the end practical instruction watch the video summarizing the assembly process step by step. We do not provide drawings of the folding variety, since it is an order of magnitude more difficult to manufacture.
Let's disassemble the assembly step by step.
Step 1 - take measurements
Is your back very tense or not? If everything suits you, measure the distance from the palm to the floor - this will be the total height of the workbench.
Step 2 - make the legs
Take ready-made bars of the desired height, or purchase plywood and cut the sheets into strips of the desired width.
Now they need to be glued: we take wood glue or a powerful epoxy, put several layers on top of each other, simultaneously gluing them together.
You may need 10 of these strips of plywood for each of the legs. It is better to glue together 10 sheets of plywood at once and, after drying, saw it into 4 parts.

Step 3 - we make the frame of the workbench
We take a ready-made board, from 4 cm thick - 4 pieces, which will be the sides of the frame-box and assemble the box, putting the sides on self-tapping screws.
In another case, you can also take several sheets of plywood, glue them together and then cut them evenly.
But in order to then correctly connect them together, it is better to use a milling cutter and lamellas.
Having drilled the necessary holes, we assemble a wooden box: we put it on PVA glue with the help of dowels of the board, we clamp it with clamps. After drying, we attach the legs to the box with self-tapping screws.
Step 3 - assemble the shelf for the tool
From plywood (5-6 sheets) we cut out a shelf, which is placed in the grooves.
The shelf needs to be fixed with confirmations: use a special drill (see photo), which simultaneously chamfers and drills.

Confirmate must be drowned, as this part of the shelf will be used as a guide for the box. Now the base of the table is ready.
Step 4 - Making a Drawer for the Countertop
We take a sheet for the bottom and again 4 strips of plywood from several glued layers. On the inner sides of the two side walls we will make grooves - for the bottom of the box.
And outside these walls we make grooves by milling so that the box can freely move along the shelves. We select the cutters as follows: the smaller one is like the thickness of the bottom, the larger one is like the thickness of the side strips + 1-2 mm.
To fix the side wall, we put dowels: we drill holes for dowels at the ends of the walls, mark the point for drilling on the mating wall with a pencil and drill to a shallow depth.
After we plant the dowels in both holes on the PVA glue. For the final assembly of the drawer, it is worth using countersunk screws that will not interfere with the opening and closing of the drawer with a cap.
Step 5 - making the countertop itself
Again we cut strips of plywood glued in several layers under the base of the countertop. We connect the strips into a box with the help of dowels and PVA.
If you use round dowels, then you need to take at least 4 pieces for each connection.
While the tabletop box is drying, we assemble its working board: we take wide sheets of plywood and glue them in several layers.
You can also pick up a countertop from the old desk and then just resize. We glue the countertop onto the box, reinforced with dowels.
Step 6 - Install the vise
As soon as the glue has set and the tabletop is ready, we drill holes in it for the wedges for emphasis and for attaching the vise.
Usually a vice is placed on 3 holes: two for bolting, one for a screw that imparts pressure when the handle is rotated.
You can take a vise from an old workbench or purchase ready-made ones and then simply fit it under the countertop by drilling holes of the desired pitch.
A bench vise is a metal screw with guides and a wood clamp.
You can take several layers of plywood with a thickness of about 5-7 cm and simply drill holes in it and put it on the screw - you get an emphasis, then put the snap-in brackets so that the vise does not fall out and you're done.
In the emphasis, you can drill holes according to the size of a large-diameter dowel, then plant it with a screw to a plywood square, having previously drilled a recess in the square.
Make these 4 stops and place them all over the tabletop to fix the workpieces with an emphasis in a vise.
Our workbench is ready!
(All of the above steps are shown separately in the video of the assembly process)
Rules of care and operation
There are a number of rules that must be strictly observed so that the workbench lasts as long as possible:
- Clean the surface of dust, glue after each use;
- Wipe the surface once a month with hot drying oil;
- Do not flood the workbench with water, do not put anything adhesive on it, including parts to be glued.
- The cutting workbench is not used in any case;
- Place a board or plywood under the workpiece if you want to use a cutting tool.
- Do not overtighten the vise screws;
- When the screws are tightened, the vise must not be struck;
- The workbench is attached to the place of its permanent location with the help of planks on screws or nails;
- The workbench should not crawl. Otherwise - strengthen all the places of its connection;
- Wipe wooden screws with dry soap, paraffin or graphite, and metal screws with machine oil only.
A home master who prefers to do all the housework on his own needs a convenient and safe workplace. The best option will become a workbench. Thanks to this simple design, the work will be significantly accelerated, since the master will work in comfortable conditions and all necessary tools and the tools will be at hand.
Figure 1. The carpentry workbench is a reliable comfortable table needed to process parts.
Design features
A carpenter's workbench is a durable, comfortable table designed for processing various parts (Fig. 1). Its tabletop must be strong and large enough to fit additional devices: a vice, a milling cutter, a circular saw and other devices. In order for small tools to be accessible, drawers or shelves for storing them should be arranged nearby.

Before you build a workbench, you need to decide on its design and dimensions. One of the main parameters is the height of the table. When performing work, the master should be comfortable, he should not experience any discomfort. To determine the height, you need to stand up straight and bend your elbows, mentally leaning on an imaginary table. The height between the bent arms and the floor will be the desired value.
In addition, you need to decide on the configuration of the workbench, the width and length of the countertop. The width should not exceed 80-100 cm. This will make it easy to reach the opposite edge, where tool shelves can be organized. The length will depend on the area of the workshop and on the number of fixtures that are planned to be fixed to the surface. It is better to equip the space under the workbench with a cabinet or drawers to store expendable materials and other items.
It is also important to decide whether the workbench will be a stationary structure or mobile, which can be disassembled and transferred to another place. If a mobile version is being built, then it is more rational to make the structure lighter, using a material of lesser thickness. Also, the mobile version should have folding legs or a removable table top.
The place where the workbench will stand should be bright. To provide additional lighting and operation of the equipment, it is necessary to provide for the installation of electrical sockets and switches. Electrical wires located near the machine must be enclosed in a corrugated pipe or a special box.
Preparation for work

Before starting work, you need to draw up a diagram of the future design, on which you indicate all the dimensions, and indicate the attachment points. This will help to correctly calculate the required amount of material and not make mistakes during assembly. To make the frame of the future workbench, it is best to use a wooden beam. For legs, it is worth choosing blanks with a size of at least 100x70 or 100x80 mm, jumpers can be built from a thinner material, for example, 100x50 mm. For countertops, flat boards are used, the thickness of which is at least 50 mm. It is necessary to choose hardwood: oak, beech, maple. Then the workbench will be strong and stable.
To make a carpentry workbench on your own, you will need the following materials and tools:
- Wooden bar.
- Boards.
- Bolts, screws.
- Glue.
- Wood saw.
- A hammer.
- Mallet.
- Drill and drills.
- Sandpaper or grinder.
- Chisel.
- Building level and square.
Stages of construction
The workbench is built in two stages. First, the frame is assembled, and then the countertop is installed.
All work is carried out in strict accordance with the drawing. Each connection is checked with a level and a square.

Figure 2. Scheme of the workbench frame clamp.
The base of the structure is a frame of bars (Fig. 2). To make it as rigid as possible, at a height of 40-50 cm from the floor, a horizontal jumper is installed between the legs, and along the length - the side. Subsequently, they can become the basis for tool boxes. The upper part of the frame is reinforced with diagonal lintels. To fasten the parts together, a tenon-groove connection with pre-gluing is used. Where such a connection is not possible, self-tapping screws can be used.
If the workbench is being built in a mobile version, then the support frame is assembled using metal corners. If it is not planned to move the structure, then the frame can be screwed to the wall and to the floor. This will make it stronger and more stable.

Figure 3. Assembling the workbench.
For the countertop, a single canvas or individual boards can be used. In the case of boards, you need to carefully fit them to each other. There should be no cracks or irregularities on the surface. The dimensions of the countertop should exceed the base by 10-15 cm.
To connect the boards to each other and attach them to the base, you will need 3 bars, the length of which is equal to the width of the table top. They are located across the boards (Fig. 3). Grooves must be made on the base into which these bars will enter. To fix the tabletop on the base, metal corners are used.
The surface must be carefully sanded with sandpaper or a grinder. Then it should be covered with drying oil.
The second life of the old table
You can make a convenient workbench with your own hands from any material, for example, from an old table. Any design is suitable for this, the main condition is that it is not too old. Before as old table will start new life, it needs to be prepared. All fasteners must be inspected and tightened. If cracks or chips are found on the supporting frame, it is necessary to install metal linings in these places. This technique will add more strength to the details of the table. In addition, the wood must be treated with special antiseptic agents to prevent its deterioration.

When assembling the workbench, you need to take into account that its surface must be thick enough so that it can not break when struck.
After preparatory work you can assemble a workbench. The surface of the countertop must be durable to withstand the severity of any work. For its construction, you need to choose boards with a thickness of at least 3 cm. They must be sequentially installed on the surface of the table and secured with self-tapping screws. The boards must be tightly fitted to each other so that there are no cracks on the surface.
The dimensions of the new countertop should exceed the old base by 15-20 cm. This allowance is necessary for comfortable and secure installation additional equipment.
To store tools and other necessary materials, you need to make boxes. They should be made strong, with convenient systems and reliable fittings. The number of boxes and their dimensions depend on the desire of the master and the size of the workbench. You need to install them so that they do not interfere with work.
Arrangement of the workplace
On the finished workbench, you can attach the necessary devices for work. To install the vise, you need to prepare recesses on the tabletop, and provide a plywood gasket on the underside. Their vertical plate should be in the same plane with the table surface. The vise must be applied to the surface and the attachment points marked. When using bolts, the holes for their heads must be pre-treated with a cutter. Due to this, the bolt heads will sink into the surface.
In addition to the vise, stops can be installed on the workbench. It is best to use rectangular ones that can be adjusted in height. They will allow you to process various parts, fixing them securely. Holes must be provided for the installation of stops on the tabletop. The workbench can be equipped with any turning equipment, but it is mainly used as an ordinary flat surface, which is convenient to work on.
Reading time ≈ 3 minutes
In any private house, workshop or garage, a carpentry workbench is a very necessary item. With its help it is convenient to make or repair any things, it also combines the functions of a table and a tool shelf at the same time. It can be equipped with a bench vice, and a machine for sharpening various tools can be installed on it. If you buy a metal workbench in a store, then it will cost a considerable amount of money, but it is quite possible to make a workbench from wood with your own hands.
Necessary tools and materials
So for self-manufacturing workbench in the garage you will need the following tools:
- Hacksaw or electric jigsaw;
- Roulette;
- Square;
- Building level;
- Spanners;
- Drill;
- Screwdriver.
Materials:
- bars for supports;
- 2 sheets of plywood or OSB (one of the sheets is cut out under the shelf of the required size);
- boards for the frame;
- self-tapping screws;
- bolts;
- washers;
- nuts.
Before work, it is necessary to make a drawing of a workbench with dimensions for ease of assembly.
Step-by-step instructions for making a workbench
For the manufacture of the upper frame, it is necessary to saw off the boards based on the required size of the workbench (see photo).

Using self-tapping screws, fix 2 long and 2 short boards so that a rectangular frame is obtained. Using a tape measure, mark the distance to the middle of the frame, and fix the remaining short board perpendicularly between two long boards, attaching it with self-tapping screws from both ends.

To make the legs of the workbench, you will need to saw off 6 equal bars. FROM inside of the resulting base, fasten one leg to each corner of the frame with bolts, washers and nuts (see workbench diagram).

For the rigidity of the structure, it is necessary to put additional boards, which will also serve as the basis for the lower shelf. To do this, you need to saw off 4 boards.

With a tape measure, you need to measure an equal distance from each leg of 30 cm, at the resulting level, fix the board to the back of the structure to 3 legs, and from the front, fix the board between the extreme and middle legs, in the place where the future shelf is planned.


The remaining two boards must be fixed to the legs, at the same level as the boards for the shelves.

From one or more sheets of plywood or OSB, using a hacksaw or an electric jigsaw, we cut out the necessary segments. We fix them to the top of the workbench flush with self-tapping screws. Additionally, a sheet of hardboard can be fixed on top, because. it can be easily replaced with a new one if the old one is badly worn out. The bottom shelf is made according to the same scheme. The distance between the extreme and middle legs of the workbench is measured with a tape measure, a sheet of material is cut out according to this size and placed on the resulting base.

When attaching legs or crossbars, it is necessary to use a square to obtain an equal distance between the parts of the structure. With the help of a level, at the place of installation, you need to check whether the workbench made with your own hands is level. In the event of a slope, it must be leveled by placing wooden chips under the legs of the workbench.
For a zealous owner, a desktop is an indispensable attribute of a garage, barn or extension to the house. Of course, a carpentry workbench can be purchased. But if this is a product of a well-known brand, then it is quite expensive. In addition, it is not known whether it will fully meet all the requests of the master. Cheap tables will not last long - definitely.
The most rational solution, if you really want to have the most convenient and versatile carpentry workbench, is to make it yourself. Having dealt with optimal dimensions, drawings, features of the selection of materials and a number of other issues, it will become clear that there is nothing difficult in this for any man.
Selecting a workbench project
You need to start with this. Any desktop is made for some specific purposes and premises. Joiner's workbench - the name is generalized. One is needed only for woodworking on personal plot(e.g. during construction or overhaul), the other is going for everyday work with small details, and from different materials. Depending on the specifics of use and the place of installation, its design features, dimensions, and drawing are determined.
Option A - portable workbench (mobile). Such a desktop is most often assembled with your own hands for small rooms (an extension, a garage), with a complex layout, and its main purpose is to perform small work with small parts. The relatively low weight of the structure makes it easy to move it, if necessary, to another segment. As a rule, the maximum that such a workbench can be equipped with is a medium-sized vice and e / emery. This will allow the carpentry table to be partially used for small plumbing work.

For household purposes home master the table according to option A is best suited. It is called mobile only conditionally, only because of its relatively low weight. If a specific place is allocated for him in a barn or garage, nothing prevents the owner from fixing his legs on the floor (fill with concrete, “fasten” with large self-tapping screws, and so on). With your own hands, whatever.

Drafting a carpentry workbench
If the workbench is assembled for domestic use, then there are recommended linear parameters (in cm) that you can focus on. But this is not an axiom, so the master himself is free to change anything, at his own discretion.
- Length - at least 180.
- Working surface width – 90±10.
- Workbench height - 80 ± 10 (taking into account the thickness of the tabletop). Deciding on this parameter, you need to focus on your own growth. It is unlikely that working with a tree will be effective and will bring satisfaction if you have to constantly stoop or, on the contrary, rise “on tiptoe”.
What to consider:
- The number and type of compartments in the cabinet table. It can be open boxes, drawers or drawers with doors, shelves. Another thing is whether the master needs them?
- To make it more convenient to work with samples of different lengths, it is worth drilling several “nests” in the tabletop to install limiters.
- To fix the workpieces, it is desirable to have a couple of clamping devices (clamps or screw vices) on the workbench. The optimal width of their "sponges" is 170 ± 5 mm.
- Desktop location. Depending on the level of illumination, the number of fixtures fixed on the workbench (and above it) is determined. But at least a couple of pieces, on the edges of the tabletop, are necessary for “spot” lighting.
If the owner is left-handed, then this should be foreseen. All standard drawings posted on the Internet are designed for craftsmen whose "working" hand is right. Therefore, you will have to place additional / equipment on the table according to the “mirror” principle.

Workbench drawing example
Selection of materials
The bar is planed. He will go to the frame (frame) of the workbench. The section is selected in accordance with the dimensions of the structure. For a large table - at least 100 x 100. If it is compact, for universal use, you can limit yourself to blanks of 100 x 70 (50). They are also perfect for various jumpers. Board. For a countertop, its minimum thickness is 50. Here you need to think about how to use the workbench more rationally. For example, to make it truly universal, one part of it can be specially adapted to perform locksmith work, that is, with metals. In this case, it is advisable to take a more massive board (for example, "sixty") and upholster a small segment of the tabletop with sheet iron. This is just one of the ideas that you can implement with your own hands when determining the design features of the workbench.
The desktop is not installed in the living quarters. And in the workshop there will definitely be differences in both temperature and humidity. That's why for the manufacture of a workbench, wood is recommended - hornbeam, beech, oak. The only disadvantage of this solution is the high cost of materials. You can choose a cheaper option - maple, larch. These rocks are characterized by sufficient hardness. Although for countertops homemade workbench, if it is not planned to carry out any “impact” work on it, sometimes slab samples (chipboard, OSV) are taken. In principle, any good owner can easily determine what suits him best.
Too porous wood should not be used. Even its high-quality treatment with antiseptics, oils will only increase the water-repellent properties, but will not add strength to the tree.
fasteners
- Bolts. There are no particular difficulties with them. They should be of such length that a washer, grover and nut can be placed on the back side. More difficult with other types of fasteners.
- Nails. How expedient it is to use them when assembling a workbench with your own hands (and such recommendations are quite common), everyone will determine for themselves. But a number of remarks are worth making.
- Firstly, a nail, especially a large one, easily splits wood, especially if it is overdried.
- Secondly, it is unlikely that it will be possible to drive it strictly vertically, given the length of the leg and the strength of the wood from which the workbench is made.
- Thirdly, the difficulty with dismantling. For example, if it is necessary to repair the desktop with the replacement of a component. It is not always possible to pull out a tightly clogged “powerful” nail.
- Self-tapping screws. For a small workbench - the best choice. The most "problem" areas can be additionally reinforced with metal strips, corners, plates. The main thing is to correctly choose the length of the leg of the fastener. There is a rule according to which it should exceed the thickness of the fastened part by 3 times, at least. Otherwise, the strength of the connection is questionable.
Assembly instructions for a carpentry workbench
In the process of making a desktop with his own hands, the master must constantly, at every stage, control the angles and levels. The slightest distortion even in one place - and everything will have to start over.
Manufacturing of workbench parts
- This is easy to do according to the dimensions in the drawing.
- Each sample is carefully polished.
- Depending on the type of wood, an impregnating composition is selected and parts are processed to protect them from destruction by rot and wood-boring insects.
- Drying. This is worth focusing on. Initiate this process using artificial heating is impossible, otherwise the workpieces will begin to deform - bend, twist. Moisture should evaporate only naturally - in a room with room temperature and good ventilation.

Base Frame Assembly (Workbench Base)
Partially about the features of fastening has already been said - self-tapping screws + reinforcement elements. But still, the main method of fixation is a tenon-groove connection with a fit on carpentry glue. But the fasteners only add strength to the entire structure of the workbench. But this is practiced only for massive tables that are not planned to be disassembled in the future (stationary options).

Here you should consider the degree of maintainability of the workbench. If he is in a room with good conditions, then it is unlikely that the wood will quickly begin to rot. In such cases, adhesive joints are fully justified. For desktops that are located in cold sheds, unheated boxes, and even more so in the open, “landing” on glue is undesirable. Partial repairs cannot be done, and the frame will have to be reassembled.

Additional reliability of the design can be ensured by installing various jumpers - diagonal, horizontal. All this is thought out even at the stage of drawing up the drawing, although it is possible to make “refinement” during the installation process.

tabletop
This is the most loaded part of the workbench, and it is advisable to make it removable. In this case, it is easy (in case of significant damage) to replace 1 - 2 boards.
- The width of the countertop is selected so that its surface extends somewhat beyond the perimeter of the frame. Otherwise, it will be inconvenient to work on such a workbench. Yes, and fixing the removable vise will no longer work.
- The side parts of the boards are carefully polished. If you do not achieve an accurate fit of the samples, then you cannot avoid the appearance of cracks.
- The blanks are stacked face down (on a flat base) and fastened with bars. They are placed perpendicular to the center lines of the boards, and the thickness of the latter allows them to be pulled with thick self-tapping screws. In extreme cases, it is easy to drill deep chamfers at individual points.

- To make the tabletop removable, it is fixed on the frame using metal corners.
- After its manufacture, additional grinding of the front part is performed. To extend the service life, it is advisable to treat the working surface with impregnating agents (wood oil, drying oil).

Workbench equipment
At what stage and what exactly needs to be done is decided depending on the modification of the desktop and the selected drawing. For example, the same vise. They can be purchased, which are easy to attach to the edge of the workbench. People with experience in carpentry make clamping devices on their own.
In principle, a man who is “friends” with the simplest tool should not have any difficulties when assembling a carpentry workbench. The only recommendation is that before you start drawing up a drawing, you should carefully review all the photos of desktops available on the Internet.

Even if they do not have sizes, it is not difficult to determine them. But with a high degree of probability it can be argued that there will be new, interesting ideas. After all, the workbench can also be folding, which is very convenient in a small box or barn. Yes, and having familiarized with the complete set of the table, design features various models, you can come up with something of your own, original. After all, the beauty of assembling with your own hands is in the absence of any canons. Only creativity + knowledge of the issue.


