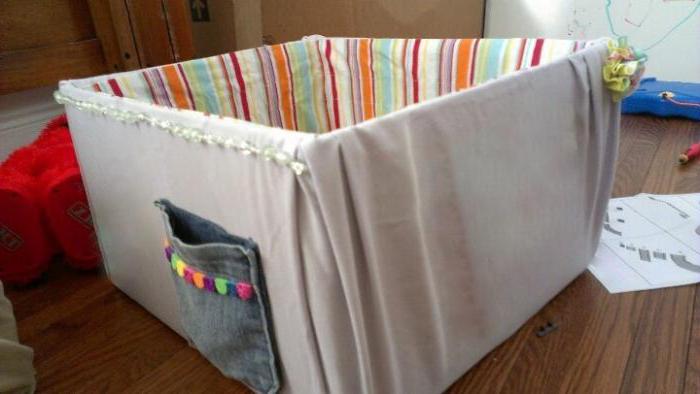
Interesting ideas for storing children's toys - we put things in order without problems. DIY toy box - simple, practical, convenient Toy basket from a cardboard box
As a rule, we buy a lot of different toys for our children (dolls, cars, soft, educational, and so on). As a result, they are all scattered across different corners apartments. To prevent this from happening, we suggest that you find out how and from what you can make a box for At the same time, it will be possible to accustom a child to order.
Using an unused cardboard box
Big shoe boxes household appliances and so on can be reused. Just decorate them - and you will get a convenient place to store children's dolls and cars.
A master class on how to make a toy box with your own hands is described below.
- You will need a cardboard box, a large piece of fabric.
- Coat the bottom of the box around the perimeter with glue from a gun.
- Unfold the fabric and line the bottom of the box with the middle, gently spreading the flap and pressing it to the glue.
- Coat all the walls from the inside, stretch the fabric and glue it to the sides.
- Wrap the fabric over the outside of the box and glue it to the bottom of the walls.
- Turn the box over and wrap the fabric at the bottom. The patch should be evenly pressed against the wall. Glue the fabric, and cut off the excess.
- To strengthen the bottom, coat the fabric with glue around the perimeter of the box and glue cardboard on top.
- Flip the box.
- Pin clothespins on top, and put something heavy inside so that the fabric sticks well to the box.
The box is ready!
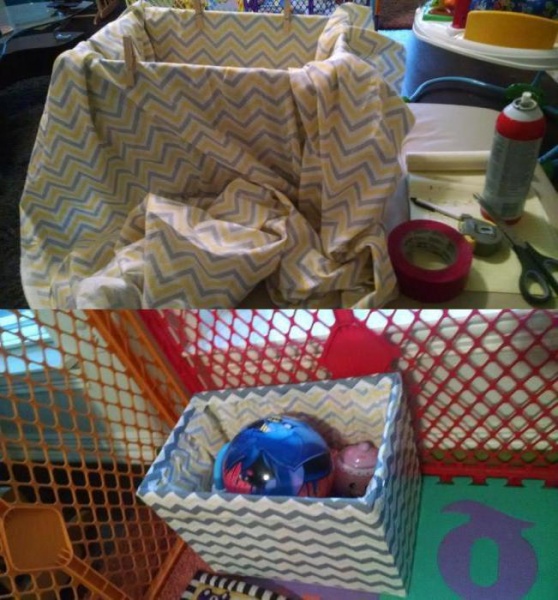
Box with handles
Instructions on how to make a box for children's toys with handles will help you in this matter.

- Take two types of fabric, thick tape or rope, glue, glue gun.
- Cut off a strip of fabric. In width, it should be greater than the height of the box (it is necessary that the flap can close the bottom and wrap itself a little inside the box). The length of the fabric should completely wrap around the perimeter of the box.
- Glue the cut out rectangle of fabric to the sides of the box.
- Wrap the excess fabric on one side inside the box, and on the other, glue it to the bottom.
- Measure out a piece of fabric in a different color. It should cover the bottom and walls inside the box.
- Lubricate the bottom inside with glue and glue the fabric.
- Coat the walls inside and also glue the fabric. Make folds around the edges.
- Glue the folds at the intersection of the two types of fabric.
- Measure the tape and glue it to the bottom, around the perimeter of the box, using a hot glue gun.
- Measure out two identical pieces of tape. Handles will be made from them.
- Glue two tapes to the walls on the sides of the box.
- On top of the box, glue another tape around the perimeter. It should cover the bottom of the handles.
The toy box is ready!
Pasted box
The easiest way for this purpose is to take self-adhesive wallpaper. Then you do not have to mess with glue and wait until all the walls dry.

But, regardless of whether you will paste over the future toy box with self-adhesive or paper wallpaper, the principle of operation is the same:
- Cut off a piece of wallpaper so that it can wrap around the perimeter of the box.
- If necessary, coat the walls with PVA glue.
- Glue wallpaper around the perimeter of the box.
- Make cuts at the top and bottom of the protruding parts of the wallpaper.
- Wrap the protruding pieces inward and to the bottom.
The box is ready!
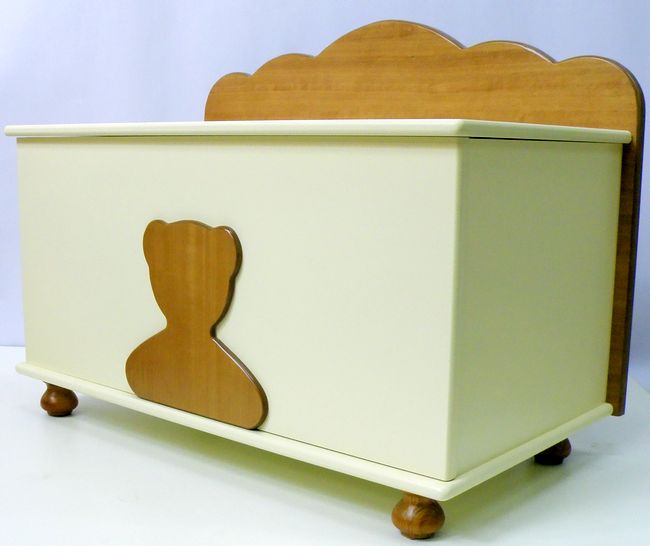
Using a tree
Do-it-yourself wooden toy box is quite difficult. But such an item turns out to be very reliable and will last much longer than a cardboard box.

Also, it can not only be used in the interior as decorative element. Such a box can become a functional part of the room.
For example, if you put a box under the wall, put a blanket and sofa cushions on top, then there will be an additional seating area.
How to make a box?
For convenience, here is a guide on how to make wooden box for storing toys with your own hands.

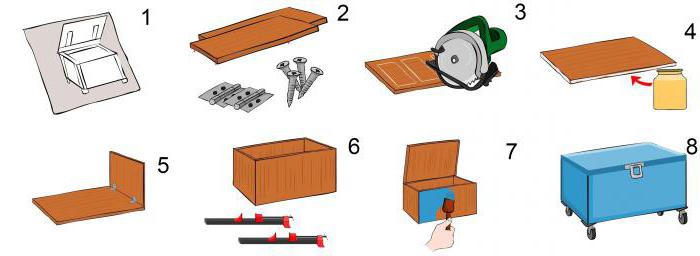
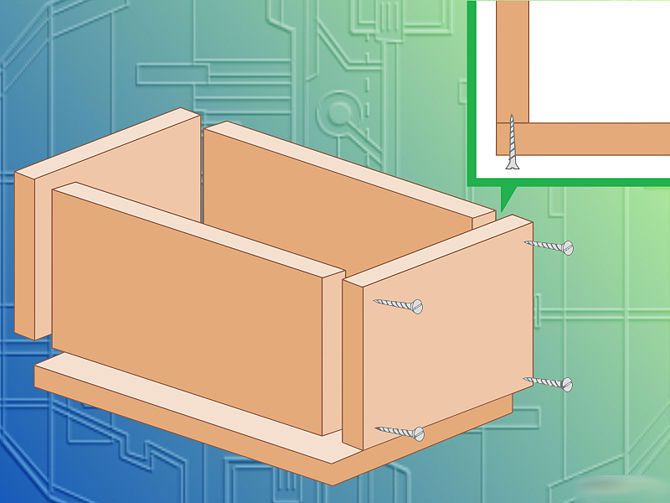
- Create a sketch of the future box (picture 1). Consider its dimensions, what will be the height, depth and width. Will he be on legs or stand upside down on the floor? Will there be handles and where should they be located?
- Prepare everything necessary materials and tools (picture 2). To get started, you will need plywood or MDF board. They are sold at a hardware store. But if you have old furniture (for example, a table, chest of drawers, wardrobe), then you can disassemble it and get the necessary materials. You will also need screws and corners, hinges, PVA glue or carpentry. Of the tools you need a simple saw or a circular saw.
- If you buy materials in a store, you can ask them to cut the boards for you there. the right dimensions. If this is not possible or you are using improvised material, then do everything yourself (picture 3). To do this, draw the board into pieces and saw it. As a result, you should get the following number of parts: four walls (all the same or two different), a bottom and a lid.
- Start assembling the box. For this place of the joints of the walls, coat with glue (picture 4).
- Then connect the two parts with corners (picture 5).
- Attach the lid to the box with hinges (picture 6).
- Wipe off excess glue with a cloth and leave the box to dry.
- Decorate the box. For example, sand it and paint it (picture 7).
- Attach the handle and legs as desired (picture 8).
Storage box is ready!
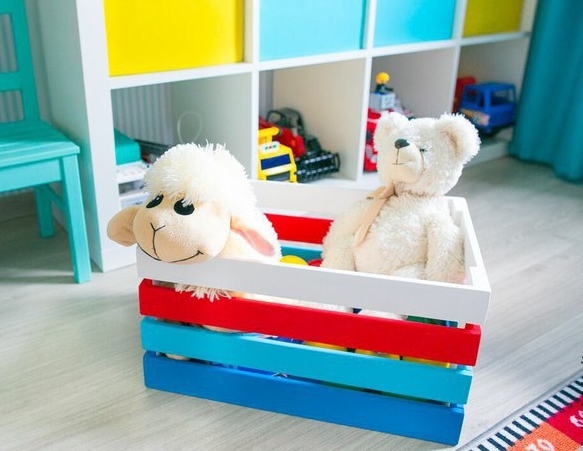
A box of boards
A wooden toy box can be made from planks. There are two ways to collect.

- Take plywood for the bottom and nail four blocks in the corners. Then nail planks to them with thin carnations. You can make gaps between the tree, so ventilation will be better.
- Nail plywood to the bottom of the box on both sides. And nail planks to it. Thus, the sides of the box will be solid, and the sides will be with slots.

When a child is born in a family, parents and visiting guests often give toys. And as the child grows up, the number of baby dolls, dolls, cars, balls begins to grow exponentially. Gradually it becomes clear that they need to be put somewhere and stored somewhere. After looking at the prices of ready-made boxes and containers for storing children's toys in stores, parents are wondering how to make a toy box with their own hands. This article can help in such a situation.
Box of different materials
the main task - make the toy box comfortable, roomy, and so that the baby likes it, otherwise the parents themselves will have to put everything there.
As a box for storing toys can be suitable:
- Cardboard boxes of all sizes, from shoe boxes to large electronics boxes.
- An old suitcase, already unnecessary and gathering dust on the mezzanine. You can decorate such a suitcase depending on the interior of the room.
- Plastic boxes and plastic buckets (preferably in different colors).
- Wooden box (for convenience, wheels can be attached from below).
- From pieces of old fabric (baskets or pockets for dolls, bags for small parts such as Lego).
Master class number 1 - a box from a cardboard box
The most affordable way to make a DIY toy storage container is from a cardboard box. It is better that such a box is dense and durable, since the child will use it several times a day.
For manufacturing you will need:
- colored paper (packaging or for crafts);
- scissors or stationery knife;
- glue (preferably PVA);
- scotch.
Step by step production:
1. To begin with, the top closing covers are cut off and holes are made (places for future pens).
2. colored paper(better pick bright colors and patterns that match the interior of the nursery) cut into sheets along the width of the box and stick on the entire surface of the box in accordance with your wishes.
3. It is better to glue the corners of the box more carefully, the remaining sheets are overlapped on the edges of the previous one.
4. Places for handles are cut with scissors, it is also better to additionally glue them with paper, similarly glue the edges of the box for strength.
5. The outer decoration of the box depends on the creative imagination of the parents, if desired, the child can decorate his box.
 Box making process
 Such multi-colored container boxes can be made in different sizes, several pieces for separate storage various kinds constructors, balls, dolls and bears, children's books, etc.

On video: do-it-yourself cardboard boxes for toys.
Master class number 2 - tofabric-lined cardboard box
Just like in the previous master class, you can make a box, only with outer and inner upholstery with fabric. For softness, you can make a layer of foam rubber.
How to make such a soft box, see the points:
1. The fabric is cut to the size of the box (all sides are pre-measured with a ruler) and sewn on sewing machine. Such patterns are made 2 pieces - it turns out, as it were, covers for the inside and outside.
 We make blanks from fabric
2. All sides and bottom of the box are smeared with glue and the resulting fabric cover is applied - first the inner, then the outer.
 Glue the corners
3. At the top, two covers are sewn with a needle.
 Sewing the edges of the cover
4. Holes for the handle are cut out on the sides, the fabric is sewn along the edges. If desired, you can sew carrying handles on the sides of the box (made from colored braid).
 Making a pen
5. External decoration entirely depends on the imagination of the parents.
 The box is ready
On video: cloth box decor.
Master class number 3 - msoft box on frame
A do-it-yourself soft toy box is made using a spiral frame. You can take it from a ready-made cylindrical box bought in a store (it is usually covered with synthetic fabric, which is not very useful for a child).
Manufacturing process:
1. The synthetic fabric must be removed from the frame, and according to its pattern, make a similar pattern for the bag from cotton fabric.
2. For the inner surface, a second pattern is made from synthetic winterizer or other fabric.
3. The bottom is cut out of a denser fabric, the fabric is sewn to the frame with threads from below.
4. The outer and inner bags with padding polyester are laid respectively from the inside and outside of the frame, fixed, the seams must be stitched.
5. The soft eco-friendly box is ready, it can be further decorated with pockets and other decorations on the outside.

On video: handmade toy bag
Master class number 4 - to orob from wood
A very strong and durable option for a toy storage container is a wooden box. It can later be used as a piece of furniture in the children's room (like a chest of drawers or seating). For the manufacture of such a wooden box, some details from old furniture that they want to throw away, such as kitchen cabinets or an old chest of drawers.
Of course, only a man who has some skills in working with wooden parts and how to fasten them can make such a box.

Production plan:
1. Draw a sketch of the future box, considering the desired dimensions and methods of its movement (wheels or handles for moving).
2. Prepare the necessary materials: plywood, boards (bought in a store) or parts of old furniture, screws, hinges, wood glue or PVA, a saw for sawing boards (you can cut them to the specified dimensions when buying in a store).
3. In total, 6 parts should be obtained: bottom, 4 side walls, cover.
4. The parts are fastened with glue and screws, the lid - with the help of hinges (folding is made).
5. The box must be sanded and painted, it can be in a solid color with drawings (children's or vegetable), it can be in different colors, etc.
6. Wheels are attached from below (for ease of movement around the room).
 Manufacturing process
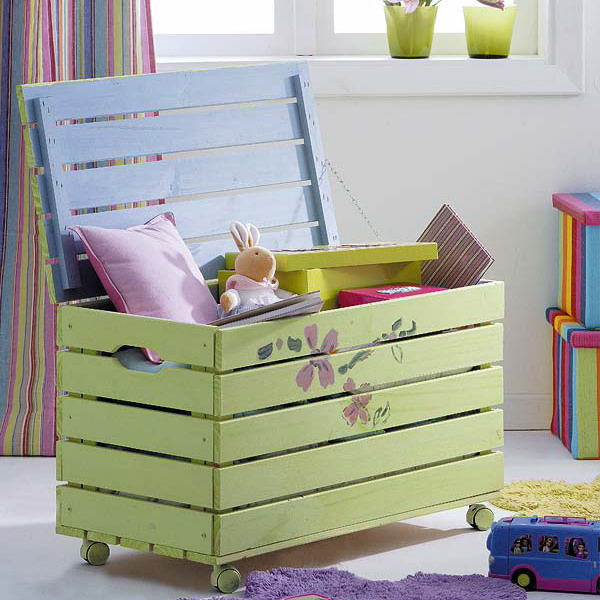
Ways to decorate such a toy box:
- In the patchwork style, the walls and the lid are decorated with geometric shapes made of colored paper.
- The classic version is a box of the same color (white or light), wooden decorative figures of animals, letters of the alphabet, hearts, etc. are glued onto it.
- If such a box is used as drawer under the bed, then only the front wall is decorated, to which a handle is also attached to make it easy to pull out from under the bed (better and the wheels at the bottom), then the top cover is not needed.

On video: wooden toy box.
Storage racks
Highly convenient option storage of many toys - making a wooden rack (open). In it, each shelf can be occupied either by sliding cardboard boxes, or standing books, lying soft toys and many children's necessary items. The main thing is that the child can get them on their own and then put them back.

The rack is made of wood with square cells. At first it will be possible to put it horizontally (while the child is small), and then turn it over and put it vertically (when it grows up). Subsequently, such racks can be installed in several different sizes and heights, resulting in a whole furniture system for storing not only toys, but also the necessary items for study.
Toy box idea (1 video)
A child in the house is not only joy, but also additional worries, especially when the child begins to walk and play with toys. After all, quite often toys are scattered throughout the house and they have to be cleaned more than once a day. That is why you need to organize their storage and a do-it-yourself basket for toys is one of the best solutions.
Both for the mother of a small child, and for himself, a basket or box for dolls, cars is the most suitable option proven by more than one generation. Most importantly, it is easy for mom to simply collect and put them in a basket, at the same time in the very early age you can teach the child to collect his own things, helping his mother in this.
For a child who has just started walking, a basket is the most the best solution, as he can easily find the toy he wants without any extra effort. Drawers with lids in this case are not so practical, not all children will be able to open them, and in addition, the lid can often cause pinching of fingers in young children, even if shock absorbers are used on it. Therefore, it is undesirable to use containers with lids.

Of course, you can use just a cardboard box or a basket, but you will have to store toys for more than one day. Therefore, it is best to put a little effort and make a toy box with your own hands, and guarantee their use for several years. After all, a cardboard box will not be durable, since most children prefer it as a toy and you will have to change it almost every month. Therefore, it is best to make a box of wood or plywood, it will be reliable and will serve you for many years.
plywood box
The easiest way to make a toy box is to simply make it yourself out of plywood. Plywood is a strong, inexpensive and durable material that will last you for decades. It is easy to work with and does not require special tools.
Children are the flowers of life! We love them and want them to have the very best. And what is so valuable for young children? That's right, toys. And here we are talking not about quality, but about quantity. The more of them, the better.
However, parents are faced with a frequent problem - all these toys are scattered throughout the house or apartment. So that you do not step on them, and there is order in the rooms, you can make a special box in which the child will store these toys.
The tool is convenient, simple and practical. In this article, you will learn several ways to make a DIY toy box. Then the child will be accustomed to order.
Box from a waste cardboard box
Everyone should have an extra box after shopping. Boxes from shoes, household appliances or products. Everything will fit. In fact, you almost already have a ready-made storage box, it just needs to be decorated and strengthened a little to store toys. Check in advance if the cardboard is soft, as it will not last long.

So below is detailed instructions how to make such a cardboard toy box. All you need for work is a box, a gun with glue and a piece of beautiful fabric. The instruction is as follows:
That's it, the toy box is ready. It remains to turn the box over, pin the clothespins on top and put the books inside so that the fabric sticks tightly to the cardboard. In order for the toys inside the box to be ventilated, do not cover it.
Advice! This is an easy option that anyone can do. You can glue such a box not with a cloth, but with paper and attach handles to it. This is done very simply.
Durable wooden toy box
It is clear that the cardboard box is not entirely reliable and children can simply bend it. To prevent this from happening, it is better to make a product out of wood. It will take a little more effort and skills, but the result is worth it. The box will be strong, durable and reliable.

In addition to its practical value, it will play a decorative role, complementing the interior of the room. Yes, and it can be used as a chair if you install it under the wall, cover it with a blanket and put pillows. We will consider two types: a box in the form of a box and from boards.
Making a wooden box
The technology is not easy, so you need to be especially careful and work according to the instructions. The photo shows what you can do.

The instruction is as follows:
At this stage, the box is ready and can be used for its intended purpose. You can decorate it, attach a handle and legs.
Advice! To protect the material, it can be opened with varnish or stain.
Board box
This option is a little more complicated, but it looks pretty nice. Outwardly, it resembles an ordinary food storage box. To work, you will need boards of a certain size, plywood for the bottom, a hammer and nails.
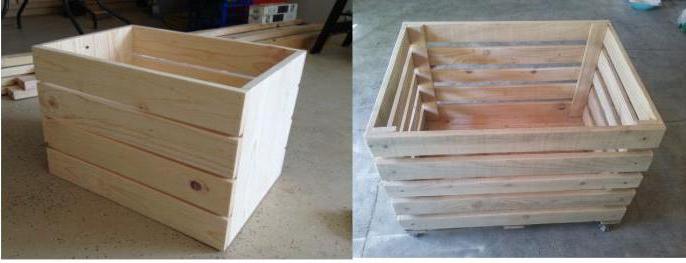
On plywood, you need to fix four equal bars in a vertical position. They must be firmly fixed. Then you need to bottom, moving up, stuff the boards on them. This is done around the perimeter of the frame. You can make gaps between the boards - large or small, as you wish. So, the box will be ventilated.
Advice! You can nail a piece of plywood to the bottom on both sides, and fill the boards with it. So, you can make legs for the structure. Alternatively, use rollers.
All parents know how difficult it is to achieve perfect order at home when the children are still very young. Especially in the nursery, where toys are scattered all over the floor, and on the table, and on the beds, and under the bed, and in other unexpected places. But this problem can be easily solved, armed with a creative spirit and the necessary materials at hand, which can be found in any home.
Our task now is to make or sew with our own hands an interesting, roomy and safe container for storing children's toys. Its types can be different: box, organizer, bag, box, etc.
In any case, whether it is a container for storing large toys or a bag for children's little things, the resulting thing should be a fun and original element of the interior.
DIY toy box
To make a custom toy box with your own hands, you will need:- Chipboard panels (side walls and bottom);
- self-tapping screws;
- Screwdriver;
- Measuring tool (tape measure or long ruler);
- Small supports (legs) or furniture wheels;
- Materials for external design (fabrics, decorative film, paints);
This box is perfect for storing large toys. But in order to make it, you need at least a small skill of a carpenter.Therefore, it is better to entrust this matter to a man who will connect all the details of the box to each other and attach special supports or wheels to it (so that the box can be easily moved around the room).
And mom can already take care of the outer design of the toy storage container by pasting it with a decorative film or drawing some kind of fun drawing on it. Inside, the box for softness can be sheathed with a furniture stapler, using dense natural fabrics and filler (foam rubber, synthetic winterizer) for this.
We can offer both simpler and spectacular option drawer:
DIY box for storing toys
Necessary materials- Big strong box;
- Beautiful self-adhesive film;
- Package with a picture from a children's gift;
- Scotch;
- Scissors or stationery knife;
- Glue.
This box is similar in appearance and purpose to a toy storage box, but unlike it, it is simpler in execution.Another advantage of such a box is that the child himself can turn it over and take everything he needs.
- First, carefully cut off the lid of the box, glue the cuts with tape.
- Paste the box with a film with an outer and inside, including the bottom.
- Take a gift bag and cut out interesting colorful details (animals, flowers, etc.).
DIY fabric toy basket

You will need:
- Fabrics in 2 different colors;
- Sewing machine;
- Strong threads;
- Scissors;
- Interlining.
In order for the basket to keep its shape, the fabric parts are additionally glued with dense interlining.For interior and exterior design, it is desirable to use fabrics of different colors. Basket handles are also additionally cut out and attached with a strong seam.
Toy storage bag

In order to sew such a bag with your own hands, you will need:
- Dense polyethylene;
- Textile;
- Scissors;
- Sewing machine;
- Threads.
Using the diameter of the bottom, measure the width of the bag and, having determined the height, open the main part of it. When doing this, do not forget to take into account that the bag consists of a woven material and a transparent film.
In the upper part of the bag, which consists of fabric, you need to make a line for the lace. The lace can be sewn from the same fabric.
Toy Organizer

Necessary materials:
- Thick fabric;
- Scissors;
- Sewing machine;
- Strong threads.
Such an unusual organizer is usually hung on the wall and put small toys and toys in pockets. various items for creativity.


