Drilling machine from the engine from the washing machine. Making a drilling machine with your own hands A collector electric motor for a drilling machine is suitable
For all lovers, do-it-yourself product will be a great helper. Such a unit, in a garage or at home, will allow you to make holes with accuracy and accuracy, make milling in wood, drill broken bolts from threads, and so on. However, buying a drilling machine can be quite expensive, and why spend extra money when you can easily make a drilling machine yourself.
General Specifications for Drilling Machine
Drilling machine drawing
For the manufacture will require a minimum of expensive materials. Basically, these are improvised tools that can be found in any garage. Of course, the material must meet the requirements of the apparatus.
For example, for the manufacture of a large stationary machine, one cannot do without a metal frame, and in the case of a desktop unit, only wooden materials can be used.
For all types of structures, three fundamental factors will be required:
- convenient drill feed lever;
- the accuracy of the movement of the drilling mechanism;
- reliable stand.
Undoubtedly, the feed lever should be placed under the working hand of the master, left or right. However, this is not the only condition for convenience. The drill feed lever should not be long, so as not to interfere with work, but not short, so that pressure on the part is easier. For a better idea of arm length, it's worth looking at the blueprints for factory drill presses. There, the length is adjusted to the desired size.
Regardless of which drilling mechanism will be used, it should be fixed with the smallest possible error factor. To do this, the drilling mechanism is best fixed on a vertical rod. However, a solid wood panel with guide rails can be used.
Without a reliable bed, a homemade drilling machine will not only perform poorly, but become dangerous to use. The base of the tool should be twice as wide as the volume of the structure. This width will allow the structure to be stable during the necessary pressure. In this case, the feed lever should not protrude beyond the edges of the bed. This rule does not apply to stationary machines, because they are fixed to the table surface or made with an individual table.
Drilling machine do it yourself
Which engine to use
You can make a homemade drilling machine using several options for the driving force:
- from a drill or screwdriver;
- from an electric motor;
- from a hand drill.
In this case, for each type of structure, the characteristics of a stationary, portable or desktop machine will be determined. In the case of an electric motor, you can make a stationary or desktop device, and in the case of an electric drill, you get either a desktop or portable unit. A hand drill can at all carry the character of a portable device that does not require power.
Drill as a machine tool
In order to get a good drilling machine from a do-it-yourself drill, it is better to make a desktop design for this tool. In this case, it is worth avoiding fixing the machine on the table. An electronic drill is a fairly popular tool, so it will be useful if it can be removed from the machine. In this case, the design on the table will be superfluous.
A desktop filler machine will require the following materials: 
- bed 45x30 cm, with a vertical bar attached to it;
- drill mount, well wrapped around the body of the tool;
- metal slider moving along the bar;
- a wheel that plays the role of a lever;
- steel cable, to control the movement of the lever.
For the bed, it is better to use a metal box with a wall thickness of 3 mm. To the box, a square pipe stand is welded. This stand will serve as a barbell or tripod. Next, a tight slider should be attached to the tripod, which will hold the drill holder and the drill itself.
It will be difficult to choose exactly the right slider, so it should be made of metal plates. The free space between the slider and the tripod should be no more than 0.5 mm, moreover, the tripod will be perfectly level.
Further sequence of actions:
- the slider is made 10-12 cm high;
- to it, a holder for a drill is welded on the front side and lugs for mounting the wheel on the back side;
- in the ears, a rod is threaded to which the control wheel is welded, and fixed with a cotter pin or a welded nut;
- on the wheel shaft, a steel cable is wound tightly (at least 6 turns), and both ends of the cable are securely attached to the top and bottom of the tripod. Thus, it will take effort to move the slider on the tripod, and the own weight (together with the drill) will not be enough for the slider to fall.
Drilling structure from an electric motor

Such machines are excellent in the role of stationary tools. In order to figure out how to make a drilling machine from an electric motor, you will have to consider the drawings and delve into the field of electrics.
For the machine, a two-phase motor is required, which will greatly simplify the connection and expand the scope of the unit. Such an engine is connected to phase and neutral wires. Incorrect connection will only affect the direction of rotation. If the rotation is in the opposite direction, then the wires are reversed, and the problem is solved.
When making a stationary structure for drilling, you will need:
- a powerful frame for the engine, which will easily move along a vertical line;
- countertop, where the pin will be fixed along a strict vertical line;
- as a pin, can be taken from the car. It will serve as a ready-made engine-moving device;
- attach a wheel for movement and weld the engine holder to the rail.
The working principle of this machine is very simple. The motor drives the drill head through a belt drive. At the same time, the engine and the drill chuck are inseparable during operation and move along a vertical line at the same time, thanks to the joint fastening.
Portable mechanism from a hand drill
It is very convenient to use a drilling machine from a hand drill in cases where it is not possible to connect an electric drill to a power source. For the manufacture of the machine, you can use a wooden frame:
- the base is made of a board 30x20 cm and a thickness of 40 mm;
- a vertical plank is attached strictly at an angle of 90 ° C;
- the vertical wall should also be made of a thick board, at least 30 mm, and metal corners and screws will help to secure it securely.
Metal skids are attached to the vertical wall (they can be taken from old furniture or buy in a store), a hand drill holder is attached to them. Thus, the drill will move freely up and down, however, this is not enough. To prevent the drill from falling under its own weight, a spring of the required elasticity is attached to the drill holder and the base of the machine.
Do not forget about the handle, which will need to be twisted. Nothing should interfere with her movement. The result should be a unit that is driven manually and does not require power.
Video: Do-it-yourself drilling machine from a drill
Each House master has in his instrumental arsenal many different devices that allow him to bring his creative ideas to life. There are not only sets of keys, screwdrivers, needle files and files that are familiar to everyone. A self-respecting specialist must have machine tools. This is a sharpener cutting tool, a small lathe for wood or metal, a milling machine or a circular saw, welding installation. Even a novice home master can make a drilling machine with his own hands.
Why a machine is more efficient than a drill
 As a rule, at home, if drilling holes is necessary, a hand or electric drill is used. The use of these tools is justified only if there are no special requirements for the accuracy of the hole being drilled.
When trying to drill holes with a drill, the drill may move to the side, resulting in either a marriage or a product of poor quality. It is generally impossible to make a deep hole in a strictly vertical or strictly horizontal direction without a machine.
It is very difficult to drill in any material not a through hole, but a hole to a given depth (blind hole) using a drill, since this tool does not provide for the use of a ruler during drilling. A drilling machine can easily cope with a similar task..

When working with soft materials such as wood or plastic, the machine can be used to create milled holes or recesses. It is impossible to perform such operations with a drill.
Main knots
Regardless of the complexity due to the need to solve certain technical problems, each home-made drilling machine contains the following main components in its design:
- bed;
- electric motor;
- drill chuck;
- transmission mechanism;
- controls and measuring equipment.
 Main constructive element any machine equipment is a bed - a massive structural unit to which all other parts are attached. As a rule, a massive metal or wooden plate is used as a bed.
The chuck acts as a holder for a drill that will be used when drilling holes of various diameters.
Electric motor powered by home network, designed to create torque and transfer it to the cartridge through the transmission mechanism.
The transmission mechanism allows you to reduce or increase the speed of rotation of the cartridge when rearranging the drive belt in it from one pair of pulleys to another. The pulley for the drilling machine can be taken from the equipment industrial production or do it yourself.
The controls are the on / off buttons of the electric motor, as well as the lever by which the rotating drill is deepened into the workpiece.
The measuring equipment is a ruler, which is fixed on a vertically moving part of the machine. In this case, the reference point is located on the fixed part, and the ruler moving down together with the drill indicates the depth of drilling a blind hole.
Manufacturing methods
 Equipment can be made from a wide variety of source components. The created machine may not be universal, but narrow-profile, for example, for drilling holes in printed circuit boards. Based on this, the stages of manufacturing the machine may vary slightly. The following examples describe the process of manufacturing various devices in design and purpose in a home laboratory.
mini drill
Many radio amateurs either already have, or really want to have a device for drilling holes in the boards in their workshop. Why buy from a dremel store when you can make your own mini drill press? The desktop machine differs from its traditional counterparts in miniature dimensions, respectively, all its parts also have small size. As a rule, the weight of such devices does not exceed 5 kg, the frame is a platform of 300x300 mm, and the height is about 250 mm.
To assemble miniature machine equipment, you will need the following components:
- bearing frame;
- stabilizing frame device;
- a bar designed to move the working head;
- depreciation device;
- electric motor mounting bracket;
- electric motor;
- electric motor power supply;
- adapters and collets.

The assembly of a miniature machine for drilling holes in printed circuit boards must be performed in the following sequence:

Homemade mini-machine for a radio amateur is ready for operation.
Drill machine
 Craftsmen who design and assemble furniture at home cannot do without special machine tools. It is easy to assemble a simple, but perfectly coping with the functions assigned to it, a drilling and filler machine with your own hands, even in a home workshop.
This can be done without buying any specific or expensive parts. To create such equipment, you will need a manual or electric drill of industrial manufacture, which must be fixed on a self-made bed.
First of all, you should prepare necessary tools and materials:
- electric or hand drill;
- a sheet of plywood 10-12 mm thick, 300x500 mm in size;
- wooden bars;
- wood screws or self-tapping screws.
The assembly procedure of the machine consists of the following operations:

After connecting the plug electric drill to AC power homemade machine ready for intended use.
Lots of options. You can make a good machine out of a photo enlarger. In this case, the old equipment already has a finished frame and a vertical guide. It remains only to fix the carriage with an electric drill.
At the heart of the steering rack
Of course, the equipment for drilling holes based on an electric drill is an original, effective and simple solution to the problem. However, what to do in a situation where you need a drill as a separate tool, disassemble the machine or buy a second drill?
In order not to bother answering these questions, you can make the following decision - to make a home-made drilling machine from the steering rack of a car. For the manufacture of this equipment, it is necessary to prepare the following materials:


During the creation of the machine, you will need welding equipment and lathe.
When creating a device from a steering rack, it is necessary to strictly adhere to the following work order:

Device own production assembled on the steering rack passenger car, ready for test run.
A tool that is necessary in a home laboratory, such as a hole drilling machine, can and should be made independently. This will not only save money, but will also encourage the master to create equipment that will fully meet his requirements for the quality of the work performed, and will also effectively bring all creative solutions to life.

Homemade drilling machine made from an engine from washing machine: photo and description of the homemade design, as well as video tests.
The engine from the washing machine can be adapted for the manufacture of a drilling machine, the design of such a device is shown in the photo.
Homemade machine made of parts:
- Washing machine engine.
- Small longitudinal feed from a lathe for metal.
- Engine speed controller.
- Drill chuck.
- Spacer on the motor shaft under the cartridge.
- Channel - 80 mm.
- Plywood.
- Sheet of metal 12 mm thick.
- Bolts M10.

The spacer for the chuck can be turned into lathe, as an option, order from a turner, using a spacer on the motor shaft, it will be possible to fix the chuck from a drill.
 As a vertical stand, a small longitudinal feed from a metal lathe is used; it is attached to a channel welded to the base.

On the longitudinal feed there is a plane in the form of a circle, the engine from the washing machine is attached to it. To ensure a tight connection to the engine mount, a round spacer is made of plywood.

We first fasten the engine to a metal plate, then through a plywood spacer and fasten it with two bolts. The engine is connected to the speed controller.

The drilling machine is quite easy to use. We set the desired speed using the regulator, clamp the drill into the chuck. Rotating the longitudinal feed knob, gradually feed the drill to the workpiece.
By rotating the handle, gradually deepen the drill into the workpiece. After the hole is ready, turn off the engine and raise it with the longitudinal feed handle.

The engine from the washing machine with a power of 420 W is able to drill metal with a drill with a diameter of 10 mm up to a maximum of 12 mm.


This video shows in detail how to make a drilling machine from a washing machine engine.
It is advisable to make a drilling machine with your own hands in those situations when in a home workshop or garage it becomes necessary to drill holes in parts of various configurations, as well as made of different materials. It should be noted that such a device makes it possible to obtain holes with sufficient high level quality.

One of the options for homemade drilling machine
When you need a homemade drilling machine
In manufacturing or repair enterprises, where the drilling operation is considered the most common, a special device is used to perform it, the models of which may have different functionality. So, it can be a compact desktop drilling machine, featuring the simplest design, or equipment equipped with several working spindles and numerical control.

The main structural elements of a homemade machine
For drilling holes in various materials, which is performed in a home workshop or garage, you can use do-it-yourself equipment. Naturally, for home use, you need a simple device that can be made from components and materials found in almost any garage or home workshop.
And in this article we will not leave unanswered the question of how to make a drilling machine at home, while spending a minimum of money. The drawings and experience of many craftsmen who have already passed this path will help us in this.
The need for such mini drilling equipment for metal, wood or plastic most often arises among those who are accustomed to independently perform various repair work in your house or apartment. Also, quite often, radio amateurs are puzzled by the construction of miniature drilling machines.
It would seem that a conventional drill can be used to perform such an operation, but such a tool is not always able to provide the required quality and accuracy of drilling operations. A home-made drilling machine, in addition to its compactness, has another important quality: drills of various types can be installed on it.

Simple mini drilling machine for small jobs
Drilling machine from a conventional drill
To make a small but functional drilling machine for your home workshop, you do not need to purchase special materials and components. The design of such a convenient and useful desktop device contains the following components:
- the base, which is also called the bed;
- a mechanism that ensures the rotation of the working tool (a conventional drill can be used as such a mechanism);
- supply device;
- a vertical stand on which the rotation mechanism is fixed.

Scheme of a homemade machine from a drill
The stand on which the drill will be mounted can be made from a chipboard sheet. This material quite capable of supporting the weight of such a device. The bed of such a mini machine should be more massive, as it protects the entire structure from vibrations, which can adversely affect both the quality and accuracy of the resulting hole, and the comfort of work.
As a material for the bed of such a drilling and welding machine, you can use an ordinary furniture plate, the thickness of which is more than 2 cm. It is most convenient to use the base of an old photographic enlarger for this, slightly modifying its design. Sometimes an old microscope is used, but this is a rather rare option, since such an assembly will not be large enough and its use will be limited.

Drilling machine from a school microscope
The quality and accuracy that a home-made drilling machine will provide depends mainly on how correctly and reliably the connection of its base and vertical rack is made. Important elements of such a micro machine are two guides along which the shoe with the drill attached to it will move. Such guides are best made from two strips of steel, which must be securely screwed to the rack with screws.
In the manufacture of the block, it is desirable to use steel clamps that will securely fix the drill on it. In addition, in order to avoid unwanted vibration processes during drilling, a thick rubber gasket must be installed at the junction of the block and the drill.
After that, you need to make a feed mechanism for such a mini machine, which should ensure the movement of the electric drill in the vertical direction. The manufacturing schemes for such a mechanism may be different, but it traditionally contains a lever and a spring in its design, which is attached at one end to the rack, and at the other end to the block with a drill. Such a spring gives the feed mechanism greater rigidity.
A drilling machine from a drill that is not planned to be removed from it can be made more convenient to use if you disassemble the native switch of the drill and mount a separate button on the frame of the mini equipment. This button will always be at your fingertips and will allow you to quickly turn the device on and off. As you can see, it is not difficult to make a drilling machine from a drill, for this it is quite enough to carefully read these instructions or watch the training videos in this article.
An example of a machine from a drill in more detail
As an example, let's take a closer look at one of the options for a home-made drilling machine from a drill assembled at home.

Self-assembled drilling machine from a drill
Making a machine tool using an asynchronous motor
The absence of an extra electric drill in the household is not a reason to abandon the idea of making a drilling machine with your own hands. To drive the rotation mechanism of such equipment, you can use any Electrical engine. Such engines, which were previously installed on various vehicles, are likely to be found in the garage or workshop of any home craftsman.
Asynchronous motors, which are equipped with washing machines, are best suited for the manufacture of a mini drilling machine. If you have such an engine, you can confidently use it to make home drilling equipment. Making drilling equipment with such an engine at home is somewhat more difficult than using a drill, but the power of such a machine will be much higher.
Given the fact that the weight of an induction motor is greater than that of a conventional drill, you will need a stronger base and stand to accommodate the feed mechanism.
In order for such a mini drilling and filler machine to vibrate less during operation, it is necessary to install the engine on a powerful base and place it as close to the stand as possible. But here it is important to maintain the correct distance, since the convenience of mounting the belt drive depends on it, due to which the rotation from the engine will be transmitted to the drilling head.
In order for you to make such a machine at home, you will need the following structural elements:
- gear;
- a hexagon on which a pulley will be put on;
- two bearings;
- tubes in the amount of two pieces, one of which must be with an internal thread;
- clamping ring, which must be made of durable steel.
The hexagon also connects to the metal tube, bearing and clamping ring. Such a connection must be very reliable so that the resulting node does not collapse during operation.
Drilling machine with asynchronous motor
The mechanism necessary to ensure the supply of a tool in such a mini machine should consist of a tube on which cuts are first made and gears. The tube will move by connecting its teeth with these files. An axle with a hexagon is then pressed into this tube, the height of which must correspond to the required tool feed.
An example of a drilling machine with an asynchronous motor
Consider one of the very serious options for a home-made drilling machine with an asynchronous motor, clearly not made by a beginner. Few home craftsmen take the risk of taking on the implementation of such a project, but if, as they say, it itchs, then nothing is impossible.

Difficult to manufacture homemade machine with an asynchronous motor
It is quite obvious that it is quite difficult to make such a machine, and then it is even more difficult to ensure the accuracy of its work. That's why the best option is to use an electric drill to make a home drilling machine.
Finally, we suggest watching a couple more videos in which the craftsmen demonstrate their home-made drilling machines. These videos once again prove what to collect with my own hands The right equipment is always real, though sometimes difficult.
DIY drilling machine
It is not difficult to make a drilling machine with your own hands. In everyday life, it is very beneficial to have tools and fixtures for performing plumbing and carpentry work. In addition, after the obsolescence of some household appliances there are a lot of useful spare parts, electric motors and other things. Of these, if desired, you can make useful equipment at home. In this article, read - how to make a drilling machine with your own hands from a drill or asynchronous motor.
Desktop drilling machine from a drill
The easiest option is to assemble a drilling machine using a drill. It does not weigh much, so we mount the rack from boards, chipboard or sheet metal. It is important to obtain a 90 degree angle between the plane of the base and the holder. To ensure the free movement of the drill strictly in the vertical direction, we prepare guides. It can be metal profiles. The main condition is the absence of backlash and distortions. The platform with the drill should move freely. Gathering a stable solid construction we fix the profile guides strictly parallel to each other and perpendicular to the plane of the base. The figure clearly shows the place of attachment of the drill to the movable platform and the method of mounting the guide profiles. In the video at the bottom of the page, you can see a variant of the lever method for lifting the platform of a home drilling machine. To automatically raise the drill up after reducing the pressure force, put the springs in tension or compression.
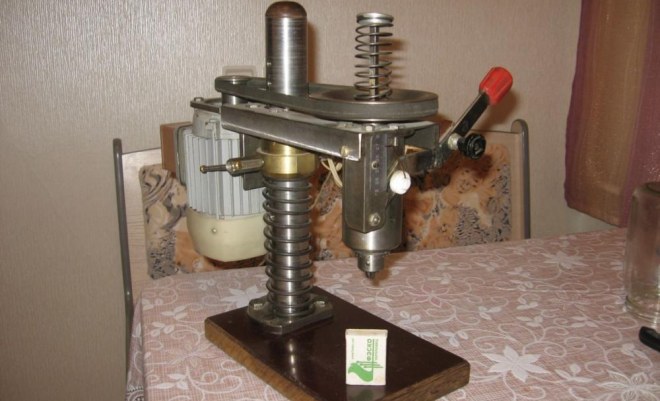
Drilling machine from the engine from the washing machine

The photo shows a home-made drilling machine, which differs from the one discussed above in the type of electric drive and more complex mechanics. Why do we need such complications. The fact is that the asynchronous motor from the old washing machine more weighty, and has more vibration. The farther from the rack the engine is located, the more shaking will be. Intense vibration will lead to inaccurate drilling and breakage of the drill. There are two ways out - to make a powerful bed, when the drive is lowered when the drill is lowered, or to place the motor closer to the holder stand motionless, then only the working part of the machine will walk. The second method requires more complex execution. Here you will need a pulley and a belt that allow you to adjust the speed of rotation. There are many options without a belt drive with a drive located against the wall. They are much easier to assemble, but the assembly discussed below has a non-standard approach, and some of the techniques used may be useful. According to the author of this design, there are still vibrations, but they are so minimal that when drilling iron with a 0.7 mm drill, the drill remained intact. Since neither the author nor other Internet users have a description for assembling such a machine, we will try to briefly consider the installation of moving and adjusting parts of a home-made desktop drilling machine.
Assembly of the moving part of the machine
The device of the drilling machine of this modification implies a fixed location of the electric drive. Although about high precision when assembling such mechanisms at home, one can only dream, one must still strive for the maximum possible fit of parts. The performance of the entire machine depends on this. As can be seen in the figure, the moving part consists of an axial hexagon, a suitable tube size, two bearings, a clamping ring and a tube with a threaded internal thread for mounting the chuck. The hexagon is part of the future transmission system; a pulley will subsequently be put on it. We pre-cut the tube along both ends with a grinder, and, on top, we make the cuts deep enough for reliable adhesion to the hexagon. The entrance must be tight, driven in with a hammer. If donning occurs without effort, then you need to pick up another tube. Then we stuff the compression ring and bearings.

The height adjustment system consists of a gear and a pipe with notches. In order to make the cuts as accurately as possible, you should roll out the plasticine and drive over it with a gear. You will get an imprint that can be easily measured and marked accordingly on the adjusting tube. It should look like the photo above. The length of this ladder corresponds to the height to which the drill can be raised as much as possible. We press the axle with bearings and a hexagon into a slotted pipe. The resulting design will walk vertically back and forth in the stationary tube of the frame when the gear is rotated. At the same time, the axis rotates in a horizontal plane through a belt drive. As you can see, the frame is made with bolts from metal corner. The whole structure is attached to the wall. The proposed assembly model can be supplemented or improved. For some, it may seem that "the game is not worth the candle." However, the solution and approach are original and deserve consideration and discussion.
Download a drawing of a home-made drilling machine with a stationary drive Download a drawing of a home-made drilling machine from a drill
New entries:
ukrlot.com
A worn out washing machine should not be thrown away immediately. Especially if there are sufficiently developed skills in working with hand tool and there is a habit of messing around in the workshop. Various homemade products from the engine from the washing machine can be extremely useful in household.
What are the engines
It depends on the class and age of the machine which engine will be in the hands. If we are talking about the old, Soviet one, it will be an asynchronous open-type device, quite reliable. The engine from an old drum-type washing machine has a power of 180 watts, but it is very convenient for homemade products, as it has excellent torque. In other cases, it may fall into the hands of:
- two-speed engine from a washing machine with fixed 350 and 2800 rpm;
- a collector unit, which, with direct voltage supply without adjustment, accelerates the shaft to 12-15,000 rpm;
- engines from modern washers of the most different classes, since manufacturers today often do not follow common standard equipment.

Immediately it is worth mentioning the inverter motor, which is equipped with the most modern washing machine. To start such a unit, a control circuit is needed. It must first convert AC to DC, and then create a new signal and change the frequency of the output voltage to control the speed on the shaft. But if the engine kit also includes power electronics from a washing machine, this will be an extremely useful addition.
How to connect and start the engine
Most useful advice: when dismantling, mark all wires and, if possible, remove additional elements connected to the power unit. One part of the answer to the question of how to start the engine from a washing machine and not burn it (if we are talking about asynchronous, from old devices) is the use of a starting capacitor. Other types of engines may have their own characteristics. You can find connection information both in the reference literature and on the Internet. The specific capacitance of the capacitor or other parameters of the circuit may change.

You need to act carefully, slowly, take precautions, use an isolated tool.
If the contacts and incoming wires were marked during dismantling, it will not be difficult to start the engine from the washing machine. In this case, depending on the type of unit, follow the instructions and take precautions. For example, it is desirable to fix the engine from the washing machine and make sure that the shaft is released and does not touch or drag foreign objects during rotation.
Grinding machine or sharpener from the washer engine
After the electrical connection is completed, and the washing machine engine comes to life, you can start making homemade products. The most common is a small grindstone. If you use a circle from a grinder, you can cut plastic pipes, aluminum corner.
You can adapt the engine to work as a grinder; for this, a circular nozzle with fine or coarse sandpaper is placed on the shaft. The list of works is as follows:
- The engine must be securely fastened. The most convenient way to do this is on a small board, which is then easy to place on a table, workbench, or any convenient surface.
- You can mount the electric motor of an old washing machine on the corners or with circular clamps from a strip of galvanized steel. To compensate for vibration and electrical insulation, in the latter case, rubber is placed between the engine and fasteners.
- Asynchronous motors from old drum washers have an open design, where dust, moisture, and sawdust get into. This can cause short circuits and malfunctions of the various types. Therefore, when mounting, the most profitable option is to completely “hug” the engine with a strip of galvanized steel.

There are several ways to connect a cartridge or a landing site for a grinding stone, a wheel for a grinder, a grinding nozzle:
- Cut the thread of the chuck seat directly on the shaft.
- Weld an adapter from several pipes different diameter. On one side, the fit of the grinding wheel is calculated, on the other, the inner diameter of the tube must correspond to the size of the shaft. This part the adapter is heated, stuffed onto the shaft, after cooling, the parts are very tightly and securely connected.
It is worth noting that a drill chuck is the most attractive option, unless you want to make a sharpener with a stone. It is easy to place almost any tool in it: a drill, a milling cutter, a grinding round head, a nozzle with a wire brush for stripping paint, a felt block. There is no difficulty in making an adapter for a circle grinder.
Even a novice home master can assemble such a machine and use it for a variety of purposes. The main thing is to correctly connect the engine and spend some effort on forming a reliable fastening of the working unit. But there are also comments. If only a high-speed engine is available, it is recommended not to reduce its speed, but to make a separate unit with its own shaft, and transfer torque to it through a pulley with a reduction factor.
Other homemade products based on the grindstone scheme
The above work will have to be done if you want to get other, most diverse machines. It could be:

We note right away that a sawmill from a washing machine engine will not work - there will not be enough torque.
But furniture makers and other home craftsmen will like the idea of \u200b\u200bmaking a horizontal drilling fixture for working with eccentric fasteners:
- The machine is made, as described above, with a chuck on the shaft.
- A support, guide shelf is made, horizontal, at such a height that the axis of the shaft runs along the center of the end face of a chipboard or wood part.
- A drill is inserted into the chuck, the part is fed horizontally, the depth of drilling can be monitored visually.
To create a place for installing a circular eccentric, it is enough to use a drill, a vertical drilling machine and a cutter of the desired diameter. This operation does not require high precision. The main, responsible task of accurately drilling a channel for a cylindrical pin will be performed by a machine from an engine from an old washer.
Conclusion
In the issue of homemade products from an old washer, everything is decided by the imagination and specific engineering skills of the performer. It is easy to make a fruit cutter, a lawn mower with steel blades, an electric scythe with a string cutting unit, even a device for plucking feathers from carcasses of chickens and ducks. Builders easily adapt old washing machines even for mixing concrete and modern mixtures. The main thing is to think carefully about solving the problem.
Not only a washing machine can become the basis for various homemade products. You can give a second life to a microwave, refrigerator, vacuum cleaner. If you don’t know how or just don’t want to use obsolete equipment, you can get rid of it. different ways described in this article.
technika.expert
Homemade from the engine from the washing machine
 In the modern rhythm of life, time passes very quickly and now a once high-quality and reliable washing machine turns into garbage due to wear and tear or for other reasons. What to do with your favorite assistant? Many will decide with a heavy heart to throw away the device. But owners with imagination and straight hands can start looking for options for using various working parts. This text is intended to help find the application of the engine from the washing machine. So, what can be done from an old washing machine, or rather, from its engine?
- Grinding machine
- lawn mower
- Wood lathe
- Circular
- wood splitter
Grinding machine
 It is necessary to start first of all with the basis of the future machine. This platform can serve as a slab of old chipboard from old Soviet furniture, distinguished by its strength and reliability. The power part of the unit is the engine from the washing machine. On its body there are standard studs, to which you need to attach mounting corners, which you will need to purchase in advance at any building supermarket or store. Accordingly, we attach the corners to the stand or directly to the base, if this, of course, is convenient.
Do not forget that simply connecting the engine from under the washing machine to 220 W will not lead to anything good. It is necessary to keep the native capacitor and connect the motor through it.
Since the motor shaft from a washing machine is not designed to attach various cutting or grinding discs to it, you will need to look for an adapter for a sharpener or an adapter for emery on local electronic boards and purchase it to make the device to last.
The purchased adapter sits on a 14 mm shaft. Visually, you can’t confuse it with anything - a cylindrical element that is fixed with a threaded bolt. The cylinder shaft itself has an M 14 thread. A double-sided washer with flow diameters is put on it, allowing you to install all expendable materials for a grinder based on an old engine from a washing machine.
Based on the base, it makes sense to make and install a removable table from the same fiberboards. To securely fix the table, on the base you will need to use two dowels on both sides of the surface. In this addition to the machine, it is necessary to make gaps for a variety of discs. It is important.
Thus, it turns out an inexpensive, but functional grinder or grinder. It will last a long time and reliably, which is very nice, especially in the context of the fact that it turned out to be made from an old motor from a washing machine. By the way, some have taken this principle as a basis in the manufacture of a router, although for most this idea still seems crazy.
lawn mower
In order to bring this idea to life and make a high-quality device, you need to use:
- steel base;
- wheels and handle;
- the wire;
- knife to be made by yourself.
Traditionally, you should start with a base of sheet steel 500-500-5 millimeters. Having prepared the wheels from under something, for example, from an old stroller, we fasten them to a steel sheet. The engine itself from the old washing machine is attached directly to the finished base using standard studs on the motor housing. On the shaft of the unit itself, with the help of an adapter previously machined on a lathe, a cutting knife is fixed. Then, having prepared the handle from the available material, we attach it to the steel base. On the same handle we bring out the power supply wire of the motor.
The advantages of this lawn mower are the simplicity of design, as well as its functionality. And the best part is that the analogue of the factory mower is much more expensive.
Wood lathe
For the basis of the product, a beam of 250-50 millimeters is needed on which the engine from the washing machine is attached. How? The answer is simple - with the help of mounting angles. We fasten the studs with bolts to the corners, and we, in turn, fasten them with self-tapping screws to the base. We put an adapter for a sharpener on the motor shaft. After that, we screw a removable nozzle onto the thread of the adapter, welded from a bolt with the corresponding thread and a small cylinder with spikes. Thus, this part of the machine is a fixed headstock.
The role of the movable headstock is a welded structure, consisting of:
- pipes with internal thread;
- shaft from a vise, at the end of which there is a small cylinder with a thrust bearing and spikes.
The pipe is welded onto a pedestal from a square of 45-45-3 millimeters. The basis for the movable headstock is made of sheet steel, on which the pedestal is also welded. Then the base of the headstock is screwed to the beam, which acts as the base of the machine.
The next structural part of the lathe from the engine from old typewriter is "emphasis". It is made of a corner with a sawn groove acting as a guide, and a second corner that reliably walks along the grooves in the guides thanks to the bolts between these two elements. The same bolts fix the corner on the guides. The stop is fastened with self-tapping screws directly to the timber.
Circular
First you need to build a frame from a square pipe in the form of a small rectangular table. In the center of it, it is necessary to weld the ears under the shaft with fastening for the circular. A tabletop or a cut-out sheet steel plate should be screwed onto the upper part of the bed. Under the upper parts of the bed, you will need to weld the base for the engine from the old washing machine with installation later.
In the form of a running gear, a belt drive is presented. On the shaft of the motor and the circular, both pulleys have grooves, and the belt has grooves. This allows the belt not to fly off the pulleys during operation. For ease of use and transportation of this circular, two wheels from an old trolley are attached to the legs of the bed on one side, and on the other hand, a convenient handle of the required length. Operating tips include safety rules when working with a circular saw, as well as the fact that you should always check the belt tension. This will keep the fingers and the rest of the body intact.
wood splitter
To get started, prepare:
- threaded cone pre-machined on a lathe;
- a shaft at one end of which a thread is cut;
- two bearings in the housing;
- bushing for bearings;
- pulley;
- bushing for pulley;
- nuts and washers with bolts.
In the form of a motor, naturally, an engine from an old machine can act. It is also worth noting that the more massive the pulley, the more powerful the wood splitter will be.
First, the shaft should be planted in the sleeve, and then the shaft should be assembled on bearings. After that, we securely fasten the cone to the shaft with spacer bolts so that the bolts go into the recesses in the cone. Then the pulley is mounted on the shaft and clamped through the lock nut with a washer. All mechanics are positioned and fixed on a sheet steel plate. At the end, you will need to make a frame, place the engine from the old washing machine on it and pull the belt between the motor pulley and the shaft.
Some ideas from other elements
The scope of the engine from the old, but so dear to the heart of the washing machine is truly great. The options described above are just some of the possibilities. More information about the use of this kind of motor, or, in general, all parts from an old washing machine, including a drum, can be found on the Internet.
“It is better to see once than hear a hundred times” - this indisputable truth applies to finding interesting variations in the use of washing machine elements today. How? There are a lot of options on the Web that can be made not only from the engine, but also from the drum, housing and even the belt separately. What is this about? Some parts of the washing machine can be used to make a mill, a milling cutter, a generator, a pump, and even a barbecue and part of the interior decor can be made from a drum!
If “on duty” you often have to drill parts and blanks made of metal or wood, and at the same time it is important to maintain an angle of 90 degrees when drilling, then you cannot do without a drilling machine.
The easiest option is to buy a ready-made drilling machine (factory-made). However, you can go the other way - make it yourself. In this case, not a drill, but an electric motor acts as a drive for the machine.
First of all, it will be necessary to cut off a piece of pipe and two pieces of a building corner. The blanks must be cleaned of rust with a grinder.

The corners themselves will need to be welded to the round pipe, as shown in the photo below. Welds also need to be cleaned. To fix the workpieces, you can use parallel clamps. How to make them, read.

Main stages of work
At the next stage, this pipe is welded to the base. Moreover, it is necessary to weld it strictly vertically, at right angles to the base. It should be quite massive.


A square frame of pieces of a metal strip must be welded to the carriage, to which the electric motor will be attached.

Then cut off a piece round pipe and make a longitudinal cut in it. We insert a stud with a threaded end into the pipe. We put two bearings on the stud. We wind the drill chuck onto the thread. A plate must be welded to the pipe itself. Then the plate is welded to the carriage.

Drilling machine assembly
We install the carriage on the rack. It will be necessary to weld a plate with an eyelet to the upper end of the pipe, after which we attach the handle to lower and raise the drill chuck.


To make a homemade drilling machine, which is ideal for a home workshop, you will need shaped pipes and other available materials. First of all, it is necessary to make a base for the vertical stand of the machine - for this we weld a frame from a 60x60 mm rectangular profile.
Basic welding work
We weld a steel sheet 4–6 mm thick on top of the metal frame, which must first be cut to size so that it does not protrude beyond the edges of the profile. We clean the seams with a grinder. Next, we make a vertical stand - for this we cut off profile pipe with wall dimensions 60x60 mm, length 65 cm.
Then we weld the vertical stand to the base. From a steel corner 25x25 mm, it is necessary to cut four pieces 8 cm long. Stepping back from the edges of the corners of 2 cm, we drill holes - they need to be threaded. We put bearings on the bolts, tighten them with nuts and screw these parts into the holes in the corners.

We prepare four plates for the size of the structure, and then we compress them with clamps and weld them together with the corners with bearings. Next, we weld a piece of the profile pipe to the plate.
Drilling machine assembly steps

We fasten the profile pipe with the plate to the guide using bolts with hexagon caps. Before welding the spindle, you need to make a seat for it so that the joints are with a small gap.

The fastening for the electric motor is very simple - anchor bolts with a ring are screwed to the corner of 25x25 mm, and where the engine is attached directly, two bushings are welded. The pulley with the shaft can be removed from the old huller.


