Mount the boiler on a wooden wall. Water heater installation
The water heater has a simpler name - a boiler. This is an ideal alternative to the lack of hot water in the house. In addition, it allows you to save money on utility bills.
Usually the boiler is installed either in the bathroom or in the kitchen. However, if it is about country house, it is possible to install the device on the roof.
Design features
The design of any water heater necessarily includes fasteners. They vary depending on where the boiler is installed - on the wall or on the floor.
With a floor device, everything is relatively simple. But mounting to the wall is carried out using steel fasteners on the back side of the tank body for heating water. In this case, you will need dowels, the dimensions of which must correspond to the mounts on the boiler. By the way, there are devices that require the removal of the back panel. The dowels are fastened with a construction gun. If there is none, then you need to drill holes for screws for fasteners using a puncher or drill.
Usually fasteners - steel hooks - are included with the water heater. Parts should only be used if they are of high quality. Their diameter should exceed one centimeter.
The water equipment market is represented by three main types of boilers. The type of installation work will depend on their type:
- indirect heating. The peculiarity lies in the absence of heating elements, heating of the liquid is possible from external sources. The design can be both wall and floor.
- Gas storage. The liquid is in a special container, it is heated due to the fact that the gas burns. It is recommended to entrust the installation to specialists.
- Electric storage. Liquid heating is provided by heating elements at the bottom of the tank, the water temperature is regulated by a thermostat. The most popular due to the ease of installation, connection and operation.
Location selection
Regardless of where the boiler will be located - in the bathroom or in the kitchen - you should pay attention to a number of nuances:
- the device must be located near communications (water and electricity);
- installation is optimal in the sanitary compartment;
- compactness of the device in the case of a small quadrature of the room;
- the wall must withstand the potential load, not only from the device itself, but also from the water poured into it;
- humidity at the site of the potentially installed structure should not be high. Otherwise, the device will easily fail.
If the owner of the premises has chosen the bathroom as the location of the tank, he must take into account the possible inconvenience if the heater is mounted above the bathroom itself. 
How to fix the device?
Brick or block walls are considered ideal for mounting a water heater, but it is highly undesirable to mount it on a thin wall. However, mounting on other types of materials is also acceptable. The most common:
- drywall,
- tile,
- wood,
- lining,
- foam blocks,
- plaster.
Consider the installation features for each type of wall. 
Drywall
Experts consider drywall to be a capricious material and question its resistance to stress. However, there are two effective ways, with which you can install the boiler in a room sheathed with sheets of drywall:
- installation on reinforcement, which is laid under the sheathing material of the walls;
- installation on holes made in the wall.
Tile
Sometimes during the repair the question arises: when is it better to mount the heating tank - before laying the tiles or after. It's good to have options. What if the tiles are already installed? Qualified specialists believe that in this case three conditions must be met:
- glue evenly applied to the tile;
- tiles must be laid without voids;
- the wall must be made of solid materials that do not allow the tile to sag or stagger.
If all the requirements are met, then any water heater can be mounted on top of the tile. 
Wood
Information about attaching the tank to wooden surface full of contradictions. According to some sources, mounting on a tree is highly undesirable, since the wall will not be able to withstand the enormous load, which will become even greater after filling the boiler with water.
According to other sources, the installation is acceptable. True, with a caveat. Before fixing the water heater, it is important to choose a non-combustible base for the unit in accordance with fire safety rules.
clapboard
This material in this case is considered capricious. Therefore, you can not do without special conditions for the installation process. You will need two vertical beams, which must be carefully processed and painted to match the color of the lining or tank. They are thoroughly fixed, and a water heater is already hung on them. By itself, the lining is not able to withstand the weight of the boiler. 
foam concrete
You will need special fasteners such as nylon spiral dowels. If the volume of the device exceeds 100 liters, it makes sense to use metal fasteners. Two mounting options are acceptable - using metal dowels or using special or chemical anchors for foam concrete. The option using a chemical (or adhesive) anchor is considered the most reliable and modern, as well as environmentally friendly.
plaster
There are two mounting options:
- Cutting holes in the slabs for the frame (metal profile pipes) with subsequent fixation to solid surfaces such as ceilings, floors or walls.
- The use of two metal tires 40x4, bent at right angles. They will be used as anchors. One end of each tire goes to the anchor to concrete ceilings, and the other for additional fixation - to the dowels to the wall.
Tools needed for the job
To install a water heater you will need:
- instructions describing the connection;
- pencil;
- metal hooks;
- dowels and screws;
- roulette;
- construction pistol;
- perforator or drill;
- hoses;
- network cable;
- water purification filter;
- nozzles.
Clarification regarding hoses for supplying water to the unit: better is more expensive, but more reliable. Flexible products can fail ahead of time. It is desirable if the elements for connecting pipes are copper.
Hot water supply of an apartment is one of the main components of a comfortable stay in it. The vast majority of city dwellers cannot even imagine that it could be otherwise. But here's the problem - not all residential buildings organized filing hot water.In addition, even from residents of fully equipped apartments, one can often hear complaints about the “quirks” of public utilities associated with both frequent interruptions in the supply of hot water and unreasonable overcharges for paying for this service.
The best way out is to achieve autonomy in this matter, to have your own water heater at home, and best of all, a storage principle of operation, a boiler, so that the supply of hot water is always “at hand”. But how to choose a boiler in an apartment so that it fully meets the expectations of the owners? And the second problem is how to install a boiler in an apartment so that it works correctly and does not pose any danger to residents? These questions will be answered in this publication.
Types of household storage boilers
First of all, it is necessary to navigate in a variety of cumulative ones, since there are many of them, but not everyone can approach the conditions of a particular apartment.
First of all, boilers are divided into direct or indirect heating.
1. Indirect heating water heaters do not use energy carriers in the form of electricity, gas, solid or liquid fuels. Water used for domestic needs ( heroften referred to as sanitary heats up due to heat exchange from passing inside the circuit, connected to the heating system (sometimes other sources of hot water are used, for example, circuits, connected to solar heat accumulators).

The figure shows circuit diagram such a water heater.
- Cold sanitary water enters the boiler tank (2) through the tube (8).
- Hot boiler process water circulates through the heat exchanger (6), which gives off its heat to sanitary water. There may be several heat exchangers, they are in the form of coils (as in the figure) or are arranged according to the “tank in tank” principle.
- Through the branch pipe (11) the heated sanitary water is taken.
- The entire boiler is enclosed in an enameled steel case (4), and the space between it and the inner tank is filled with a powerful layer of thermal insulator - expanded polystyrene (5), which ensures the preservation of the heat of heated water.
- A magnesium anode (10) is installed inside the tank, which is designed to prevent the build-up of scale on the walls of the vessel - it “pulls” it towards itself due to a lower electrical potential, and is subject to regular replacement as it grows.
- An electronic control unit (1) with a temperature sensor (3) maintains the required temperature of sanitary water. Since such a boiler itself does not use its own heaters, the control goes through the regulation of the circulation flow technical water coming from the boiler.
Boilers of indirect heating are distinguished by efficiency and high performance, of course, with sufficient power of the main boiler. However, they are not suitable for the conditions of the apartment. in the best way. The fact is that, most likely, no one will allow you to connect such a water heater to the central heating system - this will lead to a significant drop in temperature in the heating circuit. external source heat. Even if an autonomous heating system is installed in the apartment, this choice will still not be optimal. The boiler itself requires a significant amount of space, and in cramped apartment conditions it is easier to immediately install a double-circuit boiler.
2. In direct heating boilers, the principle is different - the transfer of thermal energy goes directly to sanitary water from an energy carrier - natural gas, electricity, solid or liquid fuel. In the conditions of apartments, of course, either gas or electric storage water heaters are used.
2— 1. Gas storage boilers, which should not be confused with instantaneous water heaters.

- The water in the tank is heated by gas burner(4) located below, under a panel with a special spherical shape, and from the pipe for removing combustion products passing through the tank.
- The thermostat system (3) monitors the heating level, controls the gas supply valves and the piezoelectric ignition device. As soon as the water temperature falls below the set value, the gas burners are turned on.
- There is also a magnesium anode (5), the function of which was mentioned above.
Such boilers are much more economical than electric ones, they are characterized by high performance, but they are not very popular with apartment owners, which is due to a number of reasons. Firstly, they definitely need a system for removing burnt gases, in the form of a “classic” or coaxial chimney. Secondly, the installation of such a water heater will require mandatory coordination with the gas supply organization and state technical supervision authorities. And, thirdly, the cost of such boilers is significantly higher than the most common and popular among residents of apartments - electric.
2— 2. Electric boilers are widely used in urban high-rise buildings. They are compact enough that they can be placed even on small area, are quite easy to install, which does not require any approvals, are easy to operate, reliable and quite economical.
Exists great multitude various models, but the basic scheme for all is approximately the same:

- External decorative casing (1) and internal tank (3), the space between which (2) is filled with peat insulating material (polyurethane foam).
- Input cold water(4) with flow diffuser (5).
- Hot water intake pipe (9) from the top of the boiler.
- The heating element is a heating element (7), the design of which may be different.
- Magnesium anode (6).
- Thermal sensor (8), connected to the electronic circuit of the thermostat, which controls the on and off of the heating element supply voltage to maintain the pre-set water temperature in the boiler.
As you can see, the scheme is quite simple and reliable. The cost of such boilers is quite affordable, which determines their highest, among other storage water heaters, popularity. Further presentation of the procedure for the selection and installation of water heaters will be devoted to this particular variety of them.
3. To complete the picture, it is worth mentioning another type of storage boilers - combined.
They combine the functions of both indirect and direct heating. For example, the diagram shows such a boiler:
The case contains two containers. In the external, process water circulates from the heating circuit. The inner tank (9) made of stainless steel serves as an accumulator of heated sanitary water. It contains an electric heating element and a temperature sensor. If the capacity of the external boiler is insufficient to reach the set water temperature, the electronics system switches on the electric heating. It is clear that during the period when the boiler is not in use ( at the end heating season) electrical heating becomes the main one.
Similar boilers, although they combine everything positive traits water heaters and direct heating are still very expensive, and for the conditions of an apartment, their use will be irrational.
How to choose a boiler in an apartment - practical advice
So, if a decision is made to purchase and install an electric storage boiler, you should know what parameters should be taken into account when choosing it:

1. Required storage tank volume. The variety in this matter is great, and it is necessary to choose optimal model so that the needs for hot water for all family members are fully met, and at the same time - you do not have to overpay for absolutely unclaimed volume and power consumption.
In the preliminary "estimate" proceed from the following parameters:
- Number and type of draw-off pointsconnected to the hot water circuit.
- The number of people living in the apartment.
Usually, for a boiler, the optimum water heating temperature is up to 60º C. However, this is very hot water, which must be mixed with cold water during use. For the convenience of calculations, you can tabulate the average water consumption for certain procedures, and convert it to 60 degrees:

Based on these data, it will not be difficult to calculate how much boiler is needed so that all family members can take water procedures one after another without waiting for additional water heating. It is clear that with taking a bath you won’t particularly “run away”, it’s better to navigate by an ordinary shower.
For even more ease of choice, a table will be given that summarizes recommendations for the required volume of the water heater, based on the number of residents and the type of water points:

2. Power consumption. The higher it is, the faster the water will heat up. However, do not forget that excess power is also not needed, since such a boiler will seriously load the electrical wiring in the apartment. Usually, 2 - 2.5 kW is enough for an average water heater. Nevertheless, although an ordinary power outlet should cope with such power (its standard threshold is 3.5 kW), it is strongly recommended that the installation of a water heater be accompanied by laying a separate power line from the switchboard. At the same time, if its power is higher than 3 kW, it is better to do without sockets by installing a circuit breaker for 16 - 25 A in the immediate vicinity of the boiler.
3. Dimensions and body version. It is clear that these parameters mainly depend on the selected volume of the boiler, but even here there may be some peculiarities.
The most familiar to most users are vertical water heaters. They are the most productive and economical, they are distinguished by low cost.
 "Classic" type - vertical cylinder
 Previously, the main form of the boiler was a cylinder. Such water heaters are easy to install and maintain, but they protrude excessively along the front, which sometimes prevents them from being installed in a cramped room.
 "Flat" boiler takes up less free space
 More compact are boilers "flat", flattened from two edges of the form. This arrangement of the tank, of course, is less overall, but it also has disadvantages - it is much more expensive and has a lot of welds, which can reduce the overall strength of the structure and increase the area of possible corrosion exposure.

AT recent times Horizontal boilers are becoming more and more popular - if the width of the wall allows, then they are often chosen. they heat up quickly. Their only drawback is that such an arrangement does not allow achieving high performance.
 "Flat" horizontal water heater
 Horizontal boilers can also be cylindrical or "flat" shaped.
Most household boilers are designed to hang on the wall. Large volume boilers can also be floor-mounted, but they take up a lot of precious space.
Important note - it is not allowed to independently change the orientation of the boiler location - vertical and horizontal models have their own design features, and they can only work correctly in the standard position.
4. Internal coating water tank can also vary significantly.
The most inexpensive are enameled tanks, but an anode rod must be installed in them to collect scale. The disadvantage can also be considered the instability of the enamel to large temperature differences - in case of accidental overheating, such a coating may crack.
Boilers with stainless tanks are more practical - they are not afraid of increased hardness of water and excessive concentration of chlorine-containing components in it. Some water heaters with high-quality stainless steel tanks are not even equipped with anode rods due to their uselessness. Stainless steel perfectly tolerates elevated temperatures and pressures without deformation. Of course, the cost similar models already much higher.
A modern innovative solution is expensive, but very reliable boilers with glass-porcelain coated tanks. Such containers are absolutely not afraid of corrosive effects, they are completely chemically inert, they are not subject to cracking or peeling, which, for example, are enamelled. Glass-porcelain cover is the most environmentally friendly - the water will never appear bad smell or taste, has an antibacterial effect. All these advantages, of course, affect the cost of such models.
5. The presence of protection against scale and corrosion, which has already been mentioned above.

You can add here that some models are equipped not with magnesium, but with inert anode rods, which are much more efficient and require frequent replacements. True, this convenience is also reflected in the cost of the boiler.
6. Electric heater type. You can choose a boiler with a "dry" or "wet" heating element.
 "Wet" heating element is in direct contact with water
 A conventional "wet" heating element is in direct contact with the heated water, which makes it more efficient, but at the same time increases its vulnerability to corrosion and scale deposits.
 "Dry" heating element is installed in a sealed capsule
 "Dry" heating elements are enclosed in a sealed capsule, and do not have contact with the liquid. They are more durable, they are easier to change when they fail. The only negative is that these advantages are reflected in the cost of the entire boiler.
7. Type of indication and control unit. Inexpensive models have pointer thermometers and mechanical thermostats. More modern water heaters may have a unit with a digital display, a touch control panel. It is difficult to give advice on this matter - everyone chooses according to their preference and financial capabilities. I must say that there are models even with remote controls - this is especially convenient for horizontal boilers installed high from the floor surface, under the ceiling.
8. Manufacturer and external design of the water heater. Of course, preference should be given to original models of well-known brands. There are many products of Turkish or Italian assembly on sale, which, while remaining, in principle, of sufficient quality, are nevertheless equipped with inexpensive parts (internal tanks, control units and heating elements) made in China. The total duration of their trouble-free operation sometimes raises certain doubts.
In this regard, in better side stand out German manufacturers using their own components. They are often quite large, due to the impressive thermal insulation layer, but this is justified by the fact that the daily decrease in the temperature of fully heated water in a boiler disconnected from the power supply does not exceed 5 - 7 degrees.
Although most boilers do not differ in bizarre forms, their decorative effect is nevertheless achieved by external design and a variety of body color shades - it is possible to choose the most appropriate option for the chosen style of the room.
Prices for popular models of boilers
on one's own
Services for installing boilers in an apartment are provided by many service organizations and private craftsmen. However, you can install the water heater yourself if you have basic skills in working with plumbing and household electrical equipment.
Actually, the entire installation process can be divided into three main stages: hanging the boiler in the place intended for it, inserting it into the home water supply network and connecting it to the power supply.
Preparing fixtures and hanging the boiler
To begin with, you should re-evaluate the condition of the wall on which the boiler will be suspended - it must securely hold the fasteners under heavy load. It is strictly forbidden to hang a boiler on a plasterboard wall if no additional reinforcing structures are used.

The place where the boiler is suspended must provide free access to it and visual control of the indicator panel and general condition device.
However , the water heater must not be located too far from the draw - off points . In the case when, for example, the kitchen and bathroom are very spaced apart (this happens in houses of some series), best solution there will be the installation of two boilers - one, small volume, for kitchen needs, and the second - for water procedures.
The minimum distance from the top of the boiler to the ceiling is 100 mm. From below, this value should not be less than 500 mm.
Usually complete with a water heater are special dowel hooks of the required diameter and length, designed for a double load (for example, with a boiler volume of 100 liters, the fasteners must withstand 200 kg). If there are no fasteners in the kit, you need to purchase hooks with a length of at least 100 - 120 mm, a diameter of 8 mm, with an outer diameter of the dowel - 12 mm.

At the installation site, it is recommended to depart the vertical center line with a plumb line, from which further marking will go. Then, at the desired height, taking into account the dimensions of the boiler, symmetrical holes are marked, corresponding to the location of the hooks on the mounting plate welded to the body of the water heater. The horizontal layout is controlled by the building level.
Using a puncher, holes are drilled into which plastic dowels or metal anchors with hooks are driven in. The hooks are screwed in so that they protrude 5 ÷ 7 mm above the wall surface.

After checking the reliability of fastening, you can hang the boiler on hooks.
Some models of boilers have a special suspension system. They are supplied with special brackets that are attached to the wall using dowels with a hex head under wrench. The shape of standard brackets is consistent with mounting plate water heater, and hanging such a boiler will not be much work. Of particular convenience may be a special template, sometimes supplied with technical documentation products - this will greatly simplify the process of marking holes.
Connecting the boiler to the pipes of cold and hot water supply
The next important task is to crash into the pipes of cold and hot water supply. Approximate general scheme connection is shown in the figure:

It will be necessary to install tees if free pipes for these purposes were not provided in advance in the water supply system. Before the tees on both pipes, it is recommended to provide shut-off valves (on a hot pipe, when connecting an apartment to a central hot water supply, a shut-off valve is mandatory - it is closed in case of switching to autonomous water heating).
How can a cut be made?
If the pipes are metal-plastic or polypropylene, then there are few problems - a regular tee is installed, which is mounted on compression fittings or soldered using a special apparatus. From these tees, pipes are routed to the location of the boiler.
Will create more problems metal pipe over a long, unremovable section.
 Tee-clip - not the best option
 Some craftsmen practice reaming the body of the pipe with the installation of a clamp-type tee-clip. However, there are much more opponents of this approach - such a tie-in is not very reliable, and, in addition, in this place there is a high probability of pipe blockage.
 Squeeze with an “American” nut
 It will be much more reliable to cut a section of the pipe and cut the threads on both formed pipes using a die of the appropriate diameter. After that, it will be possible to install a metal tee on the drive or, even better, on the system of union nuts - "American".

If a sump filter is not installed in the water supply system, then it does not interfere with installing it either - it will prevent clogging of the boiler tank with solid inclusions.

Often the pressure in water supply network does not differ in stability, and this is not entirely useful for the operation of the boiler. To equalize the inlet pressure to the water heater, you can install a pressure reducing valve of the required rating (usually, about 2 atmospheres).
In the immediate vicinity of the boiler, it is recommended to install another pair of shut-off valves - this will facilitate the process of dismantling the device if it is necessary to remove it for repair or maintenance work.
All metal threaded connections are carefully “packed” with tow or special fum tape.
Now about how the pipes directly to the boiler itself.

The boiler connection, marked in red, is connected directly to the hot water pipe. Often flexible hoses are used for this. This is perfectly acceptable, but the hoses themselves must be very High Quality so that there is no vulnerability in this area. Experienced craftsmen always strongly recommend connecting polypropylene pipes with American nuts.
Here is the connection to cold pipe requires a special approach, so it is worth considering in more detail.
Special importance of the safety valve
This device, small in size, rather simple in design, plays a key role in ensuring the safe operation of the water heater.
 A mandatory element for connecting to a cold water pipe is a safety valve
 Typically, such a valve is a structure of two cylinders located perpendicular to each other.
- In the cylinder with a threaded part there is a poppet check valve that prevents the outflow of water from the boiler into the cold line when the pressure in it decreases.
- In the other, there is also a poppet valve, but with a more powerful spring, which is triggered when the pressure in the boiler exceeds the maximum allowable value. This opens the drain pipe through which excess liquid is discharged, thereby equalizing the pressure in the water heater. It can also have a handle for forced opening of the valve - it can be useful for draining water from the tank during maintenance work.
To better explain the importance of this device, it is better to consider a few examples:
- The absence of a check valve can lead to the following situation. When the water in the boiler is heated, the pressure in it increases. Sooner or later, a moment is created when it exceeds the pressure in the cold pipe, and a reverse flow of already heated water will flow through it - it can appear when the “cold” tap of the mixer is opened or end up in the toilet bowl.
- It is even worse if, for some reason, the pressure in the cold water supply system disappears altogether (for example, repair work). Hot water from the boiler will simply go into the pipe, and the heating element will heat the empty tank, which will lead to the failure of the heating element and cracking of the enamel. Of course, this should be prevented by the automatic power off system in case of overheating, but you cannot rely on it alone.
- However, the installation of a conventional non-return valve does not solve the entire safety problem. On the contrary, if you mount only it, you can cause disastrous consequences - and after all, such "craftsmen" are still found! The banal failure of the thermostat in this case creates an explosive situation. The temperature in the tank rises, the pressure rises, but the water does not boil in a closed volume. But if only a way out appears - a crack in the tank or a tap opened by someone, the pressure drop will lead to an instantaneous boiling of water with huge vaporization and a powerful explosion.
 Consequences of Neglecting Security Measures - Exploded Boiler
 So, all this can be avoided by installing a safety valve. It is screwed directly into the boiler nozzle, 3 ÷ 4 turns with the usual plumbing "packing". And only then can a water pipe be connected to its other end with a flexible hose or in another chosen way. There is always an arrow on the valve showing the direction of water flow - this should be checked during its installation.
A thin flexible hose can be connected to the outlet drain pipe of the valve and discharged to the sewer. It is advised that this hose be transparent - for visual control of the operation of the device.

Never and under no circumstances should any shut-off valves be installed between the safety valve and the water heater - and this is enough widespread mistake, judging by the photos posted on the Internet.
When the boiler is operating, one should not be afraid that at times water comes out of the valve pipe - this only indicates its normal functionality. If too much water flows out - perhaps the spring has sat down, and the valve should be replaced - they are freely sold. An alarm should be caused by a constantly dry valve - has it broken, jammed or clogged? To protect yourself in such a situation, it is worth checking it and, if necessary, replacing it.
Some models of boilers are equipped with a “safety group” - both a pressure reducer, and a safety one are assembled in one case. Such devices are installed in the same way - at the inlet of cold water.
Connecting the boiler to the electrical network
This issue has already been partially considered above, so it can be briefly discussed.
- As a rule, boilers come with an already installed power cable and a three-prong plug to ensure connection to the ground loop - this will prevent electrical injury in the event of a phase breakdown on the device case. Accordingly, the socket installed near the water heater must also have a grounding contact.
- You can find boiler models that do not include a power cable. In this case, you will have to purchase it and connect it to the terminal block yourself. Be sure to take into account the color marking of the wires: blue - zero (N), brown, red, gray or black -, phase (L), and green-yellow - ground loop (PE). The plug must be rated for a current of at least 16 A.
Test run of the water heater
After everything is ready, you can try out the operation of the water heater.
- The correctness and tightness of the pipe connection is checked again. It is controlled that the valve on the hot water line is closed.
- The boiler is filled to the top with the “hot” tap on the mixer open - until water starts to run from there. After that, the mixer is closed.
- Some models have a special manual valve for initial filling - this will be indicated in their instructions.
- The water heater is connected to the mains, the required temperature is set on the thermostat. In working condition, the indicator on the boiler will light up.
- It remains to follow the rise in water temperature and the operation of the thermostat when it reaches its set parameter.
- And, of course, during the initial start-up, you should make sure that there are no leaks at all pipe joints or flexible hoses.
Mounting a water heater to the wall in your apartment is not the easiest process. To perform it requires special knowledge and skills. To hang the boiler on the wall, you will need expensive tools.
In addition, you should not mount the boiler on the walls with your own hands to a person who does not have experience in carrying out similar works. It is better to use the services of specialists. The article offers to get acquainted with the stages of work.
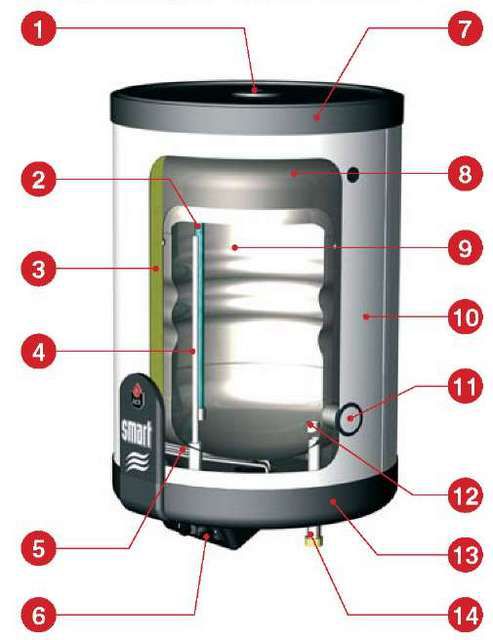
Before you hang the water heater on the wall, you need to get acquainted with its device.

According to the scheme, the drive consists of the following positions:
- 1 - internal tank.
- 2 - heating element.
- 3 – magnesium anode.
- 4 - outer case.
- 5 - branch pipe for supplying cold water.
- 6 - hot water outlet pipe.
- 7 - thermometer.
- 8 - heat-insulating layer.
- 9 - thermoplastic with a special regulator.
- 10 - decorative cover.
- 11 - indicator light.
- 12 - bracket for fixing the boiler to the wall.
Installing a 100 l water heater on the wall begins with choosing a suitable place for its installation.
In this case, you need to know a few nuances:
- The boiler should be located in close proximity to water and electricity communications. This is due to the fact that water pipes water enters directly into the boiler and is heated in it.
Tip: If necessary, devices on the wall electric water heater, you should take care of the installation of its electrical supply system in the corresponding project in advance.
- Installation of the boiler is best done in a plumbing cabinet, this will hide the entire device, leaving free space.
- Before installing a water heater in the kitchen, it is necessary to foresee the availability of a sufficient amount of free space in advance. For kitchen premises, special water heaters are produced, distinguished by their relatively small size.
Tip: In the bathroom, you should not mount the boiler above the bath itself. This can lead to inconvenience during its use.
- At high level humidity, some devices quickly fail.
- Before fixing the water heater, it is necessary to check the strength of the wall to place the device.
- Ideal for fixing the boiler when the wall is built from:
- bricks;
- concrete or other solid blocks.
This is due to the large weight of the device itself, and when it is filled with liquid, the structure will weigh even more. All this load must withstand the wall. It is impossible to mount a boiler on a wooden wall, but reliable insulation for walls from heating can allow its use for such buildings.
What elements are needed to install a water heater
You can mount the water heater on the wall using:
- Construction pistol.
- Perforator.
- Electric drills.
Fasteners for the water tank are used steel hooks with a diameter of more than 10 millimeters and dowels fixed with a construction gun, which is due to overall dimensions and the total weight of the structure. In the absence of a construction gun, holes are drilled electric drill or a puncher for special screws for fasteners, which are shown in the photo.

If there is a layer of plaster on the wall, when fixing the boiler, you can use screws about 10 centimeters long, their plastic part should be less than 8 centimeters.
Tip: When supplying water to the boiler, flexible hoses and products should not be used, the price of which is not high - they can fail quickly enough, which requires their quick replacement. It is better to spend more money and buy more quality materials. Elements for piping should be made of copper. Metal parts must not be used.
- The water heater itself.
- Metal hooks.
- Dowels.
- Electric drill or hammer drill.
- High quality hoses.
- screws.
- Instructions and diagram for connecting the device.
- Network cable.
- A filter used for coarse water purification.
- Special pipes.
- Pencil.
- The gun is construction.
How to attach a boiler
Installation technology includes:
- Choosing a suitable mounting location.
- Holes for dowels are drilled.
- Plugs are inserted into the holes on cement or epoxy resin, using plastic or wooden liners. Holes are drilled in wooden plugs with diameters smaller than those of screws, 3/4 of the length.
- Screws are screwed in and left until the cement or resin has completely cured.
- Most often, on the back surface of the boiler there is a mounting plate with figured holes in the form of a keyhole.
- The heads of screws or dowels are inserted into these holes and screwed into the wall.

- For reliable fixation of the structure, another additional screw is installed, screwed between the two already screwed in, to support the lower part of the plate. This will prevent the mounting plate from bending. A washer should be put on top of the screw to increase the strength of fixing the edge of the fastener.
- The water heater is installed.
- Reliability is determined electrical wiring in the apartment, the materials and thickness of the wires are selected.
Tip: If in doubt whether the cable will withstand the load or not, you should lay a new cable from the shield.
- Grounding is in progress.
At correct installation the water heater will work properly for a long time.
Besides:
- The set includes a built-in safety valve that prevents the outflow of water from the water heater.
- A safety valve is screwed onto the water inlet pipe for several turns. This process requires special attention, otherwise there is a high probability of damage to the joints of the pipes with the water heater tank.
Tip: When installing the device in a horizontal position, you need to remember: the hot water pipe should be located on top, and cold water on the bottom.
How to connect the boiler to the mains
When connecting the heating tank with water to the electrical network, it is necessary:
- Prepare a new network cable to connect it to the power board. This will avoid negative consequences when using a water heater.
- The connection must be made in accordance with the colors of the braid:
- yellow wire is responsible for grounding;
- blue - corresponds to the working zero;
- brown - phase.
- It is impossible to adapt water or gas pipes for grounding.
- With poor water quality in the apartment, it is advisable to purchase and install a filter for coarse cleaning. Otherwise, the design can quickly fail.
How to hang an electric water heater on the wall

To install the water heater on the wall, you can invite a specialist.
Their responsibilities include:
- Compile and submit to the owner an estimate for the materials used in the work.
- Develop a work plan and evaluate them.
- If there is an old device, dismantle it.
- Mount the boiler to the wall.
- Connect the water pipes through which water will be supplied and discharged.
- Check the unit for operability and demonstrate it to the customer.
- Organize consultations with the owner on all his questions, tell about the rules for using the equipment.
How to fix a boiler on a foam concrete wall
Before you hang the water heater on the wall of foam blocks, you need to purchase special fasteners.
It can be:
- Nylon dowel, having a spiral shape. With it, you can attach fairly heavy objects that will hold them securely.
- When installing on a 100 liters electric boiler, it is more advisable to use metal fasteners.
Example mounting options:
- With a metal dowel.

- Special anchor for foam concrete.
- Chemical anchor for foam concrete.

This is the most reliable and progressive way of fastening. Such an anchor is universal, can withstand quite high load. Another name for it is a glue anchor. Despite the use of some chemical elements, this way of fixing:
- ecologicaly clean;
- resistant to low temperatures air.
When attaching to a chemical anchor, you must:
- drill a hole by rotating the drill at an angle in different directions to expand the channel;
- the hole is cleared;
- filled with quick-hardening mix.
This results in a cone-shaped plug, which provides a very high security of fastening.
Recently, electric heating mats on the wall have been widely used. How to install them correctly, their advantages and disadvantages shows the video in this article.
With any design of the heating device, you can create in the house comfortable conditions for water heating.
Buying a water heater is not everything. It still needs to be installed, and then connected. And connect to both water and electricity. How to install a water heater depends on its type: instantaneous or storage. Depending on the size and shape, the installation site is selected. The requirements for the power supply line depend on the power, and the connection scheme to the water supply depends on the internal structure of the water heater.
Types of electric water heaters
There are two large groups: flow and storage. Instantaneous water heaters heat the water that passes through them. In this regard, they are relatively small in size, but very high power - up to 24 kW, but this is the maximum. For washing dishes and taking a shower, a power of 4-6 kW is enough, for taking a bath - 10-12 kW. So, to connect such equipment, a dedicated power line with an RCD is required.
Storage water heaters are also called "boilers", they have a reservoir and a small, compared with flowing, power - from 0.8 kW to 4 kW. However, a separate power line is also desirable for them. Boiler sizes depend on the volume of water contained in the tank. Their shape is cylindrical, and the cylinder can be located vertically (cheaper option) and horizontally (more expensive).
The place for installing the water heater is chosen mainly depending on the existing connection conditions. Most often, this is either a bathroom or a kitchen: water is supplied to both rooms. Secondly, the place is chosen for aesthetic reasons: so that the equipment is not very “striking” to the eye. From this point of view, a toilet or a bathroom is usually chosen. If space is available, this is the best choice.
How to install a boiler (storage type water heater)
Let's start with mounting on the wall, because that's where it is usually attached. Empty boilers have a solid weight, and even they contain up to 150 liters of water. Therefore, strict requirements are imposed on the mount: they must withstand twice the weight, equal to twice the capacity. That is, if you have a boiler of 80 liters, the fasteners must withstand 160 kg. In this regard, it is mounted only on bases with good bearing capacity on anchors with hooks.

There is a mounting plate on the back wall of the water heater at the top (sometimes there are two of them - at the top and at the bottom). It has slots through which hooks are threaded. Thus, the boiler is hung on the wall. There are two different ways note where to drive fasteners:
- If there are assistants and the space allows you to move relatively freely, you can lean the boiler in the right place against the wall, and then circle the slots.
- Measure the distance at which the bar is from the top of the water heater, also measure the distance between the centers of the mounting holes. Set aside all these parameters on the wall by finding the necessary points.
One caveat: if you are going to hang the water heater under the ceiling, it is necessary that there is a gap of at least 5 cm from its top to the ceiling. This is necessary so that it can be lifted by putting it on hooks. Otherwise, hanging the boiler will not work.
How to connect the boiler to the water supply
We will proceed from the fact that there is already a cold water supply point, as well as a hot water distribution comb. A little about how to connect the boiler outlets to the hot and cold water pipeline. It is more convenient to use flexible hoses, but not those that are just braided rubber, but flexible ones made of corrugated stainless steel. They also have different lengths, they have union nuts with gaskets at the ends, but their service life and reliability are many times higher. If the boiler hangs over the bathroom and all the connections are in the same place, then even if the hoses burst, nothing threatens you: the water will end up in the bathroom. If not, you can flood the neighbors.
Another option is to use plastic (polypropylene or metal-plastic) pipes. This option is used if hot water is simultaneously distributed to distribution points. Otherwise, it is more convenient to use flexible connectors. Only when using pipes, please note that special pipes are placed on hot water, which are usually marked in red, on pipes for cold water it may not be at all, or it has a blue / blue color.

Now directly about the scheme of connecting the boiler to the water supply. Although modern water heaters often equipped with automation, periodically, when heated, a sharp pressure jump occurs, which can lead to a violation of the tightness of the container. To avoid jumps, a cold water inlet is installed. When the threshold value is exceeded, a tap opens in it and some part of the water is bled off, equalizing the pressure. Therefore, when installing the faucet, make sure that the drain outlet (small socket) is directed downwards. If you want your boiler to work for a long time, put this valve in place.
It is convenient if it also has a second function - it also works as a check valve, blocking the outflow of water in the absence of pressure in the system.

If you look at the photo, there is an arrow on the body that shows the direction of water movement. If there is such an arrow, the device also works as a check valve, preventing water from pouring out. If there is no arrow, you will also have to install a check valve (above the safety valve).
For information on what functions the safety valve performs, and how best to install it if it is not located above the bath, see the video.
Another obligatory detail of the scheme is shut-off valves. They are usually placed on a branch from the riser of hot and cold water. These faucets are required. Sometimes they are also placed in front of the security group, but they are no longer mandatory, but serve only for more convenient repairs.
The safety group is a coarse filter and a pressure reducer. If these devices are not at the entrance to the house or apartment, it is very desirable to install them: they extend the life of the water heater.
For explanations of the boiler connection diagram, see the video, here are disassembled typical mistakes plumbing connections.
Connecting the boiler to electricity
All manufacturers of water heaters recommend turning on boilers to electricity to a separate line from which a double automatic machine and an RCD are installed. Please note that the automatic machine is necessarily double - that is, one that breaks both phase and zero at the same time. A ground connection is also required. These measures provide security, so they should not be neglected.

Instead of a bunch of RCD + automatic machine, you can put a difavtmat. It will also monitor both leakage current and short circuit, but made in one body. A 16 A automatic machine is enough for a medium power boiler, and an RCD leakage current of 10 mA. cross section copper wire(monofilament) 2.5 mm is enough.
How to install a tankless water heater
As already mentioned, the instantaneous water heater has smaller dimensions, therefore it is easier to find a place for it. It can be hung next to the wall, or you can hide it in a cabinet. Its dimensions are usually 15*20cm*7cm or so. In general, they are small. Weight - from the strength of 3-4 kg, so that the requirements for fasteners are minimal. Usually it is either hung on two dowels of small diameter screwed into the wall, or it has a mounting plate that is screwed to the wall, and the water heater is already hung on it. We figured out how to install a flow-type water heater, now about the connection.
Connecting the instantaneous water heater to the water supply
From this side, everything is simple. But the disadvantage is that it can only supply water to one point at a time. Depending on the installation location on the output warm water put either a shower head with a flexible hose, or a gander - for washing dishes. It is possible to put both the “gander” and the watering can through the tee (as in the picture on the far right).

In order to be able to remove the water heater if necessary and not shut off the water in the entire apartment or house, ball valves are installed at the inlet and outlet. They are required equipment. The connection from the nozzles to the tie-in point in the cold water supply line is carried out in the same way as when connecting the boiler: with corrugated stainless steel hoses or plastic pipes. Hot water to the point, if necessary, is carried by a flexible hose: in principle, there are no temperatures too high here, so it must withstand.

Another feature of instantaneous water heaters is that they can normally only heat a certain amount of water. With an increase in flow or too low an inlet temperature, they do not cope with the task. Therefore, most often such a water heater is used as a temporary one - in the country or when the hot water supply is turned off for prevention (for the summer).
It is not difficult to solve the problem with an excessive amount of water (when the pressure rises above the norm): either put a reducer at the inlet or a flow restrictor. The reducer is a more serious device and it is recommended to install it at the entrance to the apartment, and the flow restrictor is a small cylinder with a valve. It is screwed onto the cold water inlet. An example of how to install a flow type water heater and where to wind the flow restrictor is in the video.
Electrical connection
With the electrical part of the connection, everything is the same as with the boiler: a dedicated line, RCD + automatic. Others are only ratings and wire cross-section. Rated at power up to 5 kW - 25 A, up to 7 kW - 32 A, from 7 to 9 kW - 40 A. The cross section of the copper wire is 4-6 mm (monofilament).
Installing a boiler in a private house, apartment or country house is smart decision to provide hot water to the required premises. Installation of the device can be entrusted to specialists, and also, if you have the necessary skills, installing a water heater with your own hands will not cause difficulties.
There are several types of boilers, and how the water heater will be installed depends on the design and type of unit.
General rules
If the issue with the choice of a water heater has already been resolved and purchased wall variant electrical unit, you can proceed directly to its installation. But before that, some nuances should be taken into account.
- The first step is to determine the installation location of the device. The location of the unit must be such that it is easy to carry out preventive and, if necessary, repair work.
- Before installing a water heater, it is necessary to assess the condition of the water pipes. If a old pipes, it is recommended to replace them completely or at least a portion of the tie-in.
- In the vast majority of cases, the device is mounted on the wall (an exception may be the installation of an indirect heating boiler, which can be both floor and wall), so the wall must withstand a load 2 times greater than the tank capacity. For example, with a tank volume of 100 liters, the wall must withstand a mass of 200 kg. Of course, drywall is not suitable for these purposes.
- In the case of installing a water heater in a country house on a wooden wall, make sure that it is strong.
- In addition, since the unit uses powerful heating elements, before hanging the water heater, it must be taken into account that the wiring must withstand a certain load. Therefore, it is recommended to separate line from the counter with the installation of a circuit breaker in front of the device. The cross section of the wire must be 2.5 mm.

Water heater on the reinforced wall of a country house
Water heater installation
After all preparatory work, you can proceed with the installation (mounting) of the storage water heater on the wall.

The next important point in installing a water heating tank is connecting it to water pipes. There are a lot of video tutorials on the Internet on this topic. But you can use this guide as well. The figure shows the installation diagram of the water heater.

Eyeliner is done as follows:
- The red arrows show the movement of hot water, and the green arrows indicate the movement of cold water when installing the electrical unit. On the branch from the risers (2 and 3), it is imperative to install stopcocks(4 and 5).
- The valve (4) is used to shut off the water supply to the boiler, for example, if the unit needs repair or preventive descaling.
- The tap at number 5 shuts off the main hot water supply if heated water from the device is used.
- Further, continuing the installation of the boiler, it is required to cut into the pipes going to the apartment tees(6 and 7), from which the wiring to the device will go.
- It is recommended to install valves (8 and 9) on the outlet to the device. They are useful for preventive maintenance of the unit, so as not to turn off the main wiring. Also, pipes (10 and 11) to the nozzles of the device begin from these taps. You can use metal-plastic pipes, flexible hoses or polypropylene pipes.
- Installation required on cold water supply safety valve(12). This element protects the unit from overpressure. If excess pressure is formed in the tank of the device, water will be discharged into the sewer or a special container through the drain pipe (13) using the opened safety valve.
- Above the safety valve, another tee is installed, and a valve (14) is connected to it. With this tap, you can drain the water from the device if necessary. The same tee with a valve is recommended to be placed on the hot water pipe, in front of the boiler nozzle. It serves as an air suction to quickly drain the liquid from the apparatus. Must be closed during operation.

How to install a water heater with your own hands in the country, if there is no centralized water supply? To ensure the normal operation of an electric water heater, you will need to install a storage tank for water. Usually it is located on the roof, but this is not important. The main thing is that the height of the storage tank above the unit is at least 2 meters.

Electrical connection
To connect the unit to electricity, it is advisable to make for it separate switchboard with a circuit breaker and do not place it in a damp room. Then stretch the cable to the boiler and connect it to the contacts of the device. The cable must be three-core (with a cross section of 2.5 mm), with a core for grounding. The circuit breaker will protect the device from power surges that can disable the heating elements. The machine must be designed for a current of 16 A. It is also recommended RCD application(residual current device), which will protect a person from electric shock.

Below is a diagram of connecting the machine to the network.

If you are not well versed in electrical installation, it is better not to tempt fate, but to contact a specialist who will make the correct connection of the electrical appliance.
How to install the boiler correctly was discussed above. But there are recommendations on what to do during installation and use of the unit, it is impossible:
- turn on the installed unit, not filled with water;
- connect a pipe from the water main to the water heater if the pressure in it is more than 6 atmospheres;
- remove the protective cover of the unit and drain the liquid from it without disconnecting it from the power supply;
- engage in installation if you do not know how to install a boiler with your own hands;
- the use of "left" components other than those recommended by the manufacturer;
- when installing the unit, ignore the installation of the safety valve;
- do not follow the installation and safety rules.
To choose a boiler for your home, you should be guided by your needs, as well as consider its size and fit with the interior. You can entrust the installation to a specialist or do it yourself, especially since it is not so difficult task, if everything is done correctly, following the above recommendations.