Do-it-yourself circular from a grinder. Do-it-yourself circular grinder - a professional tool with significant money savings
Hello dear modellers! I think everyone has faced the problem of making rails for their projects. Therefore, it was decided to build a circular on the basis of the grinder. The idea is not new, a lot of flocks have already been written on the Internet, well, let me put in my five cents. I warn you that a circular (especially a handmade one) is a dangerous tool! I, as the author of this article, am not responsible for your life and health!!!
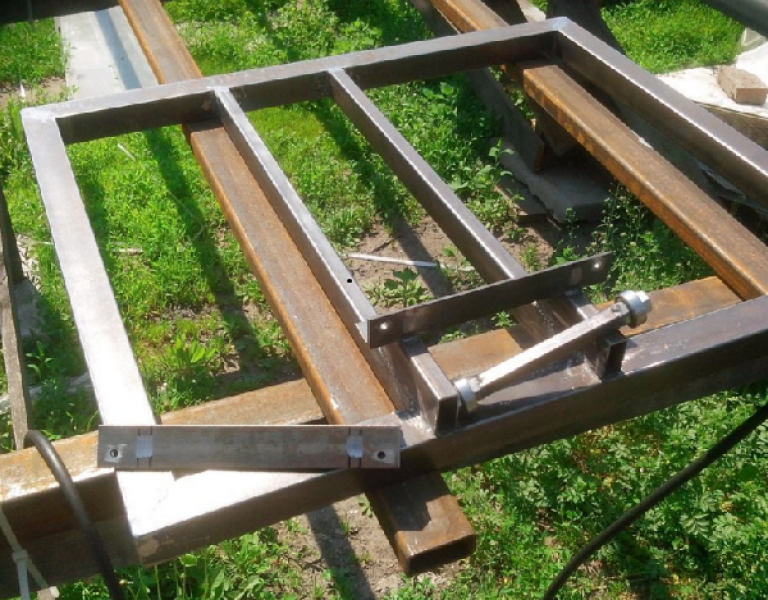
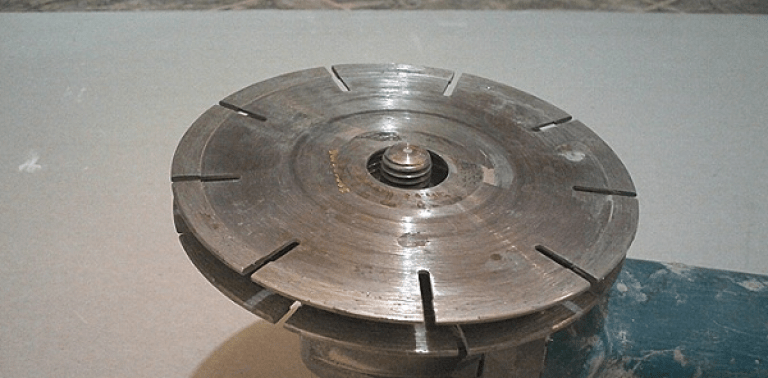
To build this unit, we need: 1) Bulgarian (with maximum speed - 10,000 rpm) 2) 125mm disc for wood (with speed - 10,000 rpm) 3) Sheets of metal 4 mm thick. and 2.5 mm. The speed of the disc and grinder must match, because if the speed of the grinder is too high, the disc may scatter, and if it is too low, the cut will not be clean. First, from a sheet of metal 4 mm thick (it is better to take 5 mm), I cut out a “table” 450 mm in size. at 340mm. and cutout for the disk.

Then he tried on the grinder along with the disk. Marked where it will be attached, drilled a hole and screwed it with a bolt. The second fixation point is located on the corner (more on that).

Further from a sheet of metal 2.5 mm. bent the corners. After fitting the entire structure, it was pre-assembled on bolts and nuts. After making sure that the grinder does not hang out, but is well fixed, the bolts and nuts were replaced with rivets. 

For the manufacture of rivets, Soviet wood screws were used.


Cutting thickness 2.2 mm. Sawing cleanly, satisfied with the result)


And now a little about the operation of this device. First, the circular is turned on and off using the carrying switch (that is, when assembling, you need to turn on the grinder and DO NOT FORGET ABOUT THIS). Work on it should last no longer than 15-20 minutes, so that the grinder does not overheat. And most importantly, follow safety precautions!
Thank you for your attention. Sincerely, Egor.
P.S. I would like to wish everyone a Happy New Year and wish you good luck, happiness, health and creative success! And may everything be fine in your life!)
www.parkflyer.ru
Do-it-yourself circular: drawings, description and video

A homemade circular saw is a kind of handy tool that can cope with a number of construction tasks in living conditions. In principle, it will not be difficult to make a circular yourself even if you do not have any special skills, the main thing is to have at least a little idea about working with metal. Required material you can usually find it in a garage or home workshop, and a steel corner, a rectangular profile pipe and an engine are suitable here. The assembled circular can be placed on an existing workbench, or, in the absence of such, it will be necessary to build a table for circular saw with your own hands. As for the motor, you can use the unit from the old washing machine or walk-behind tractor, but first things first.
Hand held angle grinder
If the farm has a "Bulgarian", then better fit not available for a hand saw. Don't know how to make a mini circular saw at home from such a popular tool? Do not despair, because its manufacture only involves providing a sliding stop and an axial handle to an existing unit. The sliding stop includes two segments in its design metal corner small section, located on both sides of the saw blade. With the help of bolts and nuts, the corners are connected on the front and back sides with a cross ligament, and the technological gap between the sidewalls of the thrust structure and the working element will be provided with washers.
It is necessary to put on a metal band clamp on the grinder so that its screw tie is located at the bottom, and a strip of galvanized metal with a hole for the sliding stop, folded in half, is already fixed to it. In principle, a special clamp with a stand can be made as a single unit, but in this case, the thickness of the metal strip will ideally be at least one and a half millimeters. Further, in the gearbox housing of the future circular, you will have to make a couple of holes for the bolts, for which it is disassembled, and the drilling points are determined. Through the holes made, an axial handle for a circular saw assembled from a grinder is attached, since the existing handle will not allow high-quality cutting, even if the master has remarkable physical strength.
The axial handle, which will be supplied with a circular grinder, is made of a metal rod or tube. The design in shape can be a transverse bracket or a kind of horn. The ends of the metal part, with which the handle is attached to the gearbox, are provided with holes for fasteners. There is one important point here: the ends cannot be riveted in order to exclude the deflection of the handle during the operation of the hand-assembled circular. It is also necessary to make an adjusting rod from a piece of metal rod (4 - 6 mm), for which we bend one end into a loop, rivet a little and form a hole for the front stop bolt. The uniformity of the gap, as usual, is regulated by washers.
At the other end of the rod, a thread is cut, thanks to which it will connect to the handle. First, one nut is screwed onto the thread, and after assembling the structure, the second one. By tightening and lowering the nuts of this fixture for a homemade hand-held circular saw, the depth of cut is adjusted. This is how at home you can convert the grinder into a full-fledged disk tool designed for cutting various materials. By the way, by remaking a circular from a drill, you can achieve a similar result.
Miniature Tabletop Circular Machine
The mobility of the element is achieved by sawing the horizontal segment into two uniform parts, which are fastened with clamps after installation. A circular saw is fixed to the vertical part of the frame on the clamp. A table from a hand-held circular saw assembly can function as a cutting machine if a standard cutting disc is installed on the grinder. It is worth noting that the through cut here will not exceed 80 mm, and for processing larger lumber, a more serious home-made circular machine will be required, which will be discussed later.
Stationary machine
A circular machine, as close as possible to factory models, requires a competent approach to assembly, therefore, before making a stationary type circular saw, you need to think through everything to the smallest detail. In principle, a desktop mini circular saw differs from a stationary one in the height of the frame, which directly depends on the nature of the work performed and the dimensions of the workpieces that the device will process. One-time work can be carried out on a compact table saw, while a circular saw from a hand-held circular saw can be easily hidden in a barn or pantry, and a carpenter who constantly manipulates lumber will need a stationary home-made circular saw. Below is a diagram that details all the elements and fixtures for a circular saw of this type.
As can be seen from the figure, home-made circulars of this type have a clear design, and drawings similar to the one presented above greatly facilitate the process of their assembly. Before you make a circular, as well as mount a circular table with your own hands, we will consider each detail of the unit separately in order to know all the intricacies of its operation and installation.
A table for a manual circular saw with a slot in the center is sometimes remade from an ordinary kitchen table or assembled from bars or metal profiles. Experts strongly recommend covering the table for a circular saw with a sheet of galvanized metal, since without a coating, the base is threatened with abrasion in the center from constant friction of the lumber, which in turn will negatively affect the quality of the cut, and the depth of cut will be uneven. The cross ties that reinforce the saw table are best made from a 60 - 80 mm steel angle with the horizontal segment outward in order to simplify the installation of the side limiter. A home-made table on which a circular saw will be installed must be strong and stable, and it must also be securely fixed in a fixed position.
saw blade
The toothed disc should rise above the surface of the circular table by a maximum of a third of its diameter, otherwise it will not saw the wood properly, and the process itself will become dangerous. If you need to cut a beam with a diameter of, for example, 100 mm, a similar cutter parameter should not exceed 350 mm, however, an engine with a power of 1 kW or more is also required here. For workpieces with a diameter of more than 150 mm, a mini circular made by hand is hardly suitable. On some factory circular machines, a riving knife is provided, which is installed behind the disk at a distance of 2 - 3 mm from the saw teeth. It eliminates the jamming moment due to the closing of the parts of the sawn workpiece, therefore it can be very useful in the case when a home-made circular is assembled.
Side stop adjustable
It is possible to put a high-quality emphasis from a steel corner with a section of about 80 mm, which is 3–4 cm longer than the table structure. The flat sides of the corner are bent down so that their width is one and a half cm more than the thickness of the table. After installation, the stop is fixed on homemade table circulars in a predetermined position with the help of bolts. adjustment given element carried out according to the template placed between it and the cutter.
Shaft
The shaft mounted on the circular is the most critical unit, therefore, it should be turned and tested as an assembly with the disk only by a specialist in special equipment. A pipe product with a carelessly fixed circle is excluded immediately, because the slightest errors in the operation of this element will result in major troubles such as equipment breakdown, damage to the workpiece and injury to the operator. The best solution would be to purchase a finished shaft with a seat for the cutter. It is better to give preference to self-aligning ball bearings with a curved inner surface, otherwise the self-made assembly will quickly collapse and the shaft mounted on a homemade circular will become unusable.
Broadcast
In our case, a V-belt drive would be an ideal option, but it is better to refuse a rigid gear mechanism, since such a homemade product does not guarantee safety. If a nail is suddenly caught in the lumber, the motor rotor will provoke the destruction of the disc, which can lead to injury. If the inner diameter of the belt drive pulleys is small, then slippage will be ensured, and the tensioned belt will serve as a kind of damper. The gear ratio is usually chosen based on the engine speed, always taking into account the allowable number of disk revolutions. The smaller the diameter of the saw blade, the greater the frequency of its rotation, and the cleaner the reworked unit will cut.
Motor
Among homemade devices the most popular is a circular assembled from an engine from washing machine.This choice is explained by the fact that the scheme of its work the best way suitable for such purposes. Unlike collector units, which are usually supplied with power tools, the engine from the washing machine runs at lower speeds, which means that it shows more long work, has increased efficiency and not so susceptible different kind blockages. You can also use a three-phase motor, but then additional costs will be required for the purchase of a starting and running capacitor, so it is more economical to manage the device from washing machine. Here, in general, and all the wisdom. In the video, you can see how a homemade circular works and evaluate its capabilities in practice.
derevo-s.ru
Do-it-yourself circular saw - reliable, practical, cheap!
For anyone home master, the presence of its own stationary sawing machine This is time saving and work safety. You can buy a ready-made stationary circular. The cost of small machines starts from 9,000 rubles, more or less decent stationary saws are sold in the price range from 30 to 100 thousand.
Despite the apparent complexity of the design, any craftsman with elementary locksmith skills can make a homemade circular saw. Moreover, during the design process it is possible to add functions that are not provided by the manufacturer.
What is a circular saw for?
Before starting work, it is necessary to determine the main tasks of the sawing machine. If you just need to cut firewood for the winter, or do basic carpentry work like making a fence, a sturdy table with a slot for a saw blade is enough. These options are popular in countryside.
 Circular for working with logs
 Of course, there can be no question of any safety and functionality when using such a device.
In some of these "models" there is a shaft for fixing the knives of a planer or jointer. As a rule, a bed is cooked from a corner or a channel, an electric motor is fixed on it from a decommissioned factory ventilation, and with the help of a pulley, the torque is transmitted to the disk. It makes no sense to describe in detail the manufacturing technology of such a machine.
Another thing is if you want to do carpentry work. In this case, you need a coordinate table with guides that are fixed at different angles. Since such a stationary saw can work with small workpieces, it is necessary to take care of the safety of the operator. It is desirable to provide for the adjustment of the rotation speed and the possibility of easy change of discs with different diameters.
 Circular on the motor from the washing machine
 Be sure to install a protective cover over the disk, and cover the rotating parts of the drive with covers. The starting device is equipped with an emergency switch, and the stop button is placed in an accessible place and is made large.
Don't miss in an accident
How to make a circular, keeping a balance between economy, functionality and safety
Bed. The frame can be made from a metal corner (channel) purchased from scrap metal collectors. If you have the funds, contact the metal rolling warehouse. Legs can be made from old water pipes by connecting them with corners.
IMPORTANT! Usage bolted connections is prohibited, because vibration will cause such a mount to unwind.
Electricity must be used. Be sure to reinforce the corner joints with a jib. The upper part of the frame (on which the table will rest) and the podium for the electric motor are made from a corner with a side of at least 50 mm. If the machine is equipped with wheels for movement, they must be with steel rims and have locks. The higher the mass of the bed, the more stable the machine will be, and the safer the work will be.
Table. The working surface is made of steel, duralumin or silumin sheet. It is permissible to use textolite, plexiglass or moisture-resistant plywood. Galvanized sheet is stuffed over plywood. The main condition is that the material should not crack from vibrations, have smooth surface and avoid deflection under a weight of at least 50 kg. If the countertop cracks or warps, the circular disc will jam.
This will lead to injury and damage to the workpiece. The use of popular OSB and chipboard materials is undesirable. These materials are unstable to vibrations, and can collapse at the most crucial moment.
There are two options for making a working groove for a circular disc. You can cut a groove or place the two halves of the countertop at a distance from each other. The disc should protrude above the table by no more than 1/3 of the diameter.
For any work, from sawing firewood to carpentry, a reliable side stop is needed. It can be a metal corner or a solid wood bar. To adjust the working gap, you can provide parallel grooves on the tabletop or simply fix the stop with clamps.
IMPORTANT! The side stop must be parallel to the plane of the disc. The slightest deviation will lead to jamming.
Engine. It is impossible to install the electric motor "by eye". Power needs to be calculated. For a disc with a diameter of 350 mm, a 1 kW motor is required, for a diameter of 170 mm, 500 W is enough. A good option is a motor from an old washing machine.
It is designed for continuous operation with medium load. If you plan to work with a disc larger than 350 mm, you can use a power plant from used industrial ventilation. Large electric motors, as a rule, are mounted on dampers (shock absorbers) that prevent unnecessary vibrations.
For a stationary saw, this is unacceptable, since a belt or gear drive will not provide permanent mesh. Therefore, the engine is fixed on a rigid and solid foundation. To adjust the tension of the belt pulley, it is possible to move the motor.
Drive unit. Best Option- V-belt. You can use a V-ribbed drive belt complete with pulleys from a car engine. The belt drive guarantees a certain safety in the event of a jammed disc (for example, a nail in the workpiece). Unlike a rigid gear train, the belt will slip on the pulley, preventing the circular disc from breaking.
If the electric motor does not have a speed controller, you can make replacement pulleys different diameter. This will make it possible to use discs of all types, for various working speeds.
Shaft. Perhaps the most important part of a homemade circular saw. It is unsafe to engage in handicraft production from a piece of pipe, so it is better to order it from a good turner or buy it ready-made. The same goes for mounting bearings. To save money, you can use hub kits from the car.
Bearings must be protected from dust; for this, a gasket casing is installed in the grooves between the bearing races. The shaft may have slots with attachments for planer knives. In this case, it must be balanced. It can also be equipped with cutter mounts. Then the machine will be able to produce paneled doors and cornices of complex shape.
Electrical part. The starting device must match the power of the electric motor. The safest option is push-button, with thermal protection for overcurrent. In this case, when the disc is jammed, automatic shutdown is possible. The switchboard is mounted on a dielectric material, the wiring is reliably isolated from the metal frame. The shutdown button is located in an accessible place, it should be pressed without effort.
Often these machines are stored on the street. Therefore, the electrical part must be protected from direct moisture. When designing a homemade circular saw, it is necessary to provide for the possibility of its repair, maintenance, replacement of worn parts.
Moving parts must be lubricated. Before practical work drawings are made in which every little thing is provided. Any manufacturing error entails the purchase of a new material, which will inevitably increase the cost of the structure.
Circular saw from grinder or circular saw
If there is no need to work with massive wooden blanks, you can make a small-sized stationary saw from a finished power tool. Circular Saw. Ready and fairly safe tool. There are two options for stationary use.
You can simply fasten the saw to the bottom of the table so that the blade protrudes above the surface to the required height. The difficulty is that the switch will be inaccessible. Therefore, it is necessary to block it and duplicate the starting device or remove the standard switch from the body of the circular saw. This is effective but not safe.
How to use a circular saw as a circular saw you can see in this video
Another option is a sliding bed. The base is mounted from two parallel metal guides. A frame with rollers and a fixed circular saw is installed on it. The workpiece is stationary, and the circular, moving along the guides on the carriage, makes cuts at the desired angle. This easy-to-make machine can actually do wonders for small workpieces.
Manual circular saw on rails
Circular from the "Bulgarian"
This power tool is in the arsenal of any self-respecting master. Instead of a cutting or grinding disc, you can install a toothed saw blade.
Carefully! Sawing a tree with a metal disc, holding an angle grinder in your hands - FORBIDDEN! This could result in serious injury.
"Bulgarian" must be securely attached to the edge of the table, ensuring that the axis is parallel to the tabletop. Only after this is it allowed to mount a steel toothed disk on the angle grinder.

Just as in the case of a circular saw, it is necessary to consider an external starting device. If the "grinder" is equipped with protection against power failure in the network, you will have to make changes to the design of the switch. If the design is simple, it is enough to install a socket with a switch, and fix the start key of the angle grinder in the “ON” position.
All of the above applies to simple ways processing of wooden blanks, that is, "parallel" and "perpendicular". If it is necessary to perform complex carpentry work, the circular requires refinement.
How to make a woodworking machine from a circular saw
Actually the working part (that is, the disk itself) remains in its place. The main element of a full-fledged machine is a moving coordinate table. The best option- make one half of the tabletop movable so that it moves relative to the rigidly fixed second half and the circular saw.
To do this, in the furniture fittings store, powerful “sleds” for drawers or sliding doors are purchased. The lower part of the slide is attached to the bed, and on the movable upper part, a half of the table is attached. It is important to achieve parallel halves both horizontally and vertically. There should not be any backlash, otherwise the saw will jam.
IMPORTANT! The direction of movement of the sliding table is always parallel to the plane of the saw blade. The required sawing angle is set by the position of the workpiece.
A fixing device for workpieces is installed on the movable tabletop with markings according to the distance from the saw blade and the installation angle. The latch must have maximum freedom to accommodate the workpiece, while at the same time ensuring its secure fastening. You can use clamps.
The workpiece is attached to the movable tabletop at the required angle, the carriage moves, the disc cuts the part at the desired angle. By adjusting the height of the workpiece, you can even cut through grooves. For safety reasons, the fastening of the workpiece must prevent the operator's hands from getting into working area saws.
It is also possible to provide for the deviation of the plane of the circular disk from the vertical. This addition expands the capabilities of the machine and allows you to cut complex configurations. Another option to increase the versatility of a stationary circular saw is a pendulum disc suspension.
Pendulum disk illustration
The engine, drive and disk are mounted on a space frame. One side is hinged on the bottom of the table, the other side is fixed with a screw height adjuster. The disc can rise above the work table to a predetermined height, providing a choice of workpiece thickness. In combination with the rotation speed adjustment, this option makes it possible to install discs of different diameters on one shaft.
Conclusion A homemade circular saw gives you the opportunity not only to save money, but also to add any number of functions you desire. And the use of improvised materials allows you to bring the cost of the device closer to zero.
How to make a stationary circular saw out of a manual circular saw is described in detail in the appendix, with drawings and several examples of implementation, which can be downloaded here
obinstrumente.ru
Reliable circular saw from a grinder with your own hands
- How to be and what to do?
- Additional aspects and summing up
When working at home, you often have to resort to such extraordinary solutions, like a circular saw from a grinder with your own hands. It is not difficult to remake it, but you must immediately remember that this is unsafe, and can also lead to very bad consequences.

Circular saw design.
How to be and what to do?
Tools and materials:
- drill (screwdriver);
- clamps;
- self-tapping screws;
- bolts with nuts;
- reduction gear.
Regardless of the conversion method, you need to use a low-speed grinder from 4500 to 6000 rpm, because because of the increase in speed, the discs will grind much faster. Along the way, it is worth remembering that the tool that is not a pity is used, because. then you can not restore it back in any case.
In any case, the protective cover is immediately removed, which in the end will be replaced by a simplified counterpart. Then there are several options for the development of events:
Bulgarian device.
- The most benign option. In this case, only clamps and bolts are used for fixing through the countertop. 3 points are fixed with clamps - the main handle, the side handle and the central block is tied up 3 cm from the disk. All clamps are fastened as securely as possible so that there is no free play even by 2 mm, otherwise when working in best case the tool will quickly fail, and at worst, it may unsuccessfully break the disk.
- The most expensive among analogues. It will require the support of a turner-miller. He will carve out a fastener that allows you to connect the countertop and the grinder through the block, which until recently served to mount the protective casing. It is this option that is the most reliable, but it is impossible to quickly carry out the process.
- Most fast option. Using long self-tapping screws for metal, fix the grinder at 3 control points. It is important here not to damage anything from the propulsion systems, so that the assembled circular saw with your own hands will work for a start. Self-tapping screws for confidence are used in pairs for each junction.
- Using self-tapping screws, the angle grinder is attached to the gearbox. This method is distinguished by a very high speed of work, but also damage to 2 expensive tools at once, therefore it is used only in the most catastrophic cases.
- The previous option is rare barbaric, but with a little more time, you can achieve best results. With the help of clamps, 3 control points on the grinder are pulled together and bolted to the gearbox. Thus, 2 tools remain intact, but the elapsed time increases up to 10 times.
When mounting to a countertop or any other surface, you need to provide the master with maximum protection, because. discs often break. There is no need to be particularly smart here, because. sheet steel layer perfectly cope with the task. If there is a desire to achieve maximum reliability, then you can use a 3 mm steel profile, which the wood cutter will not break through even at very high speeds. The protective structure is located at a distance of 5 cm from the disk so that the wood passes freely from above.
A circular saw is one of the universal locksmith tools that is widely used in various sectors of the economy, in metal and woodworking, furniture production and other tasks. The main advantages of disk machines include ease of operation, high speed and cutting accuracy, as well as good maintainability and the ability to quickly replace the cutting disk. If you do not have a professional or household disk machine, you can make it yourself on the basis of a conventional angle grinder (angle grinder) or grinder.
Self-manufacturing a cutting machine based on a grinder justifies itself from an economic point of view: for performing one-time household chores (cutting logs, metal and wooden profiles, timber and corners, as well as ceramic tiles and other materials) it is unprofitable to buy expensive machine tools. With basic skills in working with welding machines and other tools from the locksmith's arsenal, you can easily make a circular, pendulum or chain saw.

We invite you to familiarize yourself with detailed instructions, drawings and tips for making a saw from a grinder with your own hands on a video where you will find many useful practical advice and learn important theoretical information for retooling tools (photo instructions also complement the video for your convenience).
Do-it-yourself circular saw from a grinder
Circular saw designed for simple, but voluminous woodworking work - cutting timber, boards, lining, etc. - can be made quite simply on the basis of an ordinary grinder. It is recommended to take an angle grinder with a disk diameter of at least 125 mm to make the tool universal in use. You can make a circular machine based on an angle grinder according to the drawings and without based on the old kitchen table, as well as a homemade frame structure made of metal or durable wood.
The main requirement for the base is the stability of the structure (it should not loosen) and a flat bed on which the grinder will be fixed. It is necessary to make a slot for the saw blade in it. The bed can be made of wood, chipboard, plywood, sheet metal, plexiglass and other hard materials with a thickness corresponding to the loads that will be placed on the structure during operation.

Since the drive of the circular saw from the grinder will be mounted from the bottom of the table cover, it is better to make the cover hinged with strong hinges. Do not forget also about the guide bar - it can be made from an ordinary metal corner. In this case, the bar can be fixed and sliding. The most important part of making a circular saw is securing it securely to the bed. To do this, you can use strong self-tapping screws, as well as make your own special brackets for fixing the angle grinder on the table top.
Do-it-yourself pendulum saw from a grinder
On the basis of an angle grinder, you can also make a pendulum and assembly cut-off saw for use at home. With its help, you can easily cut the same parts and blanks from wood and metal. The design of such a homemade machine is safer, because. the cutting disc, together with the grinder, is mounted above the countertop. Such a saw from a grinder is made by hand according to the drawings, and also with the experience and skills of a locksmith, it is performed by eye due to the simplicity of its design.

It is quite simple to make a pendulum or mounting saw from a grinder: the design will consist of a frame, a pendulum and a mount for the grinder. The frame can be made from profile pipes, welding a frame from them and installing a platform made of sheet metal with a thickness of 3 mm or more on it. A metal bracket is attached to the platform for attaching a pendulum saw and an emphasis for fixing the workpiece during cutting. The emphasis is best done in the form of a rotating protractor, which will allow you to conveniently set the angle between the part and the saw blade.
It is also necessary to make a hole (cut) in the table top of the machine at the point where the saw blade touches. The pendulum in this design is also made of metal profiles by welding (you can see the drawings below on the page). It must be fixed on one side to the bracket, and on the other side, fix the mount for the angle grinder on it. This T-pendulum must have a movable joint to allow the cutting disc to move during operation. The connection can be made from a rolling bearing and bushing, as well as a rubber band or spring (to return the mechanism to its original position).
The fastening of the grinder to the pendulum is made in the form of a metal console with one or two brackets. To one of them, the angle grinder is attached with bolts, and with the help of the second bracket in the form of a clamp, the grinder is held by the body. A miter saw is made according to a similar principle, a video on the equipment of which you can see here.

Do-it-yourself chain saw from a grinder
The two previous types of home-made machines are good because, if necessary, the grinder can be dismantled and used in the usual way. Unlike them, for the manufacture of a chain saw from a grinder, it will have to be modified forever. You can also make a chain saw from a grinder with your own hands, but compared to the previous two types of machines hand made it is a less practical and less safe device. If you have an old grinder that you do not mind modifying for various cutting jobs, then you can make a chain saw out of it.

Such a saw may be needed on the farm for cutting branches and other wood structures where it is difficult to get with a conventional saw. To make a chain saw, you will need a bar mount bracket, which can be crafted from metal profile. The saw chain is pulled on it and the drive sprocket is wound on. It is advisable for such a design to choose a grinder with an adjustable speed of disk rotation.
Now you know how to do cutting machine pendulum, circular and chain type from an angle grinder.
Any thing made with your own hands will serve much more faithfully than a factory-made product. How to make a circular with your own hands, every master should know, because. this will allow not only to significantly save money, but also to develop a tool for your individual needs.
A homemade circular saw is indispensable for the construction and arrangement country house. With it, you can quickly and easily process large volumes of wood.
Alteration grinder
Tools and materials:
- Bulgarian;
- drill;
- clamps;
- screws or bolts;
- reducer.

The device of a homemade circular saw.
The easiest option is to redo the grinder yourself, but you need to remember that this tool has a fairly high power rating, which can make work difficult. A variant with a disk of 150 or 180 mm is used, and there must be low revolutions (4000-5000 rpm), because. otherwise, the cutter will dull at an unprecedented rate. Usually 3-tooth cutters are used for such alterations.
Options for attaching the grinder to the countertop:
- On clamps. Everything is simple here - 2 clamps tightly attract the tool to the selected work surface. It is quite easy to mount and just as easy to dismantle, moreover, this is the only option when, after dismantling, you can continue to use the tool for its intended purpose.
- For self-tapping screws. Using a drill, 3 holes are made in the body and an additional handle, into which self-tapping screws are then screwed and attached to the work surface. A similar option is possible with bolts and nuts, which is much more reliable.
- Using additional detail. You will have to turn to a locksmith to carve out the connecting piece between the countertop and the grinder. To mount it, you will have to remove the protective cover, but after fastening the tool will not move anywhere. This option is the most reliable, albeit the most inconvenient.

The layout of the elements of a homemade circular saw.
It often happens that there is no low-speed grinder at hand, so you can use a reduction gear. To fasten working tools, screws or bolts are used, depending on the desire to maintain the quality of the tools.
Only in the first indicated case, after reaching the goal, it is possible to dismantle the tool and use it for its intended purpose, and then if it was used as a circular for a very short time. In all other cases this option not even worth considering, tk. the chance of injury during further work is 9 to 10.
Situations are different, so the protective cover is often removed. It is not worth installing it back, but as a replacement it is better to use a steel corner welded to the work surface. Such a move will be much more reliable than factory plastic.
Development based on an asynchronous motor
Tools and materials:
- asynchronous motor;
- adapter;
- reducer;
- support holder;
- bolts with nuts;
- steel corner;
- welding machine.

The power of the electric motor for the circular must be at least 1.5 kW.
This option will be much cheaper and more reliable, but there is much more work to be done. Instead of induction motors collectors cannot be used, because the latter give much greater speed with less power, which is optimal for angle grinders.
To begin with, a motor is selected, the power of which should be at least 1 kW, and preferably 1.5-2 kW, at 4000-4500 rpm. This option gives out a little more power than required, so there will be no difficulties when working with it, and if it lasts for 10 years, then it will be very small.
If you managed to find the right motor, then you need to fix it to the work surface, connect the adapter to the power supply, and screw the support holder for the cutter onto the shaft. But most often, more resourceful analogues are purchased, for which you have to buy a reduction gear. For their mutual fastening, it is enough to use bolts with nuts, because. holes are almost always opposite. Otherwise, you will have to use metal screws and attach the engine in this way.
The working surface, if possible, should be metal, in any case very reliable, because. the power of the resulting tool is quite large, and during operation it may begin to vibrate. As protection, an ordinary corner or profile made of steel is used, which is welded onto the work surface slightly away from the cutter. It is located below the countertop, because. the top cannot be damaged. Particular attention should be paid to the weld, which should not split even from a strong blow.
Even with a perfectly designed tool, an annoying mistake often occurs - its incorrect location. During rotation, the lower edge of the disc should rotate towards the master, while the upper edge, respectively, away from it. If this is not done, then very quickly you will have to make friends with the ophthalmologist, even if you use goggles. And with proper performance, work boots can always be brushed with any brush after work is completed.
Brief afterword
It often happens that a home-made working tool has to be replaced with a factory one. The reasons for this may be different, but the circular remains ownerless, so it needs to be redesigned.
The grinder cannot be restored back, and the motor can rust from idle time, so a miter saw will be the best option.
It is not often needed for housework, but it costs really a lot of money. To make a circular yourself, you do not need a lot of effort and money, but you need a margin of patience. A well-made tool will serve for many more years, and it can be customized directly to the needs of the owner, which is impossible with any factory analogue.
An angle grinder, also known as a grinder, is an indispensable tool in the arsenal of any owner, used for cutting, grinding and polishing metal and wood. You can significantly expand the functionality of this tool using homemade devices which we will discuss in this article.
The publication will consider a home-made frame for the grinder, which makes it possible to turn the angle grinder into a full-fledged cutting machine from the grinder, as well as other simple designs that can be made at home.
1 We modernize the grinder with our own hands - we make a cutting machine
The key advantage of an angle grinder is its mobility - it is a compact tool with an extremely wide range of applications. However, it also has disadvantages, among which are difficulties in processing loose parts, during cutting of which strong vibration appears (which can cause the destruction of the abrasive disk at high speeds) and the difficulty of maintaining the required dimensions of workpieces when cutting several structures of identical length.
The above disadvantages do not appear when the angle grinder is equipped with a cutting machine, which significantly increases the convenience of cutting both wood and metal. The manufacturer of such a machine for a grinder can be done independently, you will need:
- profile square pipe 40*40 and 20*20 mm;
- rectangular profile 40*20;
- metal corner 32 mm;
- bearings with a diameter of 32 mm;
- studs M12;
Assembled homemade machine for a grinder it is a square frame made of a 40 * 40 mm profile, reinforced with cross bars. A rocker is fixed on the frame - a mechanism holding the angle grinder, which allows you to change the position of the tool in a vertical plane.
A homemade stand for a grinder is made according to the following algorithm:
The resulting homemade frame for the grinder is quite simple to operate. You need to install the angle grinder in the seat, position yourself to the right of the tool, put the workpiece on the supporting frame and right hand lower the adjusting lever. The cut itself is made in the space between the transverse jumpers of the frame.
1.1 Circular saw from grinder
Making a circular saw out of an angle grinder is even easier than a cutting machine, since there is no need to perform a large number of welding work. You will need the following materials:
- old table;
- metal corner;
- construction clamps or corner;
- screws, nuts.

We note right away that a low-speed angle grinder is needed here (within 4-5 thousand rpm) or with speed control, since units with high speeds are not suitable for cutting wood - due to rotation, the workpiece will be torn off from the circular saw, which endangers the machine operator. For sawing wood, it makes sense to use an angle grinder with a disc with a diameter of 150 or 180 mm.
1.2 Making a circular grinder - video
2 Shtroborez from grinder
A wall chaser is a tool used to form grooves and furrows on the surface of concrete and wooden structures. A wall chaser is necessary when reinforcing the laying of the foam block, hidden laying of wiring and cables. You can make such a tool with your own hands from an angle grinder, without spending about 5-10 thousand rubles on the purchase of a factory unit.
An angle grinder turns into a full-fledged wall chaser after being equipped with a special casing made of wood or metal, which acts as a limiter that holds the circular saw at the same depth along the entire length of the cut.

It makes sense to make a casing from sheet metal 2-3 mm thick. Decide on the width of the structure - the distance between the two side walls of the casing, it depends on the size of the disks used. After the main part of the structure on the casing, it is necessary to fix the clamp for the installation of the angle grinder. The fastening should be as strong as possible (welded with a continuous seam), since the vibration that occurs during operation can damage the connection.
A mounting socket is welded to the side wall for attaching the handle. As a nest, you can use a piece of pipe with a hole drilled for a stud or bolt. In the upper part of the casing, it is necessary to provide a nozzle for a vacuum cleaner; without it, dust can clog the structure from the inside.

Please note that the angle grinder can only make grooves when two diamond discs are installed. In this case, the first disk is mounted on the rod in the standard way, and the second - through a special spacer nut (the spacer must come with the angle grinder, it can also be bought separately). The thickness of the nut in this case determines the width of the formed strobe.
Do-it-yourself wall chaser from a grinder - video
2.1 Varieties of disks for angle grinders
In conclusion, a few words about the varieties of discs for grinders. All discs are classified into four main groups - cutting, grinding, sharpening, peeling.
Cutting discs are available in diameters of 115, 125, 150, 180 and 230 mm, their thickness can be 1-3.3 mm, they have Blue colour. The marking indicates the type of abrasive material: A - corundum, C - silicon carbide, AS - electrocorundum. Also, the markings indicate the numbers indicating the graininess - the larger it is, the higher the cutting speed will be and the lower the accuracy. The mounting hole in the cutting discs is reinforced with steel plates, which ensures its strength, since the ring experiences maximum loads during rotation.
For cutting stone materials, special diamond blades are used, which are solid and segmented. The last option is for heavy work- they can cut asphalt, granite, marble. Cutting tiles with an angle grinder can be performed using solid discs, they are focused on working with soft material and differ from segment analogues in the worst natural cooling.
Grinding discs are extremely variable, they are available with different abrasive surfaces - from emery, to sponge and felt (polishing discs). Grinding itself is carried out using special pastes that moisten the treated surface and thereby reduce the amount of dust released.

Roughing discs with metal pile are used to remove old paintwork, scale, cement mortar. There are also diamond roughing discs, which differ from cut-offs in the shape of the edges. Such disks are metal surfaces do not apply, they can only be used on stone and concrete.
It is too expensive to have the entire range of electrical tools at home. For example, a circular at home is rarely required. Sawing boards can be done with a modernized grinder.
A manual circular electric saw from a grinder is obtained by replacing a standard cutting disc with a wood disc.
True, this option is suitable for short cuts of sheet materials or a cut of thin rails. With a long cut length or on thick bars, there is risk of disc warping, jamming it. It will be much easier to hold the saw if the handle is not positioned perpendicular to the axis of the tool, but made a continuation of the body.
Craftsmen also make a manual chain saw from a grinder. True, such a tool is dangerous for the user: the absence of a chain stopper can lead to unpredictable consequences. In addition, the chain is not lubricated, which leads to its rapid wear.
Miter saw
Trimming, that is, a cross-cut of boards or bars at a right angle, is better if you use a special device.

You can also make such a machine from a grinder with your own hands.
- To do this, a grinder with a wood disk is fixed on turn bar perpendicular to the direction of the length of the board so that the plane of the disk is directed strictly vertically. One attachment point should be located in the area of \u200b\u200bthe gearbox, and the second - at the opposite end of the machine.
- The gearbox housing has threaded holes for fastening standard handles. With the help of corners and these holes, the grinder must be attached to the moving part of the machine.
- The back of the case is attached to the board with a clamp. Protective cover The disc can be used from any power tool of a suitable size.
- Closer to the vertical support you need to fix thrust corner. It should be located strictly perpendicular to the plane of the disk, both in vertical and horizontal directions.
The spring at the rear end of the bar is used to return the miter saw to its original position after the end of the cut. The horizontal table must have a transverse groove into which the disk enters when cutting the board. Disc diameter choose, focusing on the width of the boards. So trimming can be done in one go. Most importantly, the inner hole of the disc must match the mount on the axle of the gearbox.
When working on such a machine, it should be borne in mind that the drive power is not intended for a large load. Therefore, the rotating disc should be brought to the surface of the sawn part smoothly, the cut should be made without strong pressure.
Table Circular Saw
Sometimes there is a need to change the width of the board or the thickness of the bar. The best option for such work is a circular saw, especially if there are a lot of boards. For cutting boards of small length (1-2 m), the desktop version of the circular is very useful. It is not necessary to buy such a machine, you can make it yourself from the same grinder.
The design of a circular saw is much more complicated than a miter saw. The contact time of the saw blade with wood is quite long, therefore, the reliability of attaching the grinder body to the frame should be higher.
This is what one of the options for a desktop circular might look like.

The photo shows that the desktop consists of two planes:
- the upper table is designed to advance the workpiece;
- the bottom serves as an emphasis for the grinder.
The disk passes through a groove in the top surface. If the contact angle of the two planes is provided with rotary hinges, then it will be possible to adjust the working height of the saw blade to reduce the area of rubbing surfaces.
On the upper surface of the table, the head of the bolt is clearly visible, with which the grinder is fixed. Protruding bolt limits the width of the processed board. You can deal with this problem by laying another layer of plywood.
Turning the grinder on and off with a key on the case is quite inconvenient. If the key can be fixed in the working position, then it is worth installing a socket with a switch on the outside of the machine.
The stop angle should be as long as possible to prevent the board from deviating from the cutting direction. It is better to fix the corner so that you can change the working distance between it and the disk: then the width of the part to be cut will also change.
Stationary circular
You can use the grinder as a working mechanism in stationary conditions. The bed in this case will have a slightly different design. The stationary option implies the presence of free space and a large amount of work. Therefore, the entire structure can be made more solid, more massive, and, therefore, more reliable.
bed frame can be made from a corner welded joint. Bolted and other types of detachable fasteners lose grip from constant vibration, the structure begins to stagger.

A desktop made of a wide board or thick plywood is attached to the top of the metal frame. The workpiece will move along it. Thrust corner equipped with a movable mount for adjusting the cutting width.
It would be nice to provide for adjusting the height of the table or the removal of the disk above its surface - then it will be possible to cut longitudinal grooves in the board.
On the side of the machine are governing bodies: socket and on-off buttons. In the stationary version, it makes sense to exclude the key on the body of the grinder from the circuit. If there is enough space, a high-power grinder can be used as a drive.
How to make a sawmill from a grinder is shown in this video:
The nuances of using a homemade circular
It should not be overlooked that the grinder, in its main purpose - angle grinder. Therefore, using it as a homemade circular saw, you need to pay attention to the nuances.
- The duration of continuous cutting should not exceed 15-20 minutes to avoid overheating of the motor.
- The standard protection on the disc is in no way suitable for a circular saw. The protective cover can be used from a real circular or made independently.
It should be remembered that the speed of rotation of the grinder can be more than 10,000 rpm - this is several times higher than the speed of woodworking machines. At this speed, the wood begins to smoke. Except bad smell, fire is possible.