How to increase the efficiency of a potbelly stove without the help of a specialist and serious financial investments. We make the most efficient potbelly stove with our own hands Weld a potbelly stove with our own hands drawings
A compact stove for heating a small room, commonly called simply a potbelly stove, will soon celebrate its 100th anniversary. Having appeared in the 1920s, such metal stoves with a chimney became simply irreplaceable during the years of the Great Patriotic War. The potbelly stove does not give up its positions to this day, remaining a necessary attribute of a garage, greenhouse or country house. Such a stove is needed wherever people need to warm up and cook food, despite the lack of central heating.
The potbelly stove has its advantages and disadvantages. The undoubted advantages of such a heating device include:
- energy independence and autonomy;
- cheap fuel in the form of coal, firewood, sawdust, wood chips, peat, used technical oil, diesel fuel, paint waste, etc.;
- fast heating;
- small dimensions;
- installation without a foundation;
- capital is not needed;
- ease of operation;
- low financial costs in the case of making a stove with your own hands.
However, the stove-potbelly stove also has disadvantages:
- required good ventilation in room;
- high fuel consumption;
- the need for constant monitoring of the fuel level;
- quick cooling (however, we will fix this drawback - to increase the efficiency, the stove can be overlaid with bricks).
Note: If you feel the need for such a device, then you have two options - buy a metal stove industrial production or do it yourself.
First, let's talk about purchased potbelly stoves, the cost of which starts at about 4,000 rubles (for example, the Ugolek stove) and rises to 40,000 rubles and more (this cost is typical for stoves with beautiful names "Bavaria", "Baron" and etc.).
With heat exchanger 
In the middle of this price range, for example, potbelly stoves with a water heating circuit and a heat exchanger, an army cast-iron stove, a long-burning potbelly stove of the Klondike type fall into the middle of this price range.

The material for stoves and fireplaces made in workshops is usually stainless steel and cast iron. The standard drawing assumes the presence of a bunker with a firebox door, an ash pan, a chimney pipe. However, it happens that a potbelly stove is equipped with a hob, burners and even an oven. The enterprises also make stoves-heaters, as well as stoves-potbelly stoves, in which, to increase the efficiency, a ceramic or steel casing is installed, which significantly increases heat transfer. If you wish, you can buy a stove-stove stove or just a stove with a gas generator for your home.
Potbelly stove-homemade
Making a potbelly stove with your own hands is easy even without a drawing. Improvised materials are suitable for work, be it gas cylinder, a milk can, a barrel, a piece of pipe or sheet iron lying around in the garage. Having decided what can be put into action, choose for a potbelly stove with your own hands a drawing of a rectangular or circular section of the combustion chamber.
For example, you need to do the heating yourself in country house and you have an unused milk can (for arranging the stove itself), a bent piece of pipe (for creating a chimney) and a piece of metal reinforcement with a diameter of at least 6 mm (for a grate). To make a stove out of all this, it is enough to be friends with the tools, as well as apply a little ingenuity.

The can is installed on its side - this is the basis of our do-it-yourself potbelly stove, its combustion chamber. A rectangular blower is sawn under the neck, the edges are processed with a file. The blower can be left in this form, or you can attach a damper to it, getting a stove with adjustable draft at the exit.
In the upper part of the bottom of the can, you yourself need to make markings for the chimney (it should be 2-3 mm smaller than the diameter of the pipe). We cut a hole and tightly drive a piece of pipe adapted for the chimney into it. Half of the work is done.
Next, we deal with the insides of the potbelly stove. With our own hands we make a grate in the form of a “snake” from a metal rod. We introduce the rod into the neck of the can and position it so that the grate stands horizontally in the future combustion chamber. That's all! If desired, you can put the resulting stove on an iron pallet and a rack of bricks. This will help to avoid heating the floor, as well as minimize the likelihood of a fire.
Note that a similar algorithm of actions can also be applied if you want to have a potbelly stove from a barrel. long burning such stoves cannot boast, but they cope well with the function of quickly heating the room.
The second life of a gas cylinder
It's a good idea for a small oven to reuse containers that can handle a lot of heat. We have already talked about barrels, but how do you like, for example, a potbelly stove from a gas cylinder or even two? These containers are good because they allow you to make a stove for a country house or garage, both vertically and horizontally.
To create such a potbelly stove, you will need the following tools:
- welding machine;
- grinding machine with circles;
- drill with drills;
- brush with metal bristles;
- tape measure and construction pencil for marking;
- hammer, chisel, pliers.
Materials for making a stove with your own hands need the following:
- 1 or 2 gas cylinders;
- Metal sheet for the ash pan and hob (thickness must be at least 3 mm);
- cast-iron doors (old ones are suitable, for example, from a wood-burning stove, or do-it-yourself made from sheet metal);
- chimney pipe;
- thick metal fittings for the manufacture of legs and grate.
Before starting work in a gas cylinder, open the valve and leave it in this state for at least 12 hours so that the container is ventilated. Another way to clean the cylinder is to fill it to the top with water, and then empty it completely.
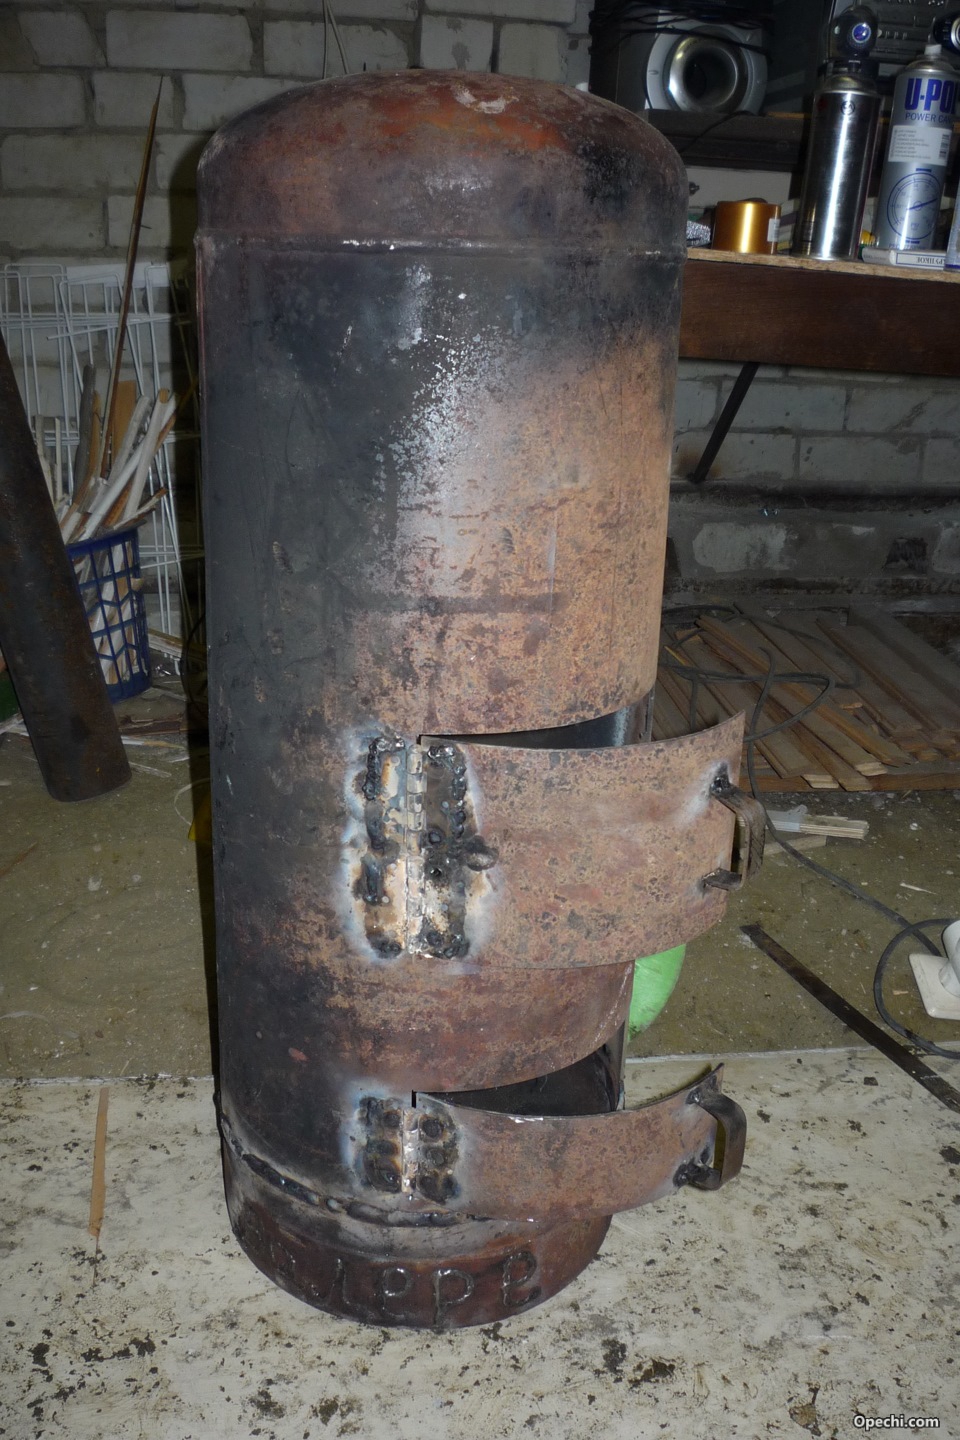
For a vertical potbelly stove, the gas cylinder is placed in a standard position for it, the neck is released and markings are made for the future firebox and blower. The marked pieces are cut out with a grinder. Separately, a grate is made - for this, cut according to the right size the fittings are welded in the places marked from the bottom of the cylinder.
Hinges are welded to the cylinder, on which the doors are hung. Further, hecks are equipped, which are designed to secure and increase the efficiency of the potbelly stove. A smoke exhaust pipe is welded on top or side of the cylinder.
For a horizontal potbelly stove, the cylinder is installed on the "legs" sideways. A square hole is cut out in it for the door and a round one for the chimney pipe. Instead of a grate, a series of holes are drilled at the bottom, and welded below the cylinder rectangular container to collect ash. The stove is almost ready, it remains to hang the door with your own hands and install a chimney.
If desired, the complete set of vertical and horizontal stoves from gas cylinders can be expanded by hob made from a sheet of metal attached to the top.
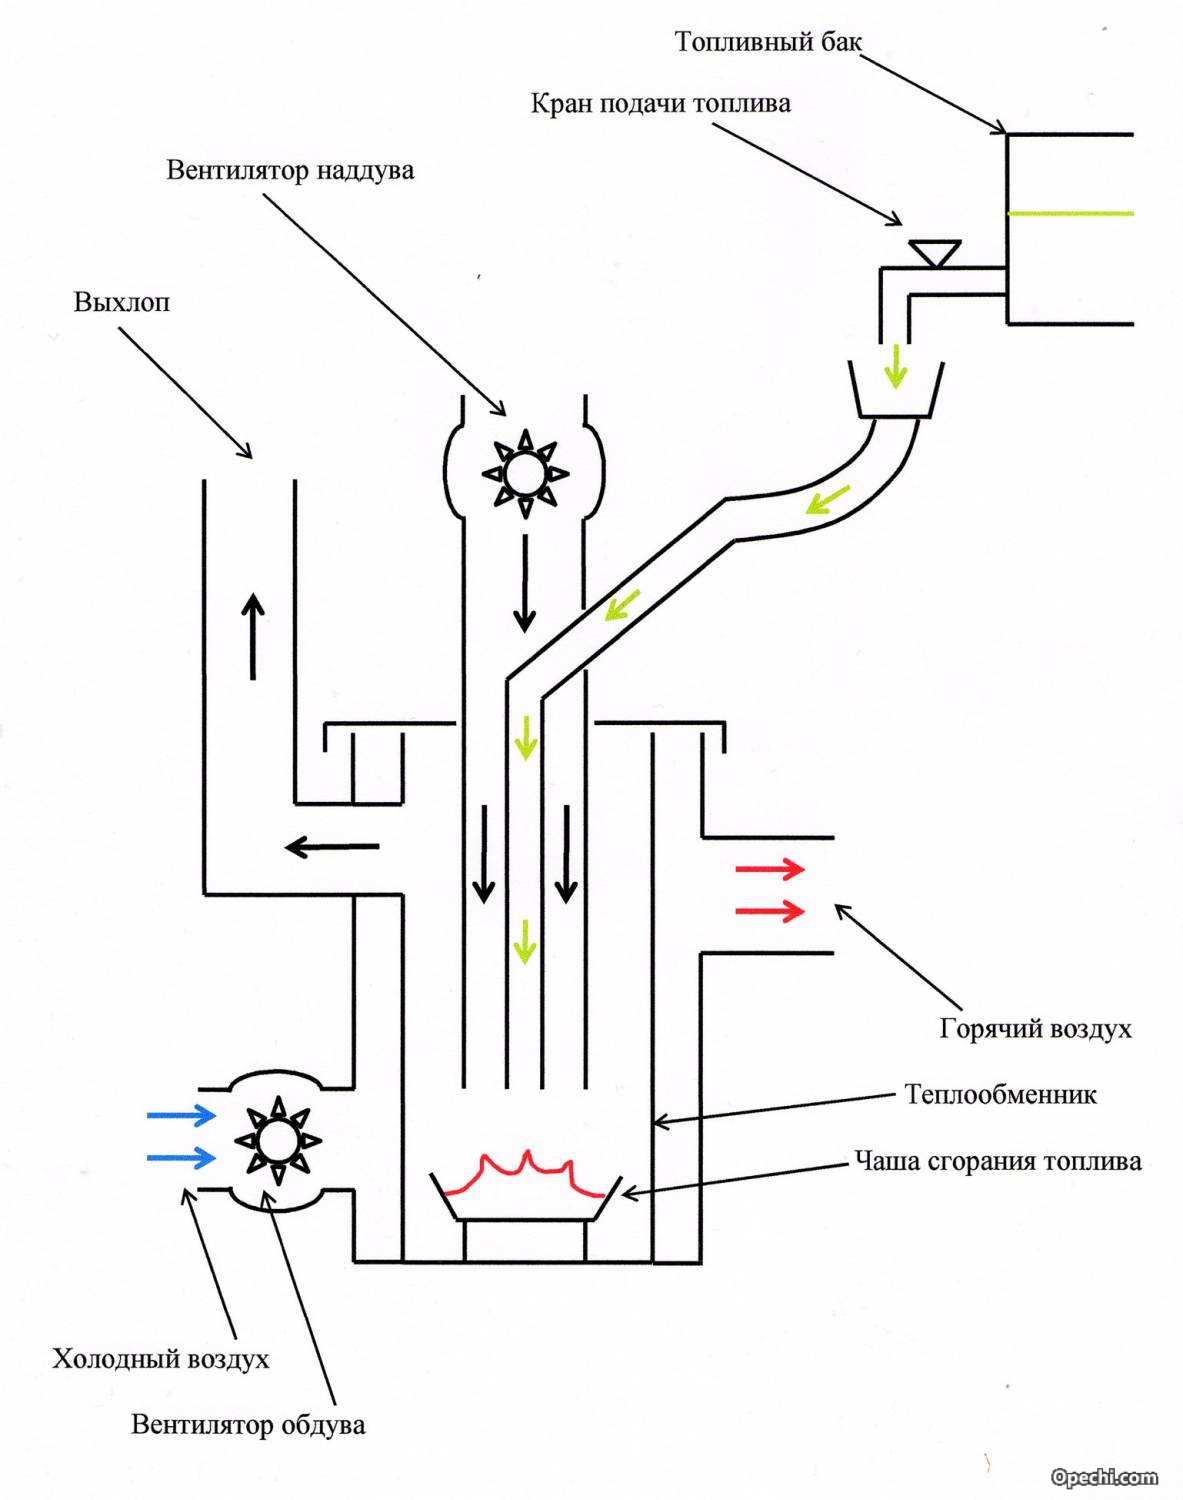
Free fuel
Note: If you want to minimize the cost of fuel for a potbelly stove, consider manufacturing homemade design for heating on automobile oil drained from the car.
A working potbelly stove is especially good for garage owners. The drawing of its design includes two tanks connected by a pipe, as well as a chimney.
To create a furnace for mining, you will need the following materials:
- Metal 4 mm thick for a potbelly stove.
- 6mm thick metal for top tank lid.
- Metal rods for the legs of the stove (3-4 pieces of suitable thickness).
- A pipe made of heat-resistant material for connecting tanks (diameter at least 100 mm, length approx. 400 mm).
- Chimney pipe (length not less than 4 m).
Work on the formation of a potbelly stove for working out is carried out in the following order:
- Legs are welded to the lower tank.
- A lid with holes made for oil and air is welded onto this tank from above.
- At least 50 holes with a diameter of 9 mm are made on the connecting tube.
- Weld the tube to the lid of the lower tank.
- A second tank with a filler neck and a chimney pipe is welded on top.
It is easy to use such a potbelly stove. Oil is poured into the cold machine through the filler neck almost to the top, not reaching the reservoir cap of just a few centimeters. Kindling material in the form of rags or newsprint is also laid there. It remains to set it on fire, and soon you will enjoy the warmth.
As a rule, such stoves "use" from 700 to 2000 ml of used oil per hour. Potbelly stoves at working out allow you to boil water and cook simple food. However, their operation requires the mandatory presence of good ventilation in the room to remove carbon monoxide, as well as compliance with the rules fire safety(do not place combustible materials near the stove, use flammable materials such as gasoline, acetone, etc.). The waste tank must be protected from water ingress. Refueling with oil is carried out only after the stove has completely cooled down.
Sheet metal
How to make a potbelly stove out of metal? This project can be implemented by yourself if you have experience welding work, as well as essential tool. From the materials you will need the following:
- sheet metal (its quantity determines the size of the stove);
- steel corners 5 mm thick;
- metal tube about 30 cm long;
- pipe with a diameter of 180 mm.
To get a potbelly stove, you need to weld a rectangle of metal sheets butted together (without a lid yet). On one side, place a blower and a furnace door. The internal space of the stove is divided into a smoke circulation, a firebox and an ash pan.

In the last two compartments, a grate is installed that will hold solid fuel. To do this, steel corners are welded inside the potbelly stove on the sides at a height of up to 15 cm. A grid welded in advance is laid on them (it can be made of steel strips welded to thick metal bars at a distance of about 5 cm). It is better to make the grate removable, so that later, when it burns out, it would be possible to replace it without any problems. In addition, the removable grate design makes it easy to clean the heater.
Let's return to the construction of the stove. In order to increase the efficiency of the potbelly stove, you can make mounts for a removable reflector ( a metal sheet not less than 12 mm thick), which will separate the furnace and smoke circulation. To do this, two metal rods are welded on top. After installing the reflector, you should get a channel for smoke.
Having equipped the inside of the potbelly stove, you can weld the top metal sheet, which will become the cover of the structure. A hole is made in advance in it for fixing the chimney pipe. Further, jumpers are equipped in the stove, delimiting the doors made for the ash pan, reflector and grate. As a rule, a small door is equipped under the ash pan, but two steel doors are made to the full width of the stove, so that it is convenient to get the reflector and grate.
The next step is to weld latches and legs to the structure (metal tubes with a diameter of up to 3 cm and a length of 10 cm are suitable for them), as well as chimney pipes from a curved pipe with a diameter of about 18 cm (note that the chimney is placed on a 20 cm sleeve ). The sheet metal potbelly stove is ready.
warm brick
A potbelly stove on wood, coal and other types of fuel can significantly increase its efficiency. To do this, it is enough to build a screen of baked clay bricks around it with your own hands. If you look closely at the drawings of such a mini-building, you can see that the bricks are laid at a small distance from the walls of the stove (about 10-15 cm), and if desired, around the chimney.

Bricks need a foundation. Do you want the masonry to last a long time? Then pour the base at a time to form a monolith. The material for the foundation is better to take concrete, which should be reinforced with steel reinforcement with your own hands. It is desirable to make a reinforcement layer at a distance of approximately 5 cm from the surface of the concrete pad.
Down and up brickwork make holes for ventilation, which will ensure the movement of air (heated masses will go up, cold air flows from below). Ventilation also prolongs the life of the metal walls of the potbelly stove, postponing the moment of their burnout due to cooling by circulating air.
Bricks laid out around the stove accumulate heat, and then give it away for a long time, warming the air in the room even after the potbelly stove goes out. In addition, brickwork additionally protects the objects surrounding the stove from fire.
If desired, the stove can be completely laid out of brick. Such a structure is beneficial in that it will serve long years without additional effort on the part of the owner. However, there are also certain disadvantages. The disadvantages of this option include the following:
- the process of laying out such a stove is quite laborious and is suitable only for those people who have experience in masonry with their own hands;
- a brick potbelly stove is quite expensive, as it requires the use of refractory materials, including special clay for mortar.
In order to get a small stove on wood, it is enough to lay out a cone measuring 2 by 2.5 bricks, 9 bricks high. In the combustion chamber, 2-4 rows are laid out from fireclay bricks. Ordinary clay baked brick is suitable for a chimney, into which you must remember to insert a stainless steel sleeve.
Whatever the way of making a miniature stove or a fireplace-potbelly stove with your own hands, you make them according to a drawing or by eye, the main thing is that at the output you get an effective heater, and in an expanded configuration also hob for cooking food. Look around for suitable materials(barrels, sheet iron, etc.) and forward to your own home-made stove or even a stove-fireplace!
A do-it-yourself potbelly stove is great for heating garages. With its help, it is possible to organize the heating of the dacha, in which they live on short visits, it can act as a temporary heating unit until the main heating is established.
With this design, you can not only heat various premises but also cook food. And one of the main advantages of this stove is that with a great desire, almost every person can properly weld a potbelly stove, doing everything himself and saving on the services of third-party craftsmen.
You can make a potbelly stove with your own hands from almost any improvised metal products. An old milk can, a piece of pipe, a barrel, sheet metal, etc. are suitable for this. A properly made potbelly stove warms up pretty quickly. At the same time, it cools down quickly, but to eliminate this drawback, it is usually enough to insulate the room more thoroughly.
Step-by-step instructions for assembling a potbelly stove from a can
To properly weld a potbelly stove, you must first prepare a suitable drawing. There are drawings of units of rectangular and round section. So, you can make a potbelly stove with your own hands even from an ordinary milk can. A diagram of such a design is shown in Fig. one.

Figure 1. Potbelly stove from a can.
To weld such a potbelly stove with your own hands, you will not need any expensive and hard-to-reach materials and tools. The following will suffice:
- Metal bar with a diameter of 0.6 mm.
- An old milk can.
- Chimney. With a great desire and appropriate skills, you can do it yourself.
- File.
- Chisels.
- Hammer.
Some of the variations discussed below will require the use of a welding machine. If desired, you can do without it. But welding allows you to get more robust design. Any specific dimensions will not be given, because in the case of a potbelly stove, everything is purely individual. Also, the dimensions depend on the capacity you have.
Work begins with the preparation of the blower. To do this, you need to cut a hole in your can slightly below the neck. give it rectangular shape. Finish the edges of the resulting hole with a file. Cut a hole in the bottom of your can so that in the future the chimney pipe enters it quite tightly. To do this is extremely simple:
- First, prepare markings at the bottom of your can, where the chimney will pass in the future. Make the hole diameter approximately 1.5-2 mm smaller than the diameter of the future flue pipe.
- Take a hammer and chisel. Use them to make a hole according to the previously prepared markings.
- Take a file and straighten out the resulting hole. It is most convenient to use a file with a round section for this.
- Push the flue pipe firmly into the hole. If it does not enter, you will still have to work with a file over the hole. The pipe should go in pretty tight.

Figure 2. Potbelly stove from a barrel.
Next, you will need to take a metal rod and bend it into a snake. In the future, the snake will serve as a grate. Bend the finished grate so that later it can be inserted into the neck. Align the inserted grate already inside the container. On this do-it-yourself potbelly stove is ready.
If you wish, you can make a reliable stand for it. And if you make a blower damper, you will get a do-it-yourself potbelly stove with the ability to control draft. The shutter is extremely simple.
Thus, you can make the simplest potbelly stove with your own hands without any problems. This does not require any special materials and tools. You just have to install a homemade stove where you need it and connect the chimney. Such a home-made unit will properly heat the room until you want to replace it with a more advanced system.
A guide to making a potbelly stove from a pipe
This option will require the use of welding. Such a potbelly stove is going to do it yourself from a cut metal pipe. The scheme of the unit is shown in fig. 2.
If desired, it can also be made from an old barrel. Everything is done in a similar way. First you need to take the reinforcement, make a grate out of it and weld it to the body. The diagram above shows that this potbelly stove is equipped with two doors for the combustion chamber and the blower with its own hands. Such a stove can be used not only for quick and high-quality heating of the room, but also for cooking.

Figure 3. Brick screen.
It is very fast warming up that is one of the key benefits such ovens. However, their main drawback follows from this - they cool down rather quickly. Metal is not the best heat accumulator. However, you can easily eliminate this shortcoming. You just need to overlay the potbelly stove with bricks with your own hands. This material, unlike metal, accumulates heat very well and retains it for a long time.
The only drawback of the design is that it will take a long time to warm up the room. But you can easily get rid of this disadvantage. You just need to create a special brick screen with ventilation holes. Such systems are used in baths. You can get acquainted with the scheme of such a brick screen in fig. 3.
The diagram above shows that the brick screen is installed at a certain distance from the stove body. This is not a random and reasonable decision. This design provides the most efficient and rational use of heat generated by the furnace unit.
Screen installation guide
Having correctly made a brick screen, you will save your home-made potbelly stove from the lack of rapid cooling. During operation, the stove will release heat, it will heat the brick, and the brick, as you know, is able to accumulate heat and keep it for a long time. As a result, you will already turn off the stove, and the room will be warm for quite some time.

Figure 4. Potbelly stove with chimneys.
Masonry should be erected at a distance of about 10-15 cm from the walls of the potbelly stove. Above and below the masonry should be ventilation holes. Air will circulate inside the brick screen. Warm will be discharged into a heated room, and cold - to cool the walls of the furnace, protecting them from rapid burnout.
Sometimes a brick is laid out around the potbelly stove in a checkerboard pattern or without a gap. This approach is absolutely wrong, forget about it. If you do the masonry without a gap, then the efficiency of heating the room will decrease significantly, and excess heat will literally fly away into the pipe. The chess order is bad because, if it is present, the air cannot circulate normally. The area of bricks is much less than solid.
As a result, it will cool down very quickly. The heat from the potbelly stove will simply pass through the masonry, as if through a sieve. Heat loss in such a situation is 50% or more. The room, of course, heats up pretty quickly. But it will also cool down at a very high speed. This method is well suited for new buildings in which there is no main heating yet, but the room needs to be warmed up. In finished buildings, it is better to refrain from it.
If there is no money at all, then you can not buy a brick, but even use broken products. But this option will fit only for temporary use.
Improved design of a homemade potbelly stove

If you wish, you can make a potbelly stove of a more complex design, using metal boxes or sheet iron for this. Get a good unit of rectangular shape. The diagram of a rectangular stove is shown in fig. four.
This design assumes the presence of smoke circulation. Thanks to this solution, fuel consumption is significantly reduced. Draft control doors can be installed. This will save even more fuel. Dampers and smoke circulations provide the most efficient operation of the potbelly stove and allow significant savings on fuel.
Thus, the historical name of this furnace has absolutely nothing to do with reality, since there is simply no excessive fuel consumption during operation.
The name "potbelly stove" was assigned to this beautiful stove only because of a misinterpretation.

It is important to be able not only to cook a potbelly stove correctly, but also to know the features of its installation and operation.
If the walls of the house are made of wood or panels, then the stove should be installed no closer than 1 m to them. The rules for the safe operation of such units provide for the mandatory installation of a smoke exhaust pipe. It should consist of one section.
If necessary, you can, of course, assemble the pipe from more than one section. But here it is important to follow the rule according to which one section of the structure must fit tightly into another. In this case, the lower must be entered into the upper. If the pipe has to be led through a wall, a thermal barrier must be installed at the passage point. It is usually made of brick. It is better not to use concrete. With constant temperature changes, it will crumble pretty quickly.
If you wish, you can buy or make additional fuel storage accessories. For safety reasons, they must be installed at a certain distance from the stove. A modern unit can not only warm up the room with high quality in just 15 minutes, but will also become an excellent interior decoration. Successful work!
To create this option, the following types of material are needed:
- metal sheet, several pieces, 5 mm thick. From them we will make all the details, blanks.
- Pipes for making some structural elements.
- Chimney pipe.
Process of creation
In the drawing below of a potbelly stove, all the necessary details are presented, indicating their dimensions.
So, we will divide all the work on creating a potbelly stove using mining as a raw material into successive steps:
- We mark all the necessary details on a sheet of metal, after which we cut them out using a grinding machine. The resulting blanks need to clean the edges well.
- We take a pipe of the required length, and drill in it round holes. In the future, with the help of this pipe, the upper and lower containers of the stove will be connected.
- We take the upper tank and cut an opening of the required size from above. This opening will not be located in the center, but will shift to the left of it. We prepare this hole for the chimney.
From the bottom side, cut out the opening, shifting it to the right. It will serve as an inlet for the connecting pipe. - We weld two circles to the part of the pipe, which determines the thickness of the upper container.
- We will do the same with the bottom of the stove. But now we will cut the opening for the incoming connecting pipe in the center of the tank. In addition, you need to cut another hole - a neck through which we will fill the furnace with fuel. On this hole we provide for the presence of a sliding cover.
- We weld 3-4 legs on the back of the lower tank. This will provide stability.
- To give rigidity to the structure, to strengthen it, we connect both tanks to each other using metal brackets.
- The main working moments are completed, it's time to think about beauty. We carefully clean the welds, and then paint the stove using heat-resistant paint. Painting the stove will also help protect it from premature rusting.
- The last step is the installation of the chimney.
Principle of operation
The operation of this type of potbelly stove can be described as follows: pour used oil into the lower container through the neck. Next, using a torch or paper, set fire to the fuel through the opening. As soon as the raw oil flares up in the tank, close the hole with a sliding lid.
The combustion process is enhanced by air entering the connecting pipe through the holes made. The air warms up and rises through the pipe to the upper part of the structure, while heating the surface of the container so that it is easy to warm the kettle on it. A big plus of such a model of a potbelly stove is that there will be no unpleasant situations with a lack of fuel, since motorists always have used oil in the garage.
Why it is impossible to extinguish boiling oil, fat, paraffin with water. If you use the stove for working out, then you must have a fire extinguisher and sand.
Model No. 2 - stove-stove from a metal barrel or pipe
For this design, we take metal barrel or a pipe with a certain diameter. A great option for a cottage in the country, and if you still assemble it beautifully, ennoble it, it will look quite good in a residential area, while also heating it perfectly.
Step-by-step execution instructions:
- We take a container for the stove and mark two rectangles. These will be the entrances for the firebox and the ash pan. Cut out these holes.
- We do not throw away the cut rectangles, as they will serve as material for the doors. To do this, each door is brought to the required size, for which it is framed with metal strips. Next, install the handle-latch.
- Inside the container (barrels, pipes), stepping back 10 cm from the firebox door, we attach the corner brackets. We will then place a grate on them.
- You can buy a grate ready-made, or you can do it yourself by welding it from reinforcing bars.
- If a pipe was taken as the basis, now its bottom and upper part should be welded.
- To give stability, lifting above the floor to the bottom of the container, we weld several legs.
- In the upper part of the tank we prepare an opening for the chimney, where we then weld it.
- We fix the hinges and hang the doors on them. We mark and fix the hook under the lock.
- An important role is played appearance, so you should clean the surface, seams. Coating the stove with heat-resistant paint will allow our design to compete with the factory model.
- When the furnace structure is fully assembled, it is necessary to connect it to the chimney, which we bring out to the street.
This type of potbelly stove is a good option for space heating, provided there is enough space, since the stove is quite big size. But another plus is its capacious top panel, on which you can install both a kettle and a frying pan.
Model No. 3 - a potbelly stove from a gas cylinder
The gas cylinder has an almost perfect, ready-made shape for a furnace design. A cylinder stove is well suited for heating a garage and country house.
Consider how you can build a furnace from a cylinder:
- Let's start by cutting off the top of the cylinder, where the valve was located, and weld a plug here.
- Next, cut a square opening at the bottom of the balloon. This will be the entrance to the firebox. We will not throw away the cut off part, since we will make a door out of it. It is only necessary to scald this part, bringing it to the desired size.
- We weld the hinges, install the door, attach the handle-lock to it.
- On the side of the cylinder, which will become the bottom of the structure, we make holes. They will take on the function of the grate.
- We prepare the box, making it from a metal of smaller thickness, and fix it under the holes - a grate. The box will play the role of an ash pan, into which the remains of combustion products fall, and at the same time acting as a blower. You need to attach a door to the ash pan.
- For the furnace design, it remains to make the legs. To do this, use a pipe or a metal corner. By welding we will attach them to the bottom fuel tank.
- In the upper part, on the opposite side of the firebox, we cut an opening in the ash pan and weld the chimney pipe.
- If desired, a cooking panel can be built on the upper plane of the stove. This is done simply - a frame of steel reinforcement is welded. Such a panel turns out to be quite roomy, you can put two items at the same time.
Model No. 4 - rectangular potbelly stove
According to many experts, this type is considered the most optimal, aesthetic, compact of all the models of potbelly stoves listed above. This design is perfect for heating a residential area.
Rectangular potbelly stove can be made in two variations:

Main purpose
The main task of a rectangular-type potbelly stove is to heat a room up to 15 square meters in size. m. An ordinary potbelly stove is characterized by rapid heat transfer, but at the same time it cools down very quickly as soon as the firewood burns out. This minus can be partially eliminated by lining the oven with bricks. But this is not an option, since bricks will significantly slow down the rate of heat transfer, and thermal energy will only be kept for a short time.
Furnace modernization
The changes made to the design of the potbelly stove, a different way of supplying fuel, made it possible to improve operational properties. At the same time, its main positive characteristics were preserved: fast heat transfer, small dimensions, ease of installation, arrangement, without additional construction of a foundation, creation of a capital pipe.
What did they do for this? In the fuel tank itself, its upper part, 2 plates were welded in, which form a labyrinth. Thus, the path of passage of gases was increased, which means that they leave more heat in the furnace. Through expansion metal surfaces the heat exchange between the gases and the vessel walls became more efficient.
The fire-fighting components of this model have also been improved: its chimney does not heat up, but remains hot at the same time. The correct position of the pipe head will provide sufficient traction. In this case, the head is placed so as to exclude being in the zone high blood pressure whatever the wind. Therefore, it would be better to install it higher than the roof ridge.
Since there is a reserve of thrust, which is formed due to the temperature of the furnace gases, it is possible to install several additional plates in the furnace - labyrinths. This will greatly increase the efficiency of the furnace device.
Another feature of such a stove is the most dense arrangement of doors on the fuel tank body. This is possible due to the implementation of high-quality straightening and cleaning the doors on emery. In this case, the door handles are made in the form of wedges. They are not just handles, but also hecks that go into the holds.
Furnace operation
The process of using, the operation of the furnace is as follows: work begins with the heating of the furnace with chips, splinters. When there is no draft, the lid is removed from the brewing opening, and burning paper is placed under the pipe, and the lid is put back in place. You can regulate the combustion process by fully or partially opening the ash pan door.
When the required air temperature in the room is reached, you need to put four not very thick logs, 40 cm long, into the stove on the coals and then close the doors well. The lack of oxygen leads to a decrease in the intensity of combustion, which turns into smoldering. Humidity, size, wood species affect the smoldering process, which can last several hours. And all this time the furnace will give off heat to the environment.
In an insulated house, without gaps, even on cold days with sub-zero temperature You can safely spend the night, having such an oven for heating.
As for the danger of carbon monoxide poisoning, this is excluded. The carbon formed during combustion is much lighter than air and furnace gases, so it is drawn out, floats out through the chimney. Moreover, the combustion process is regulated with the help of doors, and not views. Even if the doors are left open, you are only in danger of quickly burning the fuel.
Preparation method
Immediately, we note that you can take your own sizes, based on the material available. We used a sheet of steel 200x450 mm. At the same time, its thickness was 3 mm.
To assemble such a potbelly stove, you can perform the following operations:
- Weld together the walls of the structure.
- Weld the lid on top.
- Set the labyrinth plates, the grate of the grate, attach them using welding. In order to maintain the distance between the plates and the grate, position wooden bars between them. They do not need to be specially removed later - they themselves will burn out during the firebox. Some recommend making a grate for the grate not from rods, but to use a sheet with holes, 20 mm in diameter, for this.
- Make the bottom for the stove.
- Install the flue pipe. It is better to take a steel pipe with thick walls. An important point: the pipe must be all-welded throughout the entire location in the house. If the pipe is straight, then it's easy. When it is necessary to bring the pipe outside through the wall, it is recommended to make a wire template and weld the pipe and turns on it. Outside the house, outside, the pipe can be extended by simply putting one piece of pipe on another.
Why should the pipe be solid indoors, because a bad-smelling condensate appears in the pipe under the influence of furnace gases. It is he who, seeping through loosely adjacent joints, spreads a specific smell.
Fire Safety Rules
To improve operational safety the furnace is installed on refractory material, such as bricks, asbestos-cement board. To protect against falling coals, sparks, the floor near the doors is covered with a metal sheet or tiles are laid.
To protect walls, furniture and other things from ignition, protective screens made of asbestos-cement sheets are attached to the walls of the potbelly stove. In this case, it is possible not to cover the boiler surfaces with heat-resistant material. Screens are mounted on threaded studs or bolts with bushings.
Although the pipe is not as hot as in other models, it is still worth passing it through the wall using a notch. It implies the presence of a pipe in it, maintaining a distance of 20 cm. In this case, the empty space is filled with a mixture of asbestos and liquid clay.
That's all the rules, the implementation of which will ensure safe operation.
Outcome
We have considered the most effective potbelly stove that you can make with your own hands. Unfortunately, there is no clear leader among them. There is an option for every situation.
But still, the most effective potbelly stove can be called a working furnace. In it, the efficiency is maximum, because there is the effect of pyrolysis (burning out of gases).
In second place is a rectangular potbelly stove with an internal labyrinth of gases. This also greatly improves efficiency.
I would like to note that each of the furnaces has great potential for improvements and improvements. There are many on the Internet different options how to increase the efficiency of a potbelly stove. From directing a fan to it, to creating a water circuit. We will cover these points in a separate article.
Conclusion
Each stove has its pros and cons. Each is suitable for certain conditions. But she can serve you for a long time, helping in many household chores, and not just in heating the room. To do this, you just need to think carefully, choose the model that is right for your room.
But if you do not have sufficient skills, then you can always buy a stove. At the local forum in your area there will always be a craftsman with ready-made products or ready to make an oven to order.
In Russia, then the USSR, potbelly stoves were used where there was no central heating: in front-line dugouts and dugouts of the Great Patriotic War, in state institutions of the same time, in heating cars. See a photo of a potbelly stove made by yourself on the website.
Who are the authors of homemade products?
Many Russians are sure that this is only a simple Russian invention. And some are wrong. In the United States, the same homemade products have been used for centuries, being called "fat belly", in Japan - "darums".

The revival of bourgeois women took place in Russia in the second half of the 20th century due to the massive appearance of garages, garden plots, where they were the only means of heating thin-walled buildings.

After the improvement of these mini-ovens - and for cooking: a pot or pan was placed on a stove attached to the top.

Until they were replaced by a centralized supply of methane, gas-balloon stoves or wood-burning bricks. They also came in handy in the 90s of the crisis years due to interruptions in gas and other types of fuel. It's good that at least there was plenty of firewood.

What is attractive bourgeoisie?
Its main feature is the simplicity of the design. Even with many additions to it, the principle of operation of a metal stove remains the same: everything that is at hand burns and heats summer residents.


Although at the same time half of the thermal energy escapes through the direct-flow pipe. But no one writes off even a heating source that has rusted from time to time.

It is easy to make such a temporary stove in a day or two. But first draw up the drawings of the potbelly stove with your own hands. Much of what is stored in the closets of rural houses and dachas goes into action. These are milk and water metal (but not duralumin) cans, barrels from diesel fuel, vegetable oils, pipes, boxes, corners.

Nothing expensive, including a tool - in the villages every owner has it at hand. High-quality assembly using gas or electric welding.

But neighbors who have units will help with this. welding machines ensures greater reliability and rigidity of the assembly. How to make a potbelly stove with your own hands, step-by-step instruction below.

We make a potbelly stove from a steel can
Stock up on a hardened chisel, a hammer, a chimney, a piece of rod with a diameter of 0.6 - 1.0 cm. Prepare an electric drill with a drill one centimeter in diameter. If there is a grinder, you will speed up the assembly twice.


In one part of the cover, at the very bottom, drill 5 - 7 holes for future traction. Bend a long rod with a snake and with legs, at least four. These will be the grates when you insert them into the can.

Straighten the snake inside so that it lies horizontally and firmly just above the holes. Firewood will burn on this “grill”, and through the holes and with the help of a chimney go good air draft. It will be the catalyst for combustion.

For the chimney, fit a piece of water pipe, even used, with a diameter of 7-8 inches. Near the bottom or on the very bottom, strictly perpendicular to the grate, cut through with a chisel or saw through a circle with a grinder.

Insert the pipe into it a few centimeters, and from the outside fix it tightly with a clamp on the bolts or weld it to the can. The can stove is designed for a horizontal position.

Weld legs to it and put it where the potbelly stove will heat the house, garage. This is a very flammable device, so place it on a metal sheet and at least half a meter from wooden structures.


The disadvantage of the stove: you can’t even heat the kettle on it - there’s nothing to put on. And yet it will be an effective potbelly stove with your own hands, and read about the improvements below.


barrel stove
She will correct the situation, and even cook borscht and fry cutlets on this potbelly stove. Suitable not only old barrel, but it is better if it is a decommissioned gas cylinder of 50 liters.

His walls are thicker, they will heat up a little longer, but they will also hold more heat. This is the perfect sauna heater. And if you impose sea or river pebbles, other strong stones, then it will be easy to raise steam in the room.

It will stand upright. The blower will also have enough space, and a lot of firewood can be laid in the firebox above it. The exhaust pipe can be made not straight, but with knees for a greater return of thermal energy in the steam room.

If a potbelly stove is needed for a country house, then weld on top metal platform, you will cook food and tea on it.

Preservation of heat in a potbelly stove
To do this, it is necessary to overlay two-thirds of its parts with refractory bricks, placing it on horizontal ribs, leaving free access to the firebox and blower. It will be a heat shield that will keep the generated energy much longer. Holes must be drilled in bricks for better heat transfer.


The second option: a potbelly stove plus a water heater. Scald the gas cylinder from which the stove is made with sheet steel of at least three millimeters thick.


So that in the resulting container can hold at least 30 liters of water. Weld the water inlet and outlet pipes to it, connect the pipelines for heating the adjacent room. For better convection, connect a small circulation pump.

Propane stove
The ideal stove is a do-it-yourself gas stove. She does not need a chimney, because no smoke is released when the gas is burned. Its analogue is a room gas stove with an oven.

It’s not difficult to make - take ... a finished potbelly stove, insert a steel pipeline with a nozzle from the old one into it gas stove. Connect it to a standard gas hose with a reducer from a household gas cylinder.

There is no exact consumption for a potbelly stove, you can navigate the stove for 4 burners. The capacity of the cylinder (for 50 liters) with 21 kg of propane-butane is enough for 34 hours of operation of such a stove.


DIY potbelly stove photo


It is difficult to find a person who would not know what a potbelly stove is. This metal stove saved more than one generation from the cold and remains in demand to this day. This stove also has disadvantages - fast heat transfer. V. Loginov tried to increase the efficiency and improve the design. His initiatives were picked up by N. Pyankov, a reader of the SAM magazine, both models are described in this article.
The SAM magazine for 1996 published a drawing of a modified potbelly stove with increased efficiency. V. Loginov replaced the ash pan door with an adjustable blower and achieved a significant increase in efficiency. Such a potbelly stove can heat up to 10-12 hours on one load of firewood. After publication in the magazine, craftsmen began to improve Loginov's design. So, N. Pyankov left the original dimensions of the furnace, but added a grate to the design, separated the combustion chamber with two metal plates, to increase the path of burning gases.
Collapse
Device and principle of operation
What is the difference between Loginov's Potbelly stove from other metal stoves? The bottom line is the L-shaped blower. The ash pan door is replaced with pipes welded perpendicularly. The edge of the horizontal pipe is tightly welded, and the edge of the vertical pipe is threaded for a plug. Holes are made on the thread - by screwing the plug, you can reduce the flow of air, thereby regulating the combustion process.
Loginov's original potbelly stove
It is important to make a plug with a little play, so the expansion of the metal when heated will not cause problems. A screen is welded on the sides and back on the stiffening ribs to increase efficiency. Without such screens, it is extremely uncomfortable to be near the stove - the temperature is too high and fraught with burns. The firebox door is also threaded. A 200mm pipe serves as the firebox opening, and a plug with a handle with a diameter of 220mm is screwed onto this pipe.
You can see more details about Loginov's potbelly stove in this video:
Modification
Model N. Pyankova differs by the presence of an additional combustion chamber. Unlike more complex structures slow combustion ovens, Pyankov's potbelly stove is made even faster, the model proposed by Loginov. It is enough to weld steel sheets 140-160 mm long to the rear and front walls of the furnace at different distances from the top. The distance between sheets should be 80mm. The grate is installed 80mm from the bottom. Loginov's firebox door, Pyankov transferred to the upper part of the furnace and began to use it as a hob.
It will not be difficult for a good master to evaluate all the advantages and disadvantages of two drawings. If desired, you can make a new model of a potbelly stove using only these two developments, changing the rectangular shape to a round one.

An example of a homemade design (on this photo modernized Pyankov oven), but there is practically no difference in the manufacturing process.
Scheme and drawing
Loginov's drawing is quite understandable and accurate. In the presence of necessary materials recreating the design is not difficult. Here is the schematic (sorry for the quality):

Scheme of Loginov's potbelly stove
For comparison, it is worth mentioning the Pyankov oven. This is the same rectangular potbelly stove, but supplemented with a grate and an additional combustion chamber. It is impossible to regulate combustion in this model, the author did not use Loginov's blower.

Scheme of the Pyankov furnace
Dimensions
The dimensions of the potbelly stove are very compact. Combustion chamber dimensions without heat shields:
- width 250mm;
- height (without legs) 400mm;
- depth 450mm.
When calculating the final dimensions, 40-50mm must be added to the depth and width. This is the thickness of the stiffeners with a sheet of metal. The height of the legs is chosen at will, use a metal corner. Pyankov in his modification increased the height by 50mm and reduced the width by 50mm. This is clearly seen in the diagram.
Advantages and disadvantages
The Loginov stove has its advantages and disadvantages:
Advantages
- Increased efficiency. One load of fuel is able to heat the room for 10-12 hours, which is a very good indicator for a potbelly stove.
- The ability to adjust the intensity of combustion. By screwing the blower plug, it is easy to put out or kindle the fire, and the ash does not spill out onto the floor.
- Fire safety. The design is completely closed, with the exception of small holes in the blower. Smoldering embers will not fall out of the ash pan, there are no sparks, the door is tightly screwed.
- Easy to manufacture. No additional chambers and complex details, rectangular shape.
- Fuel availability. Firewood can be easily found everywhere, unlike a gas cylinder or gasoline.
Flaws:
- Hard to clean. The lack of an ash pan door makes it difficult to clean the stove from cinders. For these purposes, it must be tilted and crushed through the blower.
How to make Loginov's potbelly stove with your own hands?
Making Loginov's potbelly stove does not require special tools or materials. The master must be able to weld, cut and rivet metal, strictly adhere to the scheme.
Tools
When working with metal, you will need the following tools:
- Bulgarian for cutting metal.
- Welding machine and related protective equipment.
- Gun for metal riveting.
- Tool for cutting threads of different diameters.
- Drill and drill for metal.
materials
Materials for the manufacture of Loginov's potbelly stove:
- Sheets of metal with a thickness of at least 3 mm, with total area 1.35m2.
- Iron bars 45 cm long - 6 pcs.
- Chimney pipe 100mm. The length depends on the height of the room.
- Pipe 80mm and 30mm for blower and outlet.
- Pipe 200 mm long about 10 cm for the firebox door.
- Plug 220mm.
- The metal angle for the legs is about 1.2 meters, depending on the intended height of the structure.
- Rivets 6pcs.
Step-by-step instruction

User manual
The most important operating condition is good quality welding. With the help of chalk coating and kerosene, check for fistulas and defects. Treat the seams of the chimney especially scrupulously. Load firewood into the combustion chamber, light a fire, close the door and regulate the process with a blower. To reduce the intensity of combustion, you need to screw the blower, to put out the fire, just twist it completely.
Heat emanating from metal at a temperature higher than from brick or stone. Always use a thick oven mitt to adjust the blower, and do it carefully and quickly. Clean the oven after it has completely cooled down. In the presence of welding defects, operation is stopped and the defects are corrected. Carbon monoxide can cause death.
According to some reviews, this stove can smoke when you open the firebox door. This is due to a decrease in traction. You can eliminate the defect if you increase the diameter of the chimney pipe to 150mm and reduce its length. Slow burning stoves are popular with fishermen and tourists. Having replaced a thick sheet of metal with light and thin stainless steel chimney pipes, they successfully use Loginov's scheme for winter fishing and tourism. For such furnaces, welding is rarely used.
The price of finished products and BU
Each city has its own workshops where potbelly stoves are made. There you can order a product of any design and metal thickness. Loginov's oven did not go into mass production and it is extremely difficult to buy it ready-made. Industrial production achieves high efficiency by increasing combustion chambers, improving convection.
The finished products have a good appearance, some models have a vintage design, various colors. The price ranges from 3500 rubles to 10500 rubles. Used models are not much cheaper - the minimum price is 2900 rubles. It is necessary to take into account the cost of the chimney, which is not included in the stove.
Conclusion
Loginov's design allows minimizing fuel costs. The model can be modified and improved, it is easy to manufacture. Making a potbelly stove yourself is much cheaper than buying a ready-made one, provided you have basic skills in working with metal. Pyankov's scheme is no worse than Loginov and a little easier to manufacture - no threads or blowing tubes.
For experienced craftsmen, it is possible to turn a potbelly stove into an electric generator. This will require a Peltier element. It converts heat energy into electricity. Integrated heaters heat up and produce 12 volts direct current with a power of 60 watts. This is not enough for a full supply of electricity, but in conditions of winter fishing, army training grounds and summer cottage cooperatives without electrification, it will be very useful.
Loginov's potbelly stove is safer and more efficient in work. Its compact dimensions allow it to be used on any area, and its light weight allows it to be installed even on very flimsy ceilings and joists. The disadvantage of the design in difficult cleaning is that not everyone is able to lift and tilt a heavy metal furnace. One day of work, and in the end your own stove heating with a wide range of applications.
←Previous article Next article →