Drawing of the furnace for the house. Drawings and schemes for laying brick heating furnaces
Most domestic holiday villages do not yet have the opportunity to connect to centralized communications. From the infrastructure it is good if there are paved roads and power lines. In such conditions, the construction of a brick oven for wood-fired cottages will help solve an important problem: it will provide thermal energy for space heating and cooking.
We have selected for you schemes and arrangements of the simplest furnace structures, which a novice master can handle with laying. With our help, home craftsmen will easily master the basics of a difficult, but extremely interesting activity stove-maker. An impeccably built structure will delight both the owner and the household.
Except detailed description technology of laying brick stoves, we provide valuable recommendations on the selection of materials for the construction of units. Significant subtleties and the smallest nuances are scrupulously spelled out in the article. To help independent stove builders, schemes of stove structures, orderly briefing, photo and video guides are attached.
Competent selection of material for a structure subjected to high-temperature exposure is an important part of the work of a trained stove-maker. After all, the unit will be operated in far from simple conditions, while it should not malfunction, crack and collapse.
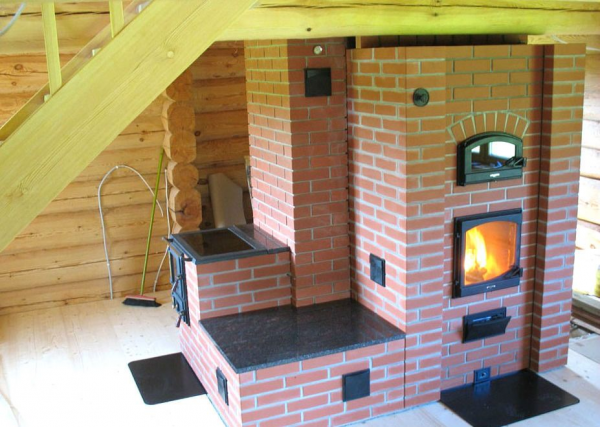
Option # 1 - a stove with a single burner panel
This is an extremely simple and compact design, as if elongated in the vertical direction. In the example, it is equipped with a door with heat-resistant glass, which allows you to monitor the process. If it is not possible to purchase just such a door, a cast-iron variety is quite suitable.
Despite the large assortment of gas boilers, and modern metal models, brick stoves have not lost their relevance and are becoming increasingly popular.
Advantages of a brick oven in the house
First you need to figure out and take stock of why a brick oven is extremely popular and whether it is worth connecting it to a common heating system. In fact, there are many reasons that contributed to this:
Brick ovens keep the heat in the room for a long time
- fast heating;
- long-term maintenance of heat in the room;
- operational safety;
- minimum evaporation, maintaining the level of humidity.
The body of the oven heats up perfectly and maintains the temperature regime for a long time. There is no need to re-fire the oven periodically. And this is the main advantage when conducting comparative characteristics in relation to furnace devices made of cast iron or steel. In practice, this is indeed the case, since metal ovens you have to lay firewood in a maximum of 6 hours, and the brick retains heat and gives it away from itself during the day.

The unique ability to keep warm for a long time ensures efficiency and improves the environment, as less carbon monoxide escapes into the atmosphere.
The optimal mode of fuel combustion ensures the decomposition of carbon dioxide and water into individual molecules. As a result, heat is generated, which the stove absorbs, then accumulates and gradually releases, thereby providing space heating.
The oven does not heat up from the outside, so it becomes safe to some extent during operation. As a result, the resulting radiation becomes soft, which is not produced by metal aggregates during heating.
A brick oven emits a slight evaporation when heated, and when the temperature drops, it absorbs moisture again. This property is called respiration. At the same time, the humidity in the room remains within acceptable limits, its indicator is from 40 to 60%.
On the shortcomings and comparative characteristics

The disadvantages of operation include the fact that you have to wait for a long time when the stove melts and heats the room. Therefore, experienced stove-makers are advised to additionally purchase a steel collector for heating the air in a forced rhythm.
When heating steel furnaces, dust is simultaneously heated, settling on metal surface, as a result, substances harmful to health are formed, which does not occur during the operation of the brick version.
The firebox can be done by hand, which will save money Money, and bricklaying will bring only pleasure.
Types of structures
In total, there are three types of brick-type furnaces for heating, which you need to know about when choosing a design:
- Channel oven-Dutch.
This design has a cast iron stove with which you can cook food. Furnaces are mostly small in size and have proven themselves in country mansions. Of course, the stove also has the functions of heating the house. The oven is easily laid out on its own.

This unique oven can heat large areas. In the design of the masonry provides:
- couch;
- baking cabinet;
- tank for heating water;
- special niche for drying fruit.
Therefore, the oven is popular.

Channel oven-Dutch. The construction received such an interesting name because of the channel sequence. It is easy to manufacture, and during the masonry process, any structural element is brought in. However, the maximum heat transfer is no more than 40%, and home heating is unlikely to be effective.
Everyone decides for himself what kind of furnace needs to be built, depending on the operating conditions and capabilities.

What kind of brick to lay the oven
Before laying the stove, it is important to decide on the choice of brick. Consideration must be given to the resistance of the material to high temperatures and its integrity during heating and cooling. The characteristic of a brick is an important criterion when choosing a material for building a furnace.
Important brick characteristics:
- brand;
- frost resistance.
Brand. When choosing, you should be aware of the brand of material, which indicates the density of the structure. Optimal when choosing will be a brick brand from M75 to M250. The higher the density index, the longer the furnace heats up, but the masonry will also cool down more slowly, thus the heat will be given off longer.

When building a stove inside a bath room, it is best to select a brick with a low index, but grade 100 and higher, otherwise the melting will be long-term. To warm up country houses or cook food, dense brick fit better. But it should be remembered that the density does not confirm the quality of the material. Therefore, it is recommended to learn about the composition of the brick.
Frost resistance. This property is especially important for a chimney located under the roof. The criterion of frost resistance means the ability to accumulate moisture, after the crystallization of water, the material is deformed, and the masonry is gradually destroyed. For hollow masonry bricks, this figure is quite high.
These indicators are important, so you should familiarize yourself with them before making a purchase decision.

Clay materials should be purchased for kiln masonry Brown color. They successfully withstand sudden changes in temperature, and if the stove has not been used for a long time, the masonry will not crack.
You should not make a choice in favor of silicate, cast or pressed bricks - their structure will not withstand the load.
Fireclay bricks are most suitable for laying the furnace, as they can withstand temperatures up to 1350 0 C. It can also be used to build the entire structure, or you can lay out only the inner verst with them.
The use of brick grade SHA 8 yellow color with patches or SHA from 22 to 45 - perfect solution for laying the stove, but not for rooms with increased level humidity, since its operation is possible only at 60% humidity.
In rooms such as a bath, it is best to use the following types of bricks:
- ceramic;
- refractory;
- clinker.
With all of the above, you can achieve an impeccable result.
Step-by-step instruction
Folding the oven for heating with your own hands is not difficult, just read the instructions.
Initially, it is recommended to lay out the rows without the use of mortar to ensure alignment, and then transfer to the mortar. It is possible to make formwork for the accuracy of the work, so there will be less chance of making a mistake, and the masonry will look slimmer.
Further sequence of actions:

- After the third row is laid, the blower door should be placed in the oven.
- To keep everything even, a level is used, and to close the gap, an asbestos cord is used.
- After they start laying out the main part, intended for heating. For this purpose, fireclay or oven bricks are used.
- Before laying a brick oven, the ceramic material is cleaned of dust and dirt and moistened with clean water.
- Fireclay bricks should not be wetted.
- Laying out the mortar can be done manually, since it is difficult to achieve a mortar thickness of 3 mm with a trowel.
- Furnace masonry must be checked. Tapping and separate editing are not allowed.
- If this cannot be done the first time, you can repeat everything, having previously cleaned the brick from the solution.
- After completing several rows of masonry, a grate is installed in the grooves of fireclay bricks to separate the ash chamber.
- The installation of the working furnace door in the furnace is carried out in the same way as the blower.
- The body of the furnace is laid out with brickwork.
- If the cast iron slab is to be below the level of the bricks, then the last row of masonry should be moved outward.
Before performing work, you should consult with a specialist.
Rules and nuances of operation
In order for the operation of the furnace to be truly cost-effective, it is necessary to maintain it in perfect condition.

A small crack that the masonry gave, up to 2 mm, will contribute to heat loss heating system. Approximately 10% of the heat will be lost due to the influx of air masses.
The firewood used must not be damp. It is recommended to dry them in a natural way beforehand, and to produce the workpiece long before the furnace is flooded. Raw firewood will play a negative role, since condensation will accumulate on the brick walls from them, the action of which contributes to the destruction of the material.
Firewood does not need to be stacked tightly to each other, there should be a gap of at least 10 mm between them, and 2 cm should remain free from the top of the stove. The ideal option would be to fill the firebox by 2/3 of the total volume of the chamber.

- If the blower is open during melting, then up to 20% of the heat will enter the pipe, and the heating will not work efficiently.
- With the furnace door open, about half of the heat will be lost.
- For uniform heating, it is recommended to select logs of the same size, about 10 cm thick.
- To better ignite the fire, it is recommended to use wood chips or a torch, and it is forbidden to use flammable liquids for these purposes.
- The view should be closed, then the heat will not go directly into the chimney, and the heating will be at the same level.
To ensure traction, you should focus on the color of the fire. If the color is yellow, then the combustion mode is optimal, if it is white, then there is a lot of air in the flame and most of the heat goes into the chimney. If the fire is red, then this is due to a lack of oxygen.
A technically competent solution for the operation and maintenance of the furnace will ensure long and reliable operation.
How to paint the oven
There is nothing wrong if the oven did not turn out beautiful from the outside. The surface can be painted. Previously, stoves were plastered or covered with two layers of lime. Today it is possible to cover the base with modern paints:

- heat-resistant enamel grade KO on an organosilicon basis;
- acrylic or silicate coloring compounds;
- special heat-resistant varnish, it can be used with pigment.
Preference is still given in favor of KO enamel (85, 174, 813). Moreover, it is intended for painting the brick itself and the metal elements of the furnace. Withstands temperatures up to 600 0 C. Acrylic and silicate coloring bases are much cheaper, but their service life is much shorter.
A good solution would be to use a transparent varnish mixed with gouache of the selected color.
Application is carried out in two layers, sequentially. In this case, the first must be dried before applying the second. Usual brushes and a roller are used. Before painting, it is necessary to treat with a primer specially purchased for this purpose.
In all cases, before performing work, everything should be weighed in order to make the right decision.
Furnace laying masters are advised to adhere to the following rules:

- To install a cast-iron stove on a stove, it is not recommended to use a solution; it is enough to ensure tightness with an asbestos cord.
- After finishing the laying of the furnace, you can begin the construction of a chimney for the heating system.
- The combustion unit is cleaned in the summer, and in the cold period it is recommended to clean the chimney a couple of times.
- In the presence of soot, the smoke outlet is clogged and the efficiency of the furnace will not be as high.
The regulation of the furnace operation is provided by a valve, a door or a view. These elements are subject to constant monitoring, and if necessary, they are replaced.
Before deciding to lay out a heating stove yourself, it is recommended that you familiarize yourself with the technical literature.
What is a brick oven country house? This is an opportunity to heat the house all winter long without using either gas or electricity. Moreover, the feeling of comfort that comes from the stove is hard to confuse with anything. There is nothing better than leaning against its hot wall at the end of the day, enjoying the warmth.
Modern construction technologies allow you to fold the stove in such a way that one good kindling will last you until the morning. In addition, a properly created design retains internal heat for 10-12 hours.
If you keep the fire in the stove a little bit, then you can heat it 24 hours a day with minimal wood consumption. In addition, it is not necessary to put firewood in the firebox. You can use special charcoal. But for this, the stove must be folded in a special way. Using a refractory stone that can withstand high temperatures.
It is also worth noting that furnaces can have many modifications. For example, the structure can be folded in such a way that a fireplace will also be attached to the stove. It will not take up much space, but will give even more warmth and comfort to the house. In addition, one pipe is quite enough to extract smoke from two fireboxes.
Types of ovens
The history of the evolution of furnace structures goes back many centuries. It is not surprising that putting together a heat-efficient and reliable stove is a real art. But with proper preparation and diligence, you can do it yourself, here is a good video instruction:
The oven can be folded using a variety of methods. At the same time, there are a number of parameters that determine the specifics of the future stove:
- Purpose.
- The temperature to which the walls must be heated.
- The time required to heat the walls and the amount of fuel needed for this.
- The design of the chimney.
- heat transfer level.
- Scheme of the movement of gases in the channels.
- The form.
- Material for finishing the outer walls.
- Main material.
Based on all these parameters, you will fold the stove of your dreams. The main thing at the initial stage is to draw up a drawing, with detailed diagrams. In the project, you need to describe in detail all the features of the future design. But before that, you need to decide what kind of stove you need.
Folding the heating stove is the easiest. She performs main function- gives warmth to people and the house. Such designs do not carry any additional functionality, but are reliable and easy to use, for which they have won many sympathies among summer residents.
Naturally, all heating furnaces are classified according to heat transfer, the time required for kindling and the degree of heating of the walls. It is on these parameters that you need to rely first of all, before folding the oven with your own hands.
If you expect to get a stove with moderate heat, you can fold it into one brick. Such furnaces heat up slowly and also cool down slowly. The average temperature of the walls is about 60 degrees.
Heating stoves cannot be called a refinement of architectural thought. But the massive design and simple forms create a sense of monumentality. In addition, if you skillfully lay down a brick in this stove, it can become an excellent element of decor.

Moreover, do not forget about the external decoration. After you fold the stove, you can plaster it and put tiles on top. Firstly, it will protect the structure from destruction, and secondly, it will give it a beautiful and aesthetic appearance.
Important ! Before you fold a brick heating stove with your own hands, keep in mind that it requires an extremely large amount of material.
Typical representatives of the family of heating furnaces include such designs as:
- "Dutch",
- OPT-3,
- triangular oven,
- Grum Grizhimailo oven,
- OTP-11
- Rectangular heating,
- T-shaped.
These ovens are rarely very popular. The fact is that in order to put them together it takes a lot of time and materials, and the functionality turns out to be poor as a result.

Very often in country houses the owners decide to lay down the heating and cooking stove. This structure has a lot of advantages in comparison with a conventional stove. On it, without any problems and even with comfort, you can cook food using pine, birch or yew firewood.
Important ! About 90% of orders from stove-makers are for heating and cooking structures.
The main element of such a furnace is hob which is made from cast iron. The oven is not built in everywhere, since in order to fold it, you need to show considerable skill. The most advanced designs have the following additional features:
- chamber for baking bread,
- couch,
- niche for drying firewood,
- water heating boiler.
In fact, the number of additional functions depends solely on your capabilities and desires. In fact, a real multifunctional combine can be folded from a simple stove, which will become the main decoration of the kitchen. It's not even worth talking about the economy. In addition, food made on such burners always tastes better.
Attention ! The level of efficiency in heating and cooking structures reaches 65%. The heat capacity is about 4 kW.
Such ovens are able to keep heat for a long time. Not only that, they provide powerful traction. The main thing is to put everything together correctly so that the smoke goes directly into the pipe, and not into the room. The most common designs:
- "Swede",
- Volkov oven,
- "Housekeeper",
- "Teplushka",
- "Baby".
As you can see, there is a huge variety of heating and cooking stoves, on which you can cook something tasty without any problems and for the benefit of the family budget.
Designs with heating shields are a cheap solution that includes all the functionality necessary for giving. To fold such a structure, you need a minimum of materials and physical labor. Enough 175 bricks for a full-fledged masonry.
In spite of minimum costs during construction, the efficiency of the furnace is more than high. This type of stove is very popular among elderly summer residents because of its convenience and low cost.
To the side are the stoves for the bath. Usually these are simple heaters, not distinguished by any architectural delights. Their main role is to heat the water in the bath and effectively raise the temperature. Such heating furnaces can store heat for two days.
Advice ! The main advantage of heaters is the ability to fit any room.
Of course, the classification of furnaces is not limited to these types. In fact, there are a huge number of them, which are classified according to many parameters. The most popular systems have just been described.
What kind of brick is better to lay down the oven
It is necessary to distinguish ordinary heat-resistant brick from the stove. Firstly, the latter can withstand temperatures above 1000 degrees. Secondly, if it is sharply cooled, cracks do not form in the structure.
For the construction of stoves, four types of stove bricks are used:
- Quartz. This brick is the result of firing sand and clay.
- Carbon - made up of graphite.
- Fireclay. Best for fireplace. But you can not discount its unique thermal insulation qualities. It can withstand temperatures up to 1600 degrees. At the same time, it does not crack and does not lose its qualities. The only negative is the yellowish tint.
- The main one is used when you need to fold a metallurgical furnace.
In fact, there are no strict rules regarding the choice of materials for masonry during construction. Nevertheless, there are some recommendations that are best followed, the main one concerns fireclay bricks. It must be placed in the hottest places, namely in the area of \u200b\u200bthe firebox and chimney. For all other zones, the grade must be at least M-200.
Attention ! The best brick for the stove is the M-500 brand.
We make a stove with our own hands
Location selection

To fold a good heating structure, you need to choose the right place. The following standards must be taken into account:
- From the smoke channel to wooden structures must be greater than 37 cm.
- The minimum distance of the pipe from the ridge is one and a half meters. The height above the ridge is half a meter.
- If it is 1.5-3 meters from the pipe to the ridge, it can be placed flush with it.
It is best to fold the stove in the middle of the house. This will ensure even distribution of heat and ease of use.
Materials and tools
In addition to brick, you will also need a number of other materials to fold the stove. These include:
- clay,
- sand,
- fittings.
These are the main materials without taking into account the components, but you still need to take care of the vent doors, blower, firebox, and so on.
To put together a good stove, you need to knead the right solution. It is best to use special refractory clay, in extreme cases, you can use red. Grains of sand should be no more than 1 mm. The optimal ratio is achieved empirically. Usually it is 1 to 1 or 1 to 2. Plus 25 percent of the water of the total volume of clay.
Metal objects play a fundamental role in the construction of the furnace. To put together a decent structure, you need doors and half-doors, grates, cast-iron dampers, latches and views. All these elements, if necessary, can be made by hand, but you will need to purchase iron sheets.
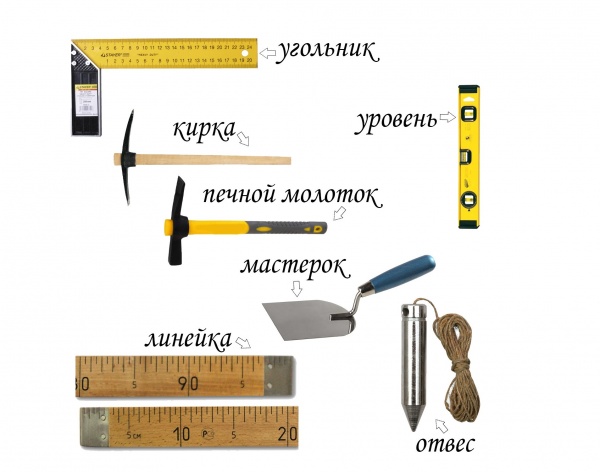
Of course, without good tools, folding the oven will not work, you will need:
- pick hammer specially for the furnace,
- Master OK,
- ruler-rule,
- wash brush,
- roulette,
- plumb line,
- level.
With this simple toolkit, you can fold any oven.
The process of building a stove
For the foundation, a foundation pit is dug, backfilling and a reinforced frame are made. The resulting structure is poured with concrete. Before you fold the stove, make sure you have brick patterns in front of your eyes.

When working, it is very important to keep order. Otherwise, it will not work to fold a high-quality oven. The slightest deviation in the design will lead to the fact that one of the channels will be blocked. The result is more than deplorable. Smoke instead of going outside through the chimney, will go into the room.

The first row is placed along the cord. Each next masonry is checked with a level. Corners are controlled by body kits. After the masonry is completed, furnace equipment is installed, for example, burners. The pipe is brought out at the very end. To find out in more detail, how to fold oven watch the video below:
A brick oven in a private house or country house can always perform several functions, such as heating and cooking. But most often the construction of a brick oven is carried out for one purpose - to constantly maintain heat in the house. In order for the space to be heated efficiently (regardless of its size), and fuel consumption to remain moderate, you should know not only design features brick ovens, but also the correct order of its construction. Also, special attention should be paid to the choice of building material. How to fold a simple brick oven with your own hands can be found further.
Furnaces should be accurately distinguished according to the principle of use, which are divided into:
- Red brick heating stoves. They are used most often, since with their help you can heat up to 100 m 2 of the room. The dimensions of the furnace can be quite large.
heating stove
- Cooking ovens. They are used exclusively for cooking, of course, while spreading a certain heat around.
- Combined brick. Such a brick oven can be used for both cooking and heating. Very convenient, for example, in the country or in a country house.

Combination oven example
- Fireplace options. A brick fireplace stove is not widely used, but some owners are trying to give old stoves exactly the look of a fireplace, saving space. Used for space heating or as decorative option fire source.

Fireplace version of a brick stove
To know the basic structural elements and the dimensions of the red brick stove, for example, you should take the most popular option - the combined one (hob and brick stove for heating a house or cottage).
The structure of the combined brick oven:
- Firebox. This is the place in the Russian stove where the combustion of fuel takes place. Since the temperature in this place is constantly high, the materials should be selected accordingly.
- It blew. A free cavity, which is laid out of brick directly under the firebox. The main function is the accumulation of ash and small unburned residues. Also, air enters the furnace through the blower, which improves the quality of fuel combustion.
- Channels for removing smoke from the furnace. One of the most difficult parts of the oven. Passing through the channels, the combustion products give off part of the heat to the brick, which subsequently heats the room.
- Chimney. Releases exhaust gases into the atmosphere. It also provides the draft necessary for combustion in a Russian stove.
- Tile. It is located in a place above the firebox and only in cooking or combination ovens.
- Holes for cleaning. For greater convenience, they are mounted at the top of the chimney, this place allows you to clean it quickly and efficiently.
The foundation is the foundation of any building.
Like every solid building, a brick stove for a house must have its own foundation. The average weight of a brick oven is 1.5 tons, no more. Therefore, in the ground it will be enough to dig a trench up to 15-20 cm deep, which is approximately equal to one bayonet of a shovel, and you can start building a brick oven with your own hands.
After the trench for the foundation is ready, formwork can be installed in it. The formwork is made from boards of any category with their own hands, the only condition is the absence of traces of decay. The structure should rise 10-15 cm above the ground. According to the rules, the basement of the foundation should be level with the floor, but many homeowners make it a little higher. The formwork walls can be fastened together with knitting needles.
A sand cushion is poured at the bottom of the trench. You don't need to use a lot of sand. A cement masonry mortar can be poured over the embankment, for which the following materials are required:
- 1/3 bucket of cement.
- 8 bayonet shovels of sand.
- Water (add until thick cement mortar). In case of accidental overflow of water, a little cement and sand should be added.
The first layer of cement will be 7-8 cm. Materials such as pieces of reinforcement or pre-welded reinforcing mesh. Next, the second layer is poured and reinforcement is also laid. Reinforcement will allow you to securely connect the entire structure and add strength to it. After pouring, the mortar must be allowed to dry, which can take up to several weeks.
2 layers of waterproofing should be laid on the finished foundation. You don't need to fasten it brickwork qualitatively presses the waterproofing to the foundation.
Laying a brick oven with your own hands, step by step
With knowledge of the sequence of laying a simple brick oven and having the required tools at hand and building materials work may take several days. At the building masters brick oven takes no more than one day.
- The most responsible in the furnace is the first brick row, which is laid with a solid surface, without any cavities or technical holes. To set its level and correct angles, use: a square, building level and (if necessary) a tape measure. After finishing the laying of the first furnace level, it can be checked using a plumb line fixed on the ceiling in the room.

Construction of the first row of brickwork
If you do not follow these recommendations and do not use a measuring tool, then the result may not correspond to the desired one: a row with curved walls, disproportionate corners, uneven surface. Then the furnace will have to be shifted, which will lead to additional waste of funds.

A whole oven brick is not always needed here, sometimes halves are enough. In order to prepare such pieces, you should use a grinder with a diamond wheel. Brick cannot be beaten with a hammer, it is too fragile and the pieces will turn out uneven.


You can see the entire process described above in more detail in the video:
The above sequence shows exactly that you can fold a simple oven (which can withstand rising degrees) or a brick slab with your own hands, and this does not require complex tools or expensive building materials.

Ordering for a brick oven
Preparing a mortar for laying the furnace
Most often, clay mortar is used for laying a brick oven (or firebox), which you can prepare yourself (for example, for cooking oven), it doesn't take much time. The following materials are needed for the firebox: clay, water, sand. Clay, before preparing the mortar for laying the furnace, must be soaked for at least 24 hours. After that, pure water, without mineral impurities, should be added to it. The resulting masonry mortar should be thick enough and resemble sour cream in consistency. The last ingredient is sand, it is added in small portions, constantly stirring the solution.
If the brick oven is laid in accordance with all the rules, then the clay mortar is not suitable for the first row (the junction of the brick and the foundation), as well as for the chimney. This is due to the accumulation of moisture during continuous operation of the furnace. Clay is prone to absorbing water and with sudden changes in temperature gives a crack. Therefore, for these places it is better to use lime mortar.
The procedure for preparing lime mortar for a brick kiln:
- Materials: quicklime, water, sand. Prepare a mass consisting of water and lime in a ratio of 3:1. In this case, it is necessary to add water to the lime and constantly stir the solution until a dough is formed. It is very important to use a protective mask and gloves when working with quicklime.
- After preparing the dough for laying the oven, it should be crushed and sieved with high quality, getting rid of too large particles.
- Sand is added to the sifted solution, the amount of which should be 3 times more lime.
- Adding water will allow you to get a thick mass for laying a stove or a separate firebox. Now you can start building a real Russian stove. Some masters, for greater strength, add a small part of the cement to the mortar.
A high-quality, but more expensive replacement for oven clay and lime mortar is cement mortar. Cement is characterized by increased strength, as well as resistance to temperature extremes, it is most suitable for laying a stove used for heating a room, as well as a chimney or oven.
To prepare such a solution, sifted sand and cement are required. The ratio should be 1 portion of cement to 3 portions of sand. Having prepared a dry mortar (it is enough to mix cement and sand), water can be gradually added to it, but only in small portions. Having achieved the necessary consistency (the solution should become creamy), you can start laying a brick oven for a house or a summer residence. The main disadvantage of cement mortar for creating a do-it-yourself brick oven is that it should be used within one hour after preparation.
And another useful video for beginner stove-makers
1.
2.
3.
4.
5.
Brick heating stoves are still very popular. You can make them yourself if you wish. In order to facilitate the work, drawings of brick ovens have been created. Following the instructions and recommendations on, you can build structures such as in the photo.
Any oven consists of the following parts:
- base (does not connect to the foundation of the building);
- the ash pan ensures the flow of air into the combustion chamber, accumulates ash, which can later be removed through a special door;
- the firebox, separated from the ash pan by a grate (grate or rods), has a door for loading fuel, firewood burns in it;
- a chimney is a pipe through which combustion products are discharged;
- smoke circulations (their labyrinth circuits are needed to absorb heat from hot smoke).
Brick ovens have such characteristics as traction, power, efficiency, type of fuel used. The draft depends not only on the height of the chimney, but also on the section, the quality of the masonry. Ready-made schemes of brick heating stoves save the craftsmen from carrying out complex calculations (more details: "").
Russian oven: drawings of brick ovens
Previously, such designs were found in every home, but now they are already a rarity. Despite this, the Russian stove can successfully fit into the interior of the room. They are also not only a heating device - they also have a hob.For laying the furnace, the following materials will be required:
- solid red brick - 1610 pieces;
- a view for a valve measuring 0.3x0.3 meters - 2 pieces;
- dry clay mortar in dissolved form;
- samovar 14x14 centimeters - 1 piece;
- damper 43x34 centimeters - 1 piece. See also: "".

The pipe of the Russian stove is traditionally laid out of brick, however modern technologies make it possible to install a round structure of good tightness with safe and convenient passage through floors and roofs (read also: "").
To work, you will need the following tools:
- trowel - for laying and leveling the solution;
- pickaxe - a multifunctional hammer with a blade located perpendicular to the axis of the handle. At its other end is a square windshield;
- bubble level for masonry and hydraulic for the first row;
- rule - serves to align the bricks of each row;
- plumb lines - one of them must be permanently attached to the axis of the chimney (overlap), and with the help of the second, the verticality of the corners is checked;
- brush - needed for grouting;
- cord - it is pulled over each row of masonry.

- Cooking chamber. For masonry, a 3/4 ground corner brick with locks is used.
- Under. From the back there is a slope, for the purpose of which the space is covered with sand, on which the brick is laid.
- Covering the bottom. The structure is covered with bricks along bars, corners or sheet blanks.
- Vault with lock. In some cases a central lock is used, in others the last two symmetrical bricks are used.
- Rows to the lower vault. The laying of a brick oven is carried out in the usual way, in the future, a vault template assembled from chipboard or springs cut from wood are installed on top of it.
- Wells. They are tied rows, in which they leave a hole leading to the undercook.
- Underbay. Bricks are laid on foundation mortar, hollow stones are not allowed.
- Code VK. For convenience, the bricks are cut to a wedge shape.
- Covering the channel above the samovar. It is solid, only whole stones are used.
- Holes are reduced above the shestak. The brick is cut in accordance with the drawing.
- Wall alignment. At the same time, the overtube is reduced, the channel of the samovar is laid.
- Installation of a samovar. The structure is closed with a separate cover.
- View installation. To build in the structure, two rows are laid.
- Chimney. The height of the pipe from the bottom to the top must be at least 5 meters. The upper rows form a visor that prevents precipitation from entering the chimney.
Buslaevskaya oven: projects
The design has a built-in hood. The oven is different small size. It is ideal for any private home, as it allows not only to heat the premises, but also to cook food. Despite its compact size, the stove heats spacious rooms well, so there are ready-made ones.Special schemes for laying brick ovens will help you get the job done without complicated calculations.
For installation, you will need the following materials:
- doors - fireboxes (0.2x0.25 meters), VK (0.39x0.5 meters), blower (0.14x0.14 meters);
- refractory - 43 pieces;
- solid brick - 382 pieces;
- oven-cabinet 28x33x50 cm;
- cast iron stove 0.7x0.4 meters with burners (removable rings different diameter);
- valves - steam exhaust (12x13 centimeters) and smoke (12x25 centimeters);
- grate - grate 30x20 centimeters;
- corner - three blanks of equal-shelf rolled products 1 meter long and 45x45 millimeters in size;
- steel - a piece of 0.3x0.28 meters;
- strip - 4 pieces of meter (4 millimeters), 0.25 meters (2 millimeters), 0.35 meters (3 millimeters);
- cast iron stove - 0.4 x0.25 meters; 40x15 centimeters.

- Complete row.
- The door blew.
- Window opening for cleaning.
- The bottom of the oven is laid out from refractory, three sides are lined with iron.
- Installation of the furnace door, grate, under the furnace - refractory, cleaning cover, blower door.
- DS installation.
- Laying refractory on the edge around the LH.
- Laying according to the scheme.
- The upper coating of the oven with clay (1 centimeter) is carried out, the DT overlaps, a stove with burners is attached.
- Installation of smoke circulation with cleaning windows, the plate is not laid.In the future, the brick is placed on the edge.
- Cleaning is covered, channels are created, 25 cm strips are laid.
- The cleanings are finished, the fixing wire is embedded.
- The cap is installed.
- Installation of the ceiling VK, while the hoods remain.
- The stoves are laid out according to the scheme.
- The small stove ends with sheet iron, the laying is carried out according to.
- A cleaning hole of a large stove is laid out, the edges of the side walls of the channels are crimped.
- Protrusion masonry.
- The protrusions are duplicated and the corner is mounted.
- The chimney of the BP overlaps similarly to the 19th row.
- A three-row neck is made, the size of the chimney is reduced to a section of 26x13 centimeters for the top valve.
- A chimney with grooves is created on this and subsequent rows.
Sauna stove ordering: schemes
Projects of brick heating stoves show the location of fireclay and clay bricks in each row. Explanations for the order:1, 2 row. A blower is created (window for air supply), dressing is used.
3. A window is left for the main chimney.
4. A damper, an ash pan door are installed.
5. A grate, a firebox are mounted, and a refractory is subsequently laid on them.
6. The shape of the chimney and firebox is repeated, doors are installed.
7-11 rows. The firebox ends on the 11th row.
12-14 rows. The heater box is installed.
15-16. The mine expands and halves by analogy with 6 next.
18. The cleaning door is installed.
22.23. The shafts are combined, while the edges of the brick are ground off. Then the shaft above the heater is completely blocked, only the chimney remains.

Frame structures can facilitate the installation process. In this case, the brick is present only in the outer walls, and all internal elements are welded from metal. This can speed up the process of laying the furnace. See also: "".
Furnaces often serve as interior decoration, so they are lined with clinker, tiles, tiles. The diagonals in the first row are carefully measured, and a plumb line is hung in the center of the chimney, which is removed on the last rows of the pipe. Also, the diagonals are controlled every 4 rows, and on each row a cord is pulled when laying, which is checked by the rule.
Instead of a cement-sand mortar, it is recommended to use clay, regardless of the type of furnace being built. Ready-made dry mortars significantly save time spent on clay preparation. So that the composition does not dry quickly, the brick must be moistened with water before laying.

Operating costs will be less if there are no rectangular ledges inside the structure. To this end, when creating an overlap (ledge), the stone is tried on without mortar, the line of overlap is outlined, and the excess material is cut off with a grinder. Internal seams during laying are regularly monitored, and excess mortar is removed from time to time. The pipe is cleaned after completion of work.
Brick ovens are laid out from several materials:
- outer cladding;
- masonry bricks (main structure);
- fireclay - refractory material lays out places that are subjected to strong heat (furnace, under);
- brick with high density edges - located inside the furnace.

The furnace seam should be no more than 5 millimeters for clay bricks, and 3 millimeters for refractory. It is forbidden to correct already laid bricks: the element is removed, the mortar is cleaned off, and then a new stone is laid. The foundation of a house or a bath must be removed from the base of the furnace by at least 5 centimeters, taking into account that in order to reduce heaving between them, the soil is replaced with sand. During the construction of a sauna stove with a firebox exiting into the dressing room, masonry must not be embedded in a frame partition, log house. The front wall of the structure is enlarged, joined with wooden elements and the gaps are sealed with non-combustible material (basalt wool is usually used). See also: "".
truss system, overlap and self wooden house are fire hazardous. Therefore, when passing the furnace through these elements, it is necessary to follow the norms of SNiP.
In the ceilings, cuttings of the following types are created:
- brick thickening (material consumption is large, the design does not look too beautiful);
- wooden box with filling from non-combustible materials (expanded clay, sand, basalt wool);
- sandwich of two pipes with internal heat-insulating material.
Drawings of brick ovens in the video with a good example of construction: