Railway track. DIY model railroad How to make rails for a model railroad
For young modellers and enthusiasts who feel sorry for or do not have money for purchased rails, but have time, below we present you an example of a budget modeling railway track.
foundation our road is a stretcher, knocked together from slats and plywood. Its size can be approximately 3000x500x120 mm or more. It depends on the area of the room. The role of ballast is performed wooden blocks on which the sleepers are laid. Homemade rails are attached to the sleepers.
And to make the canvas of your road look like a real one, grease it with liquid carpentry glue and sprinkle it with sand sifted through a fine sieve. When the glue dries, shake off the excess sand. You can do otherwise: paint the stretcher with paint. Of course, you must first putty it, clean it with sandpaper ...
Sleepers can be made from strips of plywood or pine planks 60x10x4 mm. In order not to mess with the manufacture of each sleeper, the work can be simplified. Take a sheet of plywood, mark it according to the size of the sleepers and cut it with a fine-toothed hacksaw, then clean up all the irregularities with a bastard file and sandpaper and paint oil paint or black ink.
Finished sleepers are laid on the canvas - they are glued at a distance of 20-25 mm from each other.

They need a stamp to make them. It is made from two metal rectangular bars of the same section.
On a milling or planing machine, process these bars. On one, mill a groove 7x10 mm in size and two grooves with a diameter of 3 and 4 mm, on the other - the same grooves, but instead of a groove, a protrusion. You get a fixture like a punch and a matrix. The rail head is stamped in the recess (see figure below). For a 1:50 model, a 3.5 mm notch is used, and for a 1:100 model, 2.5 mm.
Let's talk about the sequence of operations. Take a strip of tin (see figure below), draw a center line, fold. Insert a wire with a diameter of 2.5-3 mm inside - for the rail head, crimp it with wire cutters and now lay it in a stamp. Clamp the stamp in a vice, and you will get a rail that is even along the entire length with a good head and neck.
Without removing the rail from the stamp, flare its base with a screwdriver in different directions and level it with a mallet.
Attach the finished rail to the sleepers with carnations. Do this carefully and as accurately as possible. First of all, mark the line of one thread of rails along the entire length of the canvas. To do this, pull the thread exactly at a distance of 15 mm from the edge of the sleepers, reinforcing it on two nails temporarily driven into the first and last sleepers. Lay the rails and nail exactly under this thread. At the same time, they should neither touch it nor pull it to the side.
There is another way. Plan out a rectangular bar measuring 1000x32x10 mm. Lay it in the center of the ballast, secure it with nails and lay rails on both sides of it. You will see how exactly they fit, and the distance between them will be accurate along the entire length - equal to 32 mm between the heads.
It is necessary to connect the rails to each other at the joints with rods that are inserted into the rail heads. Rail joints should be in the middle of the sleepers.
When you make one section of the track, test the locomotive on it and proceed to the construction of the next section.
Fasten the sections together with metal hooks or loops attached to the stretcher.
So, you have built a railway track, laid sleepers, rails. Now you need to install the support masts and pull the contact wire.


Support masts. From a bar with a length of 200 mm and a section of 21 x 21 mm, cut out a support. For the base, take plywood (30 x 30 mm). Drill a hole with a diameter of 10 mm in the center, clean it with sandpaper and fit the bottom of the mast under it.
You can make the suspension on which the contact wire is attached from any wire with a diameter of 2-3 mm. Do not forget to wind the spring as shown in the figure, for this, take a nail with a diameter of 2 mm, clamp it in a vise and wrap a spiral around it with a height of 10-12 mm. The pendant is ready. It is attached to the supporting mast through a bracket and, in addition, for greater strength, it is pulled up with a string - an ordinary thread or thin wire.
insulators there may be plastic beads or small buttons.
contact wire runs along the entire railroad track. It is supported by the support masts that we just told you about, and the support wire. It is fixed above the contact wire and connected to it by wire braces.
To make the model portable, the overhead wires have a break in several places and are connected by connectors - two metal plates: a contact wire is soldered to one, and a support wire to the other. The plates are equipped with a lock - cutouts are made on one, rivets are soldered on the other. Thanks to this, the plates are easily and quickly separated.
You can "green" the finished railway. The material for the "grass" is dry sawdust, painted with gouache in green color. They are sifted through a sieve onto a tablet smeared with carpentry glue, drying oil or oil varnish.
"Trees" are made from a rubber sponge, foam rubber or a bundle of copper wire. The bundle is folded in half and twisted to the distance of the "trunk", and for the "branches" the wire is disconnected. In order for the “tree” to “turn green”, it is dipped in liquid glue, allowed to drain and the “crown” is sprinkled with finely chopped dyed tissue paper.
If you and your child are thinking of making a toy with your own hands, then try building your own railroad. Children love toys with lots of details. A railway assembled with an adult can become a favorite toy. For manufacturing, you will need very few items that can be found in any home. And in the end you will get a unique and bright thing that will delight your child and remind you of the time spent with you. If you don't know how to make a railroad yourself, but want to try, then it's time to learn.
Tools and materials
- Thick cardboard sheets
- Ruler
- simple pencil
- Paper scissors
- Stationery knife
- PVA glue
- Acrylic paints
Step-by-step instruction
There are several ways to make a toy railroad, but it's best to start with the simplest.
- Determine the approximate size of the future railway. The length of the rails will depend on it. The rails need to be cut out of thick cardboard. You can use boxes from shoes, furniture or appliances. Lay a sheet of cardboard on the floor and draw stripes of the chosen length on it. For sure, your railway will have bends, so you will need not only straight lines, but also curved strips for turns. Thus, you can make a ring road, which is much more interesting to play with.
- Paint future rails with gray paint, as it is most similar to metal. choose acrylic paints, as they are not washed off the surface of the paper.
- Prepare your sleepers. To do this, cut a sufficient number of small strips of cardboard. At both ends of the sleepers, you need to mark the points where the rails will be superimposed. Sleepers are best covered with brown or red paint, as they are made of wood.
- Lay out the painted blanks of rails in the correct order and turn them upside down. On this side, you need to glue the prepared sleepers at the same distance from each other.
- Now it's time to move on to making the train. For wagons and a locomotive, it is most convenient to use small cardboard boxes from juice or milk. If there are no such boxes, then you can glue them from pieces of cardboard yourself. For the locomotive, you will need two boxes that need to be glued together so that one box is vertical and the other horizontal.
- The locomotive and wagons are usually painted the same color, but you can use any color and pattern you like. After the paint dries, don't forget to paint the windows.
- Painted wheels must be glued to the wagons, and the wagons themselves must be interconnected with strips of cardboard. The train is now ready to be placed on the railroad.
- To make the toy even more interesting, make cardboard box station or several stations. They can be realistically painted with paints. From the remnants of cardboard, you can cut out the silhouettes of people, trees, houses, roadside poles and paint them with felt-tip pens and paints.
How to assign roles
Now you know how to make a railroad with your child. Let him actively participate in the process. The child can be entrusted with coloring the parts and gluing the parts of the railway together. And it is better to do all operations with scissors and a clerical knife yourself so that the child does not cut himself. If you want to trust your child to cut out some of the details, then give him scissors with rounded ends, designed for small children.
|
How to make a do-it-yourself railroad layout . Toy railroads are inherently associated with childhood. Many of us at a young age once had a plastic or iron prefabricated model railroad. And those who could boast of a foreign-made model were considered lucky. In modern times, the hobby of toy railroads has grown into a major modeling industry. Trees, houses, roads, cars, relief surroundings were added to the main attributes - a track and a locomotive with trailers. And a table with a full-fledged model of the railway, with many details and trifles, is already a real art. Abroad, such products cost from 2 thousand dollars, but in this article we will tell you how to make a full-fledged model of a toy railway with your own hands. |
Table
.
You will need space for the layout. Ideally, this should be a separate table, but you can get by with a small table, or just a fenced-off area on any suitable surface. It all depends on your desire and scope. I recommend starting with a small area, like part of a table, and then, if inspired, make a large layout. It is better to start small than to immediately take on a large amount of work and throw it halfway.
starter kit
.
The thing without which it will not be possible to make a model of the railway is the railway itself. Or rather -, and for him, or just ready-made models of railways.
.
sketch
.
To know what you are moving towards, you need to have a goal in front of your eyes. Make a rough sketch on paper - where everything should be, and what the general look of your layout will be. Surf the Internet, look at the numerous models of railways and take note of what you like -,. You can make a mock station in the Wild West, or you can make a station in the center modern city. But be sure to decide before you get to work. And make markings on the table so as not to suddenly discover that the track goes beyond the boundaries of the table, or that it will cling to a passing train.
.
The mountains
.
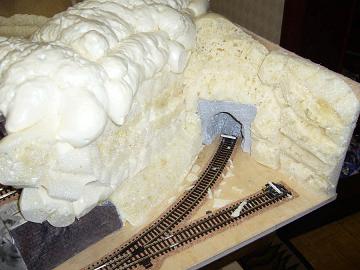
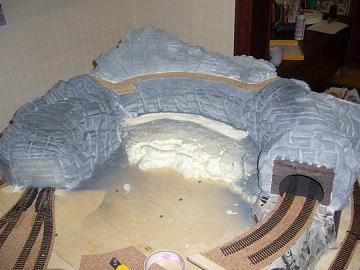
Through which the train will pass, will be the decoration of the layout. To create a small mountain, you will need mounting foam, plywood, a knife, alabaster and sandpaper.
First, think over and, if possible, draw a sketch of the future mountain. Then knock over the rails a small box of plywood or other suitable material. Make sure that the size of the box will allow your train to pass freely through the tunnel. Then start applying foam around the box, with pauses of one and a half to two hours, to allow the layers to dry and not sag under their weight. After you apply the foam of the desired volume, leave it to dry for a day, no less.

In a day, pick up a knife (more convenient - a clerical one), and start picking the mountain - cut off the extra pieces, giving it the shape you intended. Cut out hollows, crevices, try to make it as natural as possible.
Then you will need alabaster. Dilute it with water, and cover the entire mountain with a thin layer up to 3 mm. It dries quickly, so dilute it in small portions. Then again wait a few hours until everything hardens - it is better not to use a hair dryer.
Now you need to paint over the mountain in gray. To do this, buy a can of primer in any auto shop, the color of a gray stone, and you can paint your mountain. Just test the paint on something else first to make sure it's the right color for you.
Next, use sandpaper and rub the mountain in places to remove layers of primer in some places. This will give the mountain a more naturalistic look, so that it is not a uniform color, but a shade from light to dark gray. You can repeat painting and sanding several times until you get something that suits you. You can also paint individual pieces of the mountain white or black for more believability.
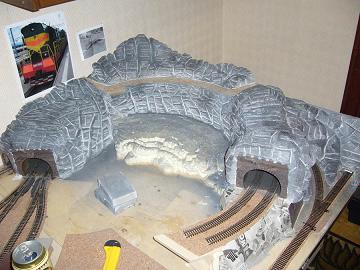
Finally, take green paint and tint the pieces of the mountain also in the color of greenery - this way it will be even more naturalistic. Only the paint should be a believable, "mossy" color.

Your mountain (or slide) is ready. Congratulations, you've already done a lot of work. Next in line are the rest of the relief details.
Here everything depends on your imagination, the size of the free space and the suitable details that you have. Fill in the unoccupied surface of the table - for example, with a dummy, which is sold in stores.
A lot of articles have been written on the topic, but I decided to write my own and below I will explain why ...
I will say right away that until recently I had no experience in building a mock-up of a railway. Searching for the necessary information on the Internet gave little. Some articles “bypassed the basics” and immediately “jumped over to difficulties” such as: “and now we will make mountains” .., or the proposed layouts were super complex: it was immediately suggested to master the Autocad program. In other articles, the emphasis was on some trifles like: “ You will need a hammer...“That’s all the valuable information. All found articles did not meet our goals and objectives. I had to do everything full-time ask and pry in stores and, of course, from lovers.
Family tradition
Let's go back 12 years. In the photo below, in the St. Petersburg communal apartment, I play with my son Alyosha in the railroad, which my father gave me many, many years ago, when I was still in elementary school! 
Yes, you can’t say anything, the quality and reliability of PIKO has been tested by time. After all, almost every weekend my son and I assembled, dismantled, designed ... And when our family moved again, each time a box with a gift from my father was first on the list of things to move. Only we had to leave it ... and again, with my father in the village, it is intact to this day!
Goals and objectives of our future layout
Primary goal: psychomotor development of the child.
That's why number of copies , the beauty (Yes, such that it was impossible to touch with hands) and unnecessary complexity recede into the background. But this does not mean that we should make a “simple circle” and “stupidly drive” a train around this circle ... In other words, we need to make the layout as functional and interesting as possible for the child.
Our tasks:
- development of fine motor skills: coupling and uncoupling of wagons, loading and unloading, construction of various objects on the layout itself and many other small operations;
- development of thinking and problem solving: this is something like a puzzle, for example, you need to remove a wagon from the middle of the train (not just with your hands, of course, but with maneuvers) and leave it on sidings (so as not to interfere) or for loading and unloading. It seems elementary, but believe me, such a task can sometimes “strain” an adult a little;
- child's interaction with other players: for example, a child controls a train, stops the train and asks another player to switch the switch. Or the child drives the train exactly to the place of loading, waits for another player to load the car and then transports this load;
- the acquisition of knowledge: give an idea of various types transport and their interaction. Transportation of various cargoes (for people we will use a passenger car, for bulky cargo - a platform, etc.). “Combined” transportation, for example, we will load something into a container (right inside this container), then transport the container itself and then unload it at the place of arrival.
This list is of course endless...
The foundation
Let's talk very briefly about the basis: rails, locomotive, wagons and power supply.
The most common and convenient scale is H0 or 1:87 (∼ 90-95% of all railway models). Keep in mind that it can be written as the letter "H" and zero (more correctly), but also as the letter "H" and the letter "O". The track width is 16.5 mm. Remember scale "H0» ["ash zero" or "h zero"] - search, ask, buy only this scale!
There is one more detail. As you know, there are straight rails, and there are also curved ones. So, this "degree of curvature" is measured by the radius. Those. if we assemble a circle from curved rails, then we can measure the radius. If you plan to use only a small two-axle locomotive, then there is no problem. But if you use large six-axle (two carts on three axles), then it will not be able to pass with a small radius. It's like a truck with a long trailer can't drive on a road with sharp curves. I will not hammer your head with this, because. different manufacturers may have different markings"curvature". You just need to remember this.
It’s good if you have purchased a ready-made set, and you can assemble from it not just “ a circle" or " ov al ”, and it has arrows, dead ends ... But what if you need to assemble it yourself from scratch? First you need to decide what size the layout will be (see below). Then you need to make a sketch of it on paper. And then the drawing can be made in full size. And if you already have rails, collect them directly on the drawing and outline them. With this huge "picture" you can already walk around and select the missing rails by simply applying them to the drawing! By the way, now there are flexible rails on sale, bend as you like, i.e. you can put one of these instead of 4-6 usual ones, and most importantly, this long rail can be either straight or curved according to your desire, exactly repeating all your fantasies on the drawing!
The simplest and cheapest is analog model of the railway. Everything is simple here: we let the current flow along the rails (minus on one rail, plus on the other) and the locomotive goes, because it has an electric motor. They cut off the current supply - the locomotive stopped, changed the polarity - the locomotive went in the other direction. Recently there has been digital control. In this case, the rails are energized all the time, but the peculiarity is that a command is sent to the locomotive (along the same rails), for example, to turn on the engine, or the light, etc. Each locomotive is assigned its own unique code. If there are two locomotives (even side by side), then you can control one of them, the other will not respond to these commands. In other words, different compositions can be controlled independently. Such a system is much more complicated and its cost is much higher.
For our purposes and goals of simple, old and reliable analog control More than enough with an inexpensive power supply.
Where could I buy
On many sites that describe the construction of the layout, they offer to immediately buy a starter kit. If you don’t peck money and you are too lazy to do something with your own hands, then this is not a problem (they will do everything instead of you, and by the way ... what did you forget here?). It must be borne in mind that a child can break something during the game. In other words, the layout should not be “cheap”, but it should not be overly expensive, so that the child can only look at it. In addition, we do not need only identical cars, we need variety: a platform, a car in which the door opens (for loading), a passenger car, some kind of tank, etc. Therefore, to start, I would advise you to look for used sets, and already supplement them, if necessary, with both new and used objects. In fact such sets are "rolling around" with many. In Montreal, where we live, you can buy them on Marché aux puces. There I bought a starter kit for only $20, compared to the regular price of 100 CAD! Here I also saw a lot good suggestions: kijiji.ca. But be careful, prices are often unreasonably high! Very good prices in the Udisco store. You can also buy online, such as ebay.com, but this is mainly for supplements. By the way, when we lived in St. Petersburg, I saw a lot of things at the Juno market.
DIY railroad layout
You can play on the floor, but the assembly of the railway itself will take from 30 to 40 minutes, after which you will no longer have the strength to play with the child itself. Then the rails will constantly be disconnected somewhere, while the cars will leave them .. It will be necessary to endlessly put everything back! Also, contact will often be lost, you will need to look for where it does not contact. The child will walk, step on the rails, sweep away the objects he built, or even step on the train ... But You'll be crawling on all fours all this time(like me in the photo above). I have already gone through this and it “finished me” ...
Layout size
The layout requirements were as follows:
- so that he can easily rush through the door,
- so that you can put it against the wall (when we are not playing),
- so that during the game you can walk around the layout,
- to make the layout as large as possible,
- so that the child can safely play "like on the table",
- so that we, adults, do not crawl on all fours and that we do not have to make an appointment with a massage therapist after such games.
So, we measured a couple of rooms where it was planned to play the railway, figured it out and came to the conclusion that a size of approximately 1.5x2 meters would do. In order not to complicate the design of the layout, for the time being we decided to simply put it on four stools during the game.
Let's start construction
I bought 8mm plywood. Checking again, I assembled all the rails on it and sawed off to the desired size. 
On the picture at the bottom You see how the future railway is assembled. In the same way, I assembled rails on plywood before as give her right size. The railway should be made as rich and interesting as possible (if possible), and not just a "circle" or "oval". Plan various branches, sidings. Of course, I want “there was more railroad”, but at the edges you need to leave some distance so that the locomotive or wagons do not fall to the floor when derailing. In addition, it is easier for a child to construct and play something on the edge of the layout, he can build different objects there, there may be a road, etc. 
Such a large plywood will deform both due to its gravity and due to the fact that the child will lean on it during the game. And when the plywood is deformed, the rails will deform. In this regard, reinforcement needs to be made on the reverse side. By the way, this reinforcement will also help protect the wires if you want to put any additional electrical objects (like traffic lights, lights or make arrows to switch them remotely). 
I thought for a long time how to cover this whole layout. At first I wanted to just paint with paint, but it would not look very nice. The professionals themselves, who build complex models of the railway, cover everything with PVA glue, and pour special “grass” on top. But I settled on a special vinyl mat (Woodland scenics) that I saw in a store. I don't think it's ideal, maybe even better fit some fabric, BUT keep in mind that this fabric must not accumulate static electricity!
I was assured that this mat adheres well and was advised a certain adhesive. Seeing the seller of advanced years in front of me, with a serious professional expression on his face, I certainly believed him. "Cool" scientific glue turned out to be simple PVA in our understanding! And as it turned out later, the plastic did not stick normally. So be careful, double-check the advice, even if they are given with a serious look 🙂  I additionally nailed the edge of the mat to the rails with brackets. In addition, the mat will be held by the rails, as we lay the rails on the mat and nail them through it to the plywood.
Now consider how we will lay the rails, for some reason this important point is ignored. You can immediately nail the rails to the layout, but this can increase the vibration from the train, especially since we have plywood that will not effectively dampen it and light cars can go off the rails. Therefore, a kind of bedding in the form of an embankment is placed under the rails. This "substrate under the rails" is called ballast. By the way, at first I thought it was purely for beauty, until they explained it to me. Ballast is often made of cork, in my case the ballast consisted of two halves, which made the task easier. First, we assemble all the rails on the layout, as it should be, connecting them with contact terminals. We try to make the joints as inconspicuous as possible. And then we plant them with special carnations through special holes in the sleepers (see photo below). 
Then we lift the rails, as in the photo below ... 
And we slip the ballast under the rails. Next, we apply PVA on the layout (but not on the rails) where the ballast will be and carefully lay it down step by step, repeating the configuration of the canvas. And pin it with pins. Be careful with the glue, I got it on the arrow, I had to switch it for a very long time so that it would not stick! 🙂 
The following is also an important point. Having laid any section, we press down carefully (!!!) rails and hammer a carnation. VERY IMPORTANT:the head of the carnation should not be pressed tightly against the sleeper! There should be a very small distance between the head of the carnation and the sleeper, approximately the thickness of whatman paper or thick paper.
In the next article, we will show you this layout in the game and tell you about future plans.
- PIKO is a German company that produces everything for railway modeling, was organized back in the GDR and is still one of the leading in the world.
- “Copy” is a term… Many people make models of railways very similar to their prototype, i.e. copy. At the same time, trains are assembled so that the locomotive and wagons fit each other in terms of time of use, place of use ...
- Remember that children can play with each other (or with adults) starting at around the age of four, meaning interaction, for example, one child “pulled up” in a car, waited for the other to load it and “drive” on. Before that, they play "in parallel", you can put it this way: "in the same sandbox, but not with each other."
Here is the basic layout of the HO railroad.
We have made a new layout. Continuation of the topic .
Hobbies are different: someone quietly and calmly collects stamps or candy wrappers, fitting their entire collection into a thick album in the top drawer, someone plays golf on Saturdays, and someone chooses an entire art direction as a hobby and devotes it all ones life.
This is exactly what can be said about lovers and fans of a railway or railway miniature, because to create crafts of this kind, one desire is not enough - it will take a lot of time, effort, careful collection of information, sometimes resources, and financial investments, and, of course, skills, so that as a result you get a real miniature railway of your own.
Features and types of railway modeling
Railway in miniature - a subject of interest not only for children, but also for adults, and adults even more and more often. Almost every child had a children's toy in the form of a railway station with rails, steam locomotives and wagons, and if it cost more, then the kit included various railway signs, a semaphore, figures of drivers and other interesting details.

It’s interesting to play this, but I always wanted more, for example, so that the railway network would be more developed and contain many branches and turns of the rails, so that train models were inertial or moved by themselves, and you could control them using the remote control, so that there were many additional elements: tunnels, bridges, roads with vehicles, trees, people, etc.
To make such a toy, or rather, not a toy, but a real mock-up of a railway with your own hands, you need to work hard, and not all children have such an opportunity, so you will probably need the help of your parents. It’s good if they share your passion for railway miniatures and help in creating crafts. For an adult lover of railway modeling, of course, it is easier in this regard.
As for the directions in which there is a miniature railway hobby, they are separated by several:
- some simply collect only toy rails, trains and all their accessories;
- others also collect, but already scale models;
- still others are engaged in the manufacture of railways in miniature, recreating entire historical stations and railway stations, laying a real railway network from different directions of the tracks, engaged in the actual reconstruction of certain objects;
- someone tries to make miniature copies of real or existing locomotives and trains in the smallest detail;
- and another interesting type of railway modeling is a park or garden railway, for the creation of which a very large scale is used, so such a model of the railway can even be used as an attraction and transport people in it.

A bit of history
A miniature railway is not a tribute to fashion and not a new phenomenon, because the history of railway miniatures and modeling goes back more than one hundred and fifty years. For the first time, the model of the railway appeared, like a toy, in the nineteenth century (in its second half). Germany, represented by the manufacturer Märklin, took over the provision of the necessary industrial volumes. Their miniature railways were of such high quality and good that even the royal family ordered such a model for the Winter Palace.
Based on the scale of the railroad shown in the German-made miniature, scale standards for railroad modeling were later adopted. By the end of the nineteenth century, America joined the cause, for the first time in the world, launching on the market electric model railway (manufacturer - Carlisle & Finch).

Almost until the middle of the last century, both an ordinary toy in the form of railway rails with a train, and an ideally exact copy or a miniature railway were perceived in the same way, however, after the toy ceased to cause such a stir, and modeling began to take shape as a serious hobby, gradually finding more and more more fans.
Therefore, the manufacturers tried to please their new admirers - adults who were eager to assemble a full-fledged miniature model of the railway. To do this, they began to produce more advanced models, where the rails could be folded into a full-fledged railway track in miniature, where locomotives and wagons had many parts and elements, which also included various buildings, road paraphernalia and signs, a semaphore, etc.
Nowadays, there are practically no world-class giant firms left that would be engaged in such production, however, there are many small successfully functioning companies specializing in the production of certain models of trains or additional accessories, without which a miniature railway is impossible.
Scales, components and other nuances
To make a model of a railway, you must understand many nuances, for example, on what scale a miniature railway is usually made, what types of sets and configurations of crafts can be obtained, whether a diagram is needed and where to get it, what to do with accessories, necessary details and various accessories, etc.
Scale and size standards for railway modeling are very different. The most common are sizes bearing the symbol TT and NO.
The TT standard size - from the English Table-top trains - means that the model of the railway is carried out on a scale of one to one hundred and twenty (1:120) with a gauge of twelve millimeters. Such a miniature railway is also called a twelve-millimeter railway. All mobile models of trains are also made in it - this is done by supplying electricity along the rails, although it is possible to connect an electric locomotive through a contact network.

A large number of models and various accessories for assembling railway miniatures of this size are produced by:
- German companies Berliner TT Bahnen, Tillig;
- European manufacturers Roco and Piko have a small selection;
- Jago pleases fans with rare models of vintage locomotives;
- Russian firms "Peresvet" and "TT-model";
- American PossumValleyModels, GoldCoast (some models of wagons and locomotives).
Another common size is NO. The name comes from the English abbreviation HalfZero or half zero. The model of the railway in this case is produced in a scale ratio of one to eighty-seven (1:87). There is also a size 0, in which the scale is taken twice as much, that is, 1 to 45. And here it turns out half of zero, but the Latin letter O is used instead of it in the designation.

A miniature railway in this scale is considered the most popular and widespread in the world due to the fact that it can be made without the use of complex devices, moreover, these models of railways are large enough for detailing, but at the same time quite convenient and compact to place the layout in the house or apartment.
A miniature railway of this standard size is also mobile: energy is supplied from a contact network or along rails (if there is electric motors in locomotive models). Plus - you have the opportunity to use additional interesting elements when creating crafts:
- a smoke generator device that will run on oil and create a smoke effect over diesel locomotives or steam locomotives;
- installation of a sound decoder in the rolling stock - you can play any sound files that imitate noises and sounds of train traffic, etc.;
- signaling devices, which stands for signaling, centralization and blocking.

Various other sizes also exist. For example, the large-scale G standard, which has been developed and produced since 1968 and is still being developed by the German company LGB. This is the clearest example of an outdoor garden railroad. In general, the larger the scale at which a miniature railway is built is chosen, the more detailed the prototype should be repeated, the smallest details and elements should be taken into account.
Do it yourself or buy?
Today you can find many thematic forums, special publications dedicated to railway modeling. You can purchase various elements separately and put them together later, mounting your own railroad layout.
However, first of all, you will need to decide on the available free space. Can you allocate half or even an entire room for the layout? If not, then you will first have to deal with the construction of a mock-up or equipment of a special place. To do this, you can use at least a separate table or make a retractable / folding tabletop, which will be used only for your project and nothing else, which means that you do not have to fold and remove the layout every time.
There are also options for modular layouts, which consist of individual blocks, cantilever structures (you can attach mock-ups to the walls like shelves) and lift-ups (easily stows away under the ceiling).
It is also better to take the appropriate scale for an apartment, for example, with a size of 1:87 you will not do much, because you will need a space of one by three meters at a minimum. It is better to stop at 1:120 or 1:160 scales, since designing a layout in an even smaller Z size (1:240) will require a lot of skill, effort and financial investment.
To create your own miniature railway, you will need to come up with and think over its future appearance to the smallest detail. Perhaps you should start with the simplest scheme, for example, make only one rail ring and a locomotive with several cars. Over time, you will add additional tracks, trains, semaphore and signs, station and buildings, figures of people, etc. to the project.
Experienced craftsmen already know how to create whole detailed landscapes - mountains and plains, bridges and tunnels, forests and fields, miniature streets, numerous forks in the paths, depots and other interesting things.
Even for the simplest project, it is better to make a diagram. Just try to draw what exactly you want to create. If your plans are to create a railway of a certain historical era, then you will need to thoroughly study all available information on this topic, find archival photographs, copy them, etc.
Also detailed diagram will be needed for the manufacture of models of steam locomotives and wagons. You can use the drawing diagram of a particular machine by looking for its photo. Just divide the real dimensions of this or that train by the scale you need and you will have ready plan the buildings.
Step by step work plan
- Provide space for the project and make a sub-layout (a simple configuration can even be placed on a plywood sheet).
- Transfer the scheme of the future railway miniature to the mock-up (draw how the rails will pass, mark the forks and turns, roads where you will place buildings or structures). For a complex rail arrangement, the scheme can be designed on a computer in a special program.
- Laying rails. Rail material can be bought at a specialized store or you can make them yourself. Since current flows along the rails in moving roads, craftsmen make them from thick copper wire, rolling it to a rectangular section on a manual machine. Sleepers are made of thin bars, which are also cut on the machine. The tracks are attached in two ways: they are either glued or nailed to the base with small studs, you can then solder the rails to the same studs or also glue the rails to the sleepers.
- For a mobile model, you need to additionally develop wiring diagram, and then mount it already on the layout. Homemade blocks are usually taken as a power source, you can also take a factory one. Do not forget about safety rules - the output voltage cannot be high, use a power supply unit up to sixteen volts, and if the model is small, then six to nine volts will be enough. The electric motor for the train can be purchased at the radio store or removed from any toy. Conduct electricity to the engine from two rails. To distribute electricity throughout the base, stock up on connectors and copper wires. Think over all the details before wiring - where the semaphores and traffic lights, barriers will be located, whether the lights will be on, etc.
- Backfill and lay the ballast, selecting it in size among aquarium soils or any household bulk materials.
- Think over and make a relief and a landscape. To make your layout look like a real one, be sure to design a beautiful landscape. You can use professional materials such as trowel-mass, forest litter, meadow powder, different layers of the earth, crushed stone, sand, gravel and other interesting accessories from well-known manufacturers. If you choose more budget options, then to simulate the mountains, it is quite possible to get by with building foam, which is then easy to paint in any desired color. Hills, fields, vegetation and other decor can also be recreated from plywood, building plaster, fiberglass, papier-mâché, wood and others. finishing materials. To paint the details, use acrylic paints.
- If there is no time and desire to bother so much, then many elements can be taken to the layout and in ready-made, for example, from toy sets, in which there are figures of trees, and dummies of grass or bushes, animals, cars, signs, people.
- With buildings the same situation - either use ready-made options, or build your own from cardboard, wood, plywood, papier-mâché. Use photographs of real stations and other buildings as references.
- Add the necessary components: draw roads, paint the grass, arrange the figures of people and put the trains on the rails.
Passion for railway modeling can start with a gift set with a railway and trains. Such a hobby, although it requires considerable effort and expense, undoubtedly helps to develop, think, create and not stand still.