How to close the corner battery in the room. How to hide batteries in a room - simple and original ideas
In fact, we are talking not only about old cast-iron batteries. It is very likely that when moving to new apartment you find that the batteries (even if they are white and neat) spoil the overall look of the room. And you don't know what to do with them. We've put together five inspirational ideas for you on how to disguise an ugly radiator.
1. Paint the color of the walls or make them contrast
Let's start with the most banal: paint the battery in the color of the wall with special paint (resistant to elevated temperatures). But this can only work if the radiators initially look decent - such decor will not save shabby cast-iron batteries.
Even cooler - paint the radiator in a contrasting color - the battery will instantly turn into a stylish design detail. Just paint it carefully and carefully.
Even more interesting idea- paint the radiator in ombre style or different colors. Such a bright battery can no longer be called ugly.
2. Order or make a special screen
Another simple option to hide the battery is to put a special metal or wooden screen on it. It can be ordered in special stores, or you can do it yourself. Remember that it must have holes for heat to escape. Most often, wooden grilles are used for decoration: they do not interfere with the passage of warm air, they are easy to install and easy to remove.
In addition, such a screen can be used as a small shelf - put a vase of flowers or souvenirs on it.
The disadvantage of wooden screens is that they can be deformed under the influence of high temperatures.
3. Turn the battery into a mini chest of drawers
A more advanced way is to disguise the radiator as furniture. For example, under the chest of drawers. It is rather difficult to build such a structure on your own, but it can be ordered according to your design. Surprisingly, some chests of drawers are made in such a way that guests will not even guess that a battery is hidden behind them.
Or you can just carefully hide the battery under the table.
4. Hide the battery in a cabinet
This method is similar to the chest of drawers idea, but requires even more imagination. You do not just close the battery with a small chest of drawers - it becomes a full-fledged part of a large cabinet (for example, a bookcase).
Such a cabinet looks very organic: the mesh insert does not spoil it at all appearance. However, remember that in the event of a radiator breakdown, you must have quick access to the battery (the door must open).
5. Make a recreation area above the radiator
If the battery is very large (or there are several of them), then you can turn the space above it into a bench and make a cozy seating area there. To do this, you need to make a wooden box with bars, put a small mattress on it and decorate the bed with small pillows.
It may leak, it will have to be replaced or repaired. Therefore, it is better to choose designs that are easily removed. It is desirable that they do not have a fixed mount. Suitable pads with a hinged door, a sliding mechanism. At a minimum, valves, pipe connections, thermal head and threaded connections must remain accessible in the event of a breakdown.
The second important point is related to the amount of heat entering the house. Any box reduces it. Especially if it is deaf, completely closed on top or has a dense weave. It is better to choose something more open and not to place the heater too deep. To, you can put a solid screen on the legs, and cut a groove in the middle.
Another way to compensate for heat loss is to install a heat-reflecting screen behind the battery. For example, polyethylene foam.
- Before closing, prepare it: wash, blow.
- The distance between the masking structure and the heater should be 35-50 mm.
- The minimum gap between it and, as well as the floor, is 60-70 mm.
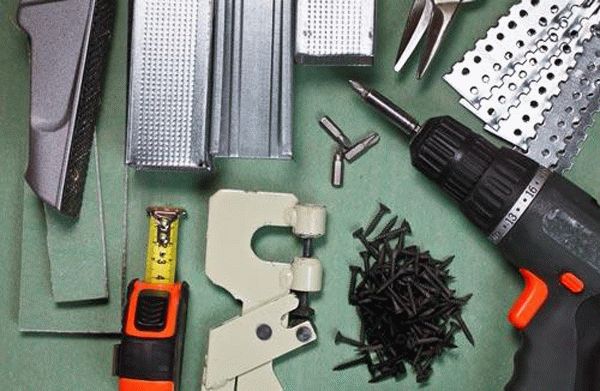
The preparatory phase consists of cleaning and purging the heater, as well as collecting tools. List of what you need for work:
- GKL sheets 12 mm thick.
- Pencil.
- Roulette, ruler, level, corner.
- Liquid nails, screws, dowels.
- Metal profiles in 2 sizes: 27*28 and 60*27.
- Screwdriver, perforator, screwdriver.
- Construction mesh with self-adhesive surface.
You can mask the entire wall or just a part under the windowsill. The box is installed in the floor or leaving a gap above and below it. When marking, it must be taken into account that the edges of the structure should protrude at least 10 cm beyond the battery.
- Make a mark on the wall.
- Attach a profile to the lines, make marks for the holes in increments of 15-25 cm.
- Drill holes and attach profile 27*28 and then jumpers 60*27.
- Make a markup on drywall, cut it with a clerical knife, attach it to the frame with screws.
- The seams between the sheets are filled with putty with a mesh. and paint.
- To reduce heat loss, craftsmen recommend drilling as many holes in the surface as possible.
Another, visual instruction for covering the GKL on the video.
Painting
One of simple ways radiator design. Suitable for cast iron and steel panel structures. Modern aluminum models will be difficult to paint. You will have to apply many layers, and the result will be unattractive. You can make them monophonic by choosing a shade for the interior, contrast or create beautiful drawing. In this case, stencils from art stores, decoupage technique will help.
Water-dispersion, acrylic and alkyd are suitable for work. All of them are resistant to high temperatures. Acrylics dry faster, almost do not emit an unpleasant odor. Alkyd, on the contrary, are distinguished by caustic fumes. Water-dispersion compositions are deprived of this drawback, but they are less durable, wear out quickly, and scratches appear on them.
Exist hammer paints for metal. They create a heterogeneous texture with a chasing effect. This is a good option if you need to hide various defects of the old surface: chips, cracks.
You need to start painting from the preparatory stage:
- Clean the surface of dirt. The dust that has settled inside is washed off with a brush with a spray bottle.
- Remove previously applied paint. This is done with a washing solution, a drill with a brush attachment or a building hair dryer - it melts the layer and can be removed with a spatula.
- Buy two small brushes: straight and curved for the inside of the heater or a foam roller for a panel radiator.
- Almost does not reduce heat transfer.
- It can be changed frequently depending on mood or new renovation.
- There is quick access to heating in case of an emergency.
The last plus - light fabric does not look as bulky as drywall, metal, wood, MDF. The only negative is that this design is not suitable for apartments in a minimalist, high-tech or classic style.
Any communications that have been laid or are located in plain sight have always been a problem. It can be very difficult to fit them into the overall interior of the room. But especially often there is a problem - how to properly close the radiator in the room. After all, it is necessary to maintain an important condition - nothing should be an obstacle to good heat transfer.
There are many ways that allow you to close heating radiators and at the same time ensure a comfortable temperature regime.

If this is not possible, then screen creation options are perfect. Namely - the design of the radiator different ways, which allow you to hide it. Several options should be highlighted:
- Hanging screen installation.
- Creation of a wooden - removable element.
- The use of drywall boards - for the box.

It should be noted that the last item is the most popular at the moment. At the same time, it cannot be regarded as the most ideal. The fact is that the creation of a solid box is a rather controversial decision. Indeed, in case of any breakdown, leakage, you will have to disassemble it completely, which is very inconvenient.
So the first step is to review heating system. Check the joints and connections, inspect the radiator for leakage or blockage. Only after such preventive work and replacement of damaged areas do the direct installation of the structure begin, which will close the battery.
The design for hiding the radiator must meet the following parameters:
- Warm air flows should not meet obstacles in their path. This ensures uniform heating of the entire room.
- All threaded connections and air and water discharge valves must be easily accessible.

Attention! Very often, an option is allowed that can be found in some apartments. It lies in the fact that heating radiators are completely hidden by plasterboard plates. This is invalid.
Screen for battery
This option is the simplest and most popular. Screens can be of different appearance. Often there are structures made of metal. There are two types:
- Hanging. They are simply superimposed on the battery, without having any additional attachment. Therefore, with any contact they can fall.
- Embedded. They are inserted into specially prepared boxes made of wood or drywall. Highly convenient option. In addition to those made of metal, there are plastic, wood and HDF (high density fibreboard).
Which option to choose depends on the specific situation.
Creating a GKL box for a built-in screen
This option is the most common. It is quite convenient to make a box while finishing the walls with drywall, then you can immediately create a frame for it, which will be part of the overall design.
Stage one: preparation
Before you hide the heating radiator, it must be prepared. It is very convenient when modern batteries are used, but with cast iron ones you will have to tinker.
- Using an iron brush, remove the old layer of paint.
- The surface is degreased.
- Check joints, nuts and seams. If necessary, tighten or change.
- Paint the surface with paints for metal with a high temperature threshold.
 Usually, through the holes in the battery-covering structure, it is still partially visible, so the finish of the device itself cannot be ignored.
 Prepare the necessary tool:
- perforator with a drill or impact drill with drills;
- screwdriver, metal scissors or jigsaw;
- construction knife and level;
- sandpaper with a bar;
- hacksaw;
- brushes;
- capacity and a set of trowels;
- ruler (roulette) and a pencil.
You will need the following materials:
- Plasterboard boards.
- Perforated corner.
- Metallic profile.
- The grid is sickle.
- Self-tapping screws and dowels.
- Primer.
- Putty.
On a note! Sewing a battery with drywall is not as easy as it seems. At least minimal experience with metal profile and gypsum boards.
Stage two: markup
It is determined how the box will look like - hanging in the air or standing on the floor:
- When the box is joined to the flooring, then immediately measure and mark three main lines - two side and front.
- If it hangs, then beat off the distance from the floor. A line is marked on the wall and checked by level.
Then make markings on the walls. Do not forget that from the edge of the box being erected to the edge of the radiator - there should be at least ten centimeters.
The result is a rectangle that will indicate the edges of the attachment of the future structure.
Stage three: creating a frame
 Profile frame for a box
 To do this, use a metal profile. Mounting technology:
- Profile guides are applied to the lines marked on the wall. They are pre-cut at the desired height. A drill drills several mounting holes. Do it so that there are marks on the wall.
- According to these points, holes are drilled into which dowels are inserted.
- The profile is placed on the attachment points and fixed with screws.
- Thus, all parts of the metal frame are installed. Do not forget to fasten them with connecting elements.
Advice! Between the metal profile and the surface, it is necessary to provide for laying a special shock-absorbing material.
You should get a metal frame that will be securely attached to the base. It would be better to close the heating pipes right away - for greater convenience, they are considering a removable option.
Stage four: sheathing

The further process will be completely uncomplicated when compared with the work that has already been carried out.
The sequence is:
- To close the heating point in the room, markup is done in advance on a sheet of drywall. Using a hacksaw (electric jigsaw) cut it into the desired elements. Small parts can be easily cut with a construction knife.
- Immediately calculated and the place under the screen. It can be of different sizes, most often they use 60 * 90 cm and 60 * 120 cm. It is better to measure the chosen option on the internal frame. A couple of millimeters are removed from the result.
- For greater convenience, each cut section is marked on the wrong side. Or they do it differently - they immediately install them.
- Details cover the necessary places. For this, self-tapping screws are used. They are screwed in increments of fifteen centimeters.
- Screws are screwed flush with the surface.
Stage five: finishing

Begins The final stage finishes. It lies in the fact that the created box is treated with putty. It is necessary to close all seams well. The process looks like this:
- The seams are slightly embroidered, a construction knife is suitable for this.
- The separated areas are primed.
- Perforated corners are placed on the corners.
- The outer seams are smeared with a mixture and a sickle mesh is applied.
- A finishing layer of putty is applied to the surface.
It turns out a design that has a "window" into which the screen is inserted. Thus, it is possible to close any heating battery.
On a note! Very often it is possible to create a fairly large box that can be used to store unnecessary things.
If the room is more suitable wooden structure, then it can be made completely removable (shown in the photo below). So, it is possible to close the heating radiator and not carry out numerous works.
Do the following:
- The markup is removed. Take into account the places of supply of pipes.
- A box is made of wood, which is immediately equipped with an external crate.
- Corner hooks are installed along the outer perimeter, the hinged part of which is screwed to the wall.
Now it remains to put the box in its place. Taking it off is also easy.

Conclusion
To close any heating element, special screens are used, which can be done independently. The main thing is to correctly calculate the size of the structure and complete the frame.
Greetings, comrades! Today we will talk about how to decorate a heating battery in a living room. Since your humble servant was a plumber in the recent past, any decor will be discussed from the standpoint of practicality - the heat transfer of the heater and its maintainability.
How does the battery heat up
Any heater gives off heat to the heated room in two ways at the same time:
- convection. The air is heated by direct contact with the surface of the radiator and, due to the decrease in density during heating, is displaced upwards by colder air masses. Cooling down, it again falls down, reheats upon contact with the radiator - and so on ad infinitum;
- Thermal radiation. IR rays propagate within the line of sight and cause heating of all objects near the heater.

The predominance of one or another method of heat transfer is determined by the configuration of the heater and its temperature. For an aluminum battery with developed fins, convection prevails, for a radiator plate - radiation.

In order for no obstacles to interfere with convection, the radiator is placed under the window in a strictly defined way:
- Distance to window sill should be equal to at least 6-12 cm. The flow of heated air should rise freely, ensuring efficient and uniform heating of the entire volume of the room;
- Between radiator and wall there is a gap of 2-3 centimeters. It provides the movement of air heated in contact with the back of the sections;
- Between battery and floor clearance is also needed (at least 8 cm): it provides a free flow of cold air, replacing the heated one.

In order not to interfere with heat transfer due to radiation, the battery must not be closed from the main volume of the room with furniture and thick curtains.
Malfunctions of heating devices
The idea to close the battery with a screen arises, as a rule, among the owners of Soviet-style cast-iron radiators. Indeed, outwardly they are quite unsightly. Initially unattractive appearance is often exacerbated by years of influx of layers - unevenly applied and partially burnt out.

And now - the bad news. Cast iron radiators have a number of typical problems that require free access to them.
Intersection leaks
The essence of the problem: paronite gaskets between cast iron sections are not elastic. Over time, they become more and more rigid.
When heating sections in heating season the gasket is compressed due to the thermal expansion of the sections, and after cooling it no longer returns to its previous dimensions. Nipple connection leaks.

elimination: The end sections are detached and both gaskets are changed on the current pin connection. Work requires access to blind radiator plugs at the end of the radiator. If you close the battery with a blank screen, and even more so hide it in a box, it will be simply impossible to unscrew the plugs and remove the sections.
Locknut leak
The essence of the problem: burnt or rotten organic winding under the locknut on one of the eyeliners no longer seals the threaded connection.

elimination: when the heating riser is dropped, the lock nut is unscrewed a few turns and rewound with sanitary flax or other winding. If you close the heating radiators with a screen or box, access to the connections will be extremely difficult. You cannot turn a pipe wrench or adjustable wrench in a confined space.
Fistula on thread
The essence of the problem: a cast-iron radiator is connected to an eyeliner with a long thread cut into it. Steel is subject to corrosion. Through fistulas appear primarily in areas with the smallest wall thickness, that is, in the hollows of the threads.

elimination: when the heating riser is dropped, the liner is cut off at the beginning of the thread, and an electric arc or gas welding a new one is welded on. If you close the radiators with a non-removable screen or put them in boxes, the welder will not be able to get to the problem area of the liner.
A box or screen for a radiator often hides the problem from the homeowner: there is a leak, but you can't see it. You will learn about the presence of a defect in the radiator or piping from flooded neighbors or during flooding own apartment when a small fistula on the pipe turns into a source of a serious leak.
Airlock
The essence of the problem: After the heating circuit has been reset, air remains in the circuit when it is restarted. Air locks impede circulation in risers.
elimination: air is vented through the so-called Mayevsky taps installed on the top floor for each riser. Cranes are most often mounted in the upper deaf radiator plug. And in this case, to start the riser, you need free access to the battery.

Radiator silting
The essence of the problem: silt and sand carried by the coolant gradually accumulate in the lower collector of the sections farthest from the supply - in the area where the water velocity is minimal. The end sections stop heating.

elimination: sludge is flushed out of the battery through the flush valve. A hose is attached to the tap, installed instead of one of the blind radiator plugs, through which water is discharged into the sewer. Both the installation of the flusher and the flush itself require access to the end sections.
decor requirements.
So, how to hide batteries in an apartment without compromising their functionality and maintainability?
- Plasterboard boxes around batteries are strictly prohibited. Such a box will drastically reduce the heat transfer of the batteries, limiting air convection. At the same time, in the absence of a heat meter, you will be in full size pay for the heat you have not received;

- The more gaps in the screen - the better. Through these gaps will pass warm air and thermal radiation;
- A solid horizontal shelf on top is a bad idea. It will limit the movement of the upward air flow;
- The material of the decorative screen should have maximum thermal conductivity. Having warmed up, he himself will become a source of heat, heating the room due to infrared radiation;
The exception is screens that are installed to protect children from burns. For obvious reasons, their front surface should not heat up.

- The ideal option is a screen that is transparent in the infrared spectrum. Permeability to infrared rays has, in particular, ordinary glass;
- The back surface of an IR-opaque screen should be as dark as possible, ideally jet black. The black surface absorbs the maximum amount of heat. White and, conversely, reflects radiation over the entire spectrum;
- Any decor should be easily dismantled. Sooner or later, the battery will need service or repair.
materials
What can be used to make a decorative screen? I will evaluate popular materials in terms of the above requirements.
| Image | Material and its properties |
 |
Metals A: Metal screens (aluminum and, to a lesser extent, steel) have excellent thermal conductivity. They are impenetrable to thermal radiation, but when heated, they themselves are able to become a source of infrared rays. The most advantageous design is a metal mesh on a light frame. |
 |
Glass: Glass screens are transparent to heat radiation. The front surface heats up to a much lower temperature compared to the radiator, which makes glass a safe material for a family with small children. When mounting the screen, gaps must be left above and below it for air convection. The distance from the radiator is not less than 2-3 cm. |