Bios rev 5.0 how to open all settings. How to set the BIOS to boot the system from a USB flash drive
In order to install an operating system on a computer, you need to configure it to boot from a USB flash drive or disk. Therefore, in today's article, we will consider how to boot from a USB flash drive in BIOS. This must be done to begin installing Windows. Since if you just insert a bootable USB flash drive with the system, then nothing will happen. Your old OS will start to boot. If you have not yet downloaded the latest version of the operating system, then read the article - How. Let's now proceed directly to the configuration process itself.
After restarting the computer, it is not always necessary to enter the BIOS of the motherboard to configure. First, let's try to use the Boot Menu (boot menu). To do this, before the system starts to boot, you must press the "F8" key, thereby a special window should appear with a list (boot menu) of connected drives. In this menu, you need to select our flash drive with the OS recorded on it.
After that, it should begin, namely copying the installation files to the hard drive. After the computer restarts itself, Windows installation will begin from the hard drive.
If for some reason you are unable to open the boot menu, then let's start figuring out how to boot from a USB flash drive in BIOS. But first, I want to briefly tell you what a BIOS is. 
BIOS (basic input / output system - "basic input / output system")- a special set of embedded software that implements the application programming interface necessary to work with computer components and devices connected to it. 
In order to get into the BIOS settings, you need to have time to press the “Delete” or “F2” button or any other, depending on when the computer boots up. On the monitor you will at this point in time display the logo of the manufacturer of the motherboard or information about the processor, memory and hard drives. At the same time, something like this will be written at the bottom of the screen:
- "Press Del to Enter Setup"
- "Press F2 for Settings" or similar.
After clicking on one of the buttons, you will have to get into the BIOS settings. Depending on the board, the software for the basic I/O system may be different. I propose to consider the most popular options, as well as configure them to boot from a USB flash drive.
If AMI BIOS is installed on your board, then in order to set the disk boot order, you and I need to perform the following steps:

Note! The USB flash drive must be connected even before you enter the BIOS, otherwise it will not be detected for you.

If your motherboard is with AWARD or Phoenix BIOS, then to set up Windows boot from a USB flash drive, we take the following steps:

On many modern laptops, the InsydeH2O bios is installed and many are faced with the problem of setting the disk boot order. Let's deal with this problem together. We will do everything step by step so as not to make a mistake.

Note! If you need to install a boot from a CD or DVD, then in the first place you need to put the item "Internal Optic Disc Drive"
- After the settings have been made, go to the "Exit" menu section and select the "Save and Exit Setup" item, thereby we will save the changes made and exit the BIOS.
Currently, many motherboard manufacturers install UEFI software instead of the usual BIOS, which has a graphical interface, as well as mouse control support and a Russified menu. Thus, it makes it easier for us to solve the problem of how to boot from a USB flash drive in BIOS.
If you are lucky, and when you enter the BIOS you see that the graphical interface has loaded in front of you, then you need to go to the advanced settings by pressing the "F7" key or the corresponding button in the main window. In the menu that appears, you need to go to the "Download" tab and in the "Disk loading order" item, put our bootable USB flash drive in the first place. 
After making the changes, press the "F10" key and select the "Save settings and restart the computer" item.
Let's summarize.
In today's article, we have discussed how to boot from a USB flash drive in BIOS. At the same time, I tried to show in as much detail as possible how this is done in different versions of the BIOS. As a rule, all settings come down to placing the first in line, a bootable USB flash drive or a disk with the system. Many users have difficulty with this, since the interface is in English. But as you can see, the developers are doing their best to adapt the BIOS for all users. This is clearly visible in the new UEFI software.
Hello dear friends and enemies! In previous articles, we told you about how to prepare for installing windows. This is downloading official Windows distributions directly from Microsoft servers, creating a bootable flash drive, preparing the computer for installation | reinstalling the system, as well as entering BIOS on different computers and laptops under different operating systems.
Today's article is from the same series. We will learn how, by going into BIOS, in the settings, set the OS to boot from a USB flash drive or from a CD / DVD disk, that is, from external media.
In most cases, we need to boot from an external drive to install the system or to check the system using some kind of LiveCD. Yet this is not always the case. Sometimes it happens that a separate operating system is recorded on some external HDD for some specific needs. For these two cases, you can use the BIOS settings in different ways to start from external media. Let's try to take a closer look at all the possible options for launching from a USB flash drive.
For a one-time launch from a USB flash drive, you can use boot menu. To call this menu, there are special hot buttons on the keyboard. They differ for different manufacturers. But in most cases, these are the F8 , F11 , F12 buttons and a little less often Esc (in one of the following articles I will tell you in detail how to switch to BootMenu from various motherboards and OS). When called boot menu a menu appears with options to select the device from which the launch will be performed. Here it remains only to select your flash drive and press the button Enter.
Important: In order for your flash drive to be displayed in the list, you need to connect it to the computer before turning on the power of the computer or rebooting.
Configuring boot from a USB flash drive in AMI Bios
To install a boot from a USB flash drive in AMI BIOS need:

Run from a flash drive in Bios Award and Phoenix
In these BIOS versions, to go to the settings that are responsible for the connected devices, you must select the 2nd item Advanced BIOS Features(translated from English - Advanced BIOS settings). In the next submenu, select the item First boot device(same as 1st Boot Device, that is first boot device). A list of devices that you can select to download will open. These are Floppy, HDD, CD/DVD, USB-HDD and others. To boot from a USB flash drive, I recommend choosing USB-HDD or USB-Flash, and to boot from a CD / DVD, select CD-ROM.
  After that, first press Enter, and then Esc (Escape exit). We find ourselves in the menu 1 level higher. Here we go to the penultimate menu item on the right " Save & Exit Setup" (Save and exit).
Version InsydeH20 BIOS mostly found on laptops. The actions that you need to perform in it to boot from a USB flash drive are similar to the actions in AMI Bios. Here also in the main menu we move to the right to the item " Boot". Next, you must enable the function of loading from external media. To do this, switch the option" External Device Boot"in position Enabled (included). After that, we already set the download priority with " Boot Priority" on the External Device Boot, that is, External Device Boot should be above the others in the list.  This is for a flash drive. For a CD / DVD disc, you need to move the item to the first line Internal Optical Disc Drive(translated from English - " internal optical drive"). Next, move to the point " exit"and select the item" Save and Exit Setup".
Changing boot device to UEFI
If you read one of the previous articles on the project, you should already know that UEFI usually has a graphical interface. Therefore, there, changing the settings for booting from a USB flash drive is more understandable and more convenient for ordinary users. Here, no one should have any difficulties, especially since above we have familiarized ourselves with the terms commonly used by all manufacturers. The difference can only be in the location of the settings items, and also in the fact that in some versions UEFI you can simply drag and drop devices to change boot priorities.
Results:
In this article, I tried to show you how to set up booting from a USB flash drive in the most common BIOSes. If you have some kind of exotic Bios or Uefi on your computer and you don’t know what’s there and how, then you are welcome in the comments.
In Windows 7, 8, 10 operating systems, it is possible to start booting from external media without entering Bios / Uefi, but I will briefly tell you about this in one of the following articles. In order not to miss, I advise you to subscribe to blog updates by mail. Your e-mails will not become the prey of spammers, for which I vouch.
Not from a DVD disc, as many people usually do, but from a USB device, then the first step is to go into Bios and set the boot from a USB flash drive. Otherwise, you won't get anything. Because, when booting, the computer will access either the hard drive or the DVD.
In this article I will try to describe in as much detail as possible and for different versions of BIOS.
Booting from flash drive in bios
I will not be mistaken if I say that laser discs are slowly fading into the background. More and more personal computers are being released without DVD-ROMs. The distribution kit of the operating system also does not have to be on DVD, it can easily fit on a flash drive. I won’t be surprised if they disappear soon, giving way to cloud storage. One way or another, but as long as the technology exists, it must be able to use it.
How to get into Bios
Each manufacturer of computers and laptops has its own buttons to get into the BIOS, such as "F1", "F2", "TAB", etc.
But the most common option is of course "Delete".
Being directly in the BIOS, we are interested in the "Boot" section - it is there that the parameters that we need are changed.
Phoenix Award
Now it's a rarity. I remember it from old computers with the Windows 98 operating system. I just had one.
The first thing we do in this and subsequent cases is to check if the USB controller is activated. To do this, we need to go to the "Peripherals" section.
And opposite the inscription "USB Controller" the parameter "Enable" must be set. If it is missing, it should be included. This is done with the help of Top and Down, - go to the desired line, press Enter and select.
Now we press "ESC" (this is the exit from the previous menu) and head to "Advanced". Here we are interested in the line "First Boot Device", where using the above method we set the value to "USB-HDD", as shown in the screenshot below.


Award
Again, the very first thing is to see if the controller is connected. Heading to "Integrated Peripherals".

We find "USB Controller". Use Enter to select the "Enable" value.

We return to the main ESC window with an apt, head to "Advanced BIOS Features" and then "Hard Disk Boot Priority".

In the picture above, unfortunately, booting from the hard drive is set. And there should be "Patriot Memory". You can change it with the help of "+" on the keyboard, by going to the desired line.

The next step is to press Enter on the line "First Boot Device". We now have a “CD-ROM” there, and we need to put the “USB-HDD” or “USB-FDD” already familiar to us.

And save the settings by going to "Save & Exit Setup".

AMI
Again, at the very beginning, we check the USB controller for operability. To do this, go to "Advanced" and then "USB Configuration".

Please note that "Enable" is set opposite "USB 2.0 Controller" and "USB Function".


As you can see from the picture below, the hard drive is currently exposed. Using Enter, change the position to "Patriot Memory".

Should look like this.

Then we go to "Boot Device Priority".

BIOS UEFI
For example, I will use a Lenovo laptop.
After turning on, simultaneously press the combination of hot keys En + F2. This brings us to the InsydeH20 Setup Utility. More often it can be observed in laptops from Toshiba and Acer. Use the Up and Down buttons to go to "Security" and, on the contrary, "Secure Boot" set "Disabled". Attention, I did not highlight this word in vain!

Now we go to "Boot" and look. Should be UEFI opposite "Boot Mode".

Today I will tell you how to enable booting from a USB flash drive in the BIOS of various manufacturers. It doesn't matter which version you have, the order of gestures will be as follows:
1. We insert our bootable USB flash drive into the USB port of your computer. I recommend inserting it into the port located directly on the motherboard, i.e. from the back of the system unit.
2. Turn on the computer and press the key Delete(or F2) to get into the BIOS. Depending on the manufacturer and BIOS version, other keys (Esc, F1, Tab) may also be used, so you need to carefully read the prompts on the screen.
In BIOS, we can only navigate through the tabs using the keyboard.
Below I will describe this process in detail using the most used BIOS versions as an example.
Attention! Remember that if you are installing the operating system from a USB flash drive or CD and have selected a boot device in the BIOS, and not in the boot menu, then after the first automatic reboot of Windows, you must enter the BIOS again and return to boot from the hard drive. If this is not done, autoload from a USB flash drive or CD will work again, and Windows will again begin the first stage of the procedure. installation.
Configuring Award Bios to boot from a USB flash drive
Award Bios:
First, let's check if the USB controller is enabled. We go to "Integrated Peripherals". We go down with the arrow on the keyboard to the item “USB Controller”. Press the “Enter” key and in the window that appears, select “Enable” (also using “Enter”). Opposite “USB Controller 2.0” should also be “Enable”.
 Exit this tab by pressing Esc.
Then we go to "Advanced BIOS Features" - "Hard Disk Boot Priority".Now in my example, the hard drive is in the first place, and the flash drive should be.
 We stand on the line with the name of our flash drive (Patriot Memory) and raise it to the very top using the “+” key on the keyboard.
 Exit here by pressing "Esc".
Configuring AMI Bios to boot from a USB flash drive
If, upon entering BIOS, you see such a screen, then you have AMI Bios:
 First, let's check if the USB controller is enabled. Go to the tab "Advanced" - "USB Configuration".
 Opposite the items “USB Function” and “USB 2.0 Controller” should be “Enabled”.
 If this is not the case, we stand on this line and press the “Enter” key. From the list that appears, select “Enabled” (also using “Enter”).
Then exit this tab by pressing “Esc”.
Go to tab "Boot" - "Hard Disk Drives".
 Now I have a hard drive in the first place, but I need to put a USB flash drive here. We become on the first line, press “Enter” and in the window that appears, select our Patriot Memory flash drive.
 It should be like this:
 We leave from here through "Esc".
Select "Boot Device Priority". Here, the first boot device must be a USB flash drive.
 Press Esc.
Then we exit the BIOS, saving all the settings made. To do this, go to "Exit" - "Exit & Save Changes" - "OK".

Setting up Phoenix-Award Bios to boot from a USB flash drive
If, upon entering BIOS, you see such a screen, then you have Phoenix Award BIOS :
 First, let's check if the USB controller is enabled. We go to the “Peripherals” tab - opposite the items “USB Controller” and “USB 2.0 Controller” should be “Enabled”.
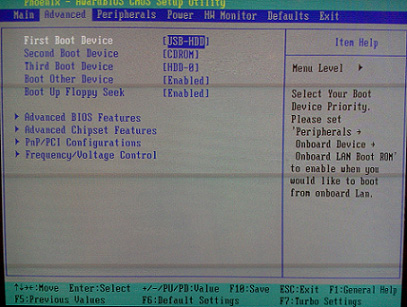
 Then we go to the “Advanced” tab and opposite “First Boot Device” we set “USB-HDD”.
 After that, exit the BIOS, saving the changes. To do this, go to "Exit" - "Save & Exit Setup" - press the key "Y" - "Enter"
 That's practically everything you need to know in order to boot from a USB flash drive. In my article, I described the process of setting up the Bios of the most popular versions: Award and AMI. The third example shows Phoenix Award Bios, which is much rarer.
In different versions of the BIOS, the described procedure may be slightly different. But the main thing is that you understand the principle of tuning itself.
By the way, I would also like to add: in order to choose which device to boot your computer from, it is not necessary to change the settings in the BIOS. You can call up a special menu immediately after turning on the computer to select boot devices (this can be done by pressing F8, F10, F11, F12 or Esc). In order not to guess with the keys, we look carefully at the monitor immediately after turning it on. We need to have time to see an inscription like this: “Press Esc to selest boot device”. In my case, it was necessary to press “Esc”.


