Concrete bath. Individual approach to bathroom design
Modern plumbing stores offer a huge number of font options. The choice of the buyer appears not only a variety of materials, but an incredible variety of different shapes, colors and sizes. In such conditions, it is very difficult not to find a suitable model for your bathroom. But sometimes there are situations when you want to install a unique and sophisticated font in the bathroom, which will satisfy not only practical needs, but also emphasize the style of the room. A do-it-yourself concrete bath will be one of the ways out in such a situation.
Of course, you can choose a unique design model or make a custom-made bath, but such a product will require large financial investments and not everyone can afford it. If you create a font yourself, you can also choose wood as a material, but special carpentry skills and tools are needed here, and besides, the tree itself is not cheap. In this article, we will talk about how to make a concrete bath yourself.
Features of a concrete bath and work planning
The simplest and relatively cheap option that you can make yourself is to create a concrete form and make it clad with ceramic or plastic mosaics. If the shape of the font will have strict shapes with sharp corners, which is highly undesirable, then ordinary tiles can be dispensed with. According to technical indicators, such a font will be equated to a stone model and have high strength.
Before starting work, it is necessary to clearly draw up an action plan, calculate the amount of consumables and purchase the necessary tools. By default, the sequence of actions will be as follows:
- preparation of the base and installation of formwork;
- pouring the walls and bottom of the future font;
- plastering and molding;
- lining the bath with a finishing material.
If you have at least some experience with concrete mixes, then in general the process is not difficult.
It is important to remember that the third point is the most responsible, which includes finishing plaster and the creation of a future form. Before making a bathtub out of concrete, clearly determine which material will be used for cladding, since the final plastering technology depends on it.
Facing material

As a facing material for finishing, you can choose:
- ceramic tiles;
- mosaic;
- paint or liquid acrylic.
However, the choice of facing material directly affects the technology of finishing plaster.
If ceramic tiles are used for cladding, then try to avoid rounded areas during formation, since then it will be problematic to tile them. When using mosaics, you can afford more rounded shapes, since this material allows you to work with such a surface. If paint or liquid acrylic is used for the final cladding, then the finishing plaster must be carried out using a special reinforcing mesh. It is also necessary to add special additives to the plaster mixture, which give the plaster plasticity and at the same time strength.
Preparing for work and creating formwork

So, before you make a concrete bath yourself, you need to prepare a place for it and build a formwork. To create formwork you will need:
- flat boards or OSB sheets for creating formwork walls;
- reinforcement with a diameter of 6-8 mm to create a frame:
- mounting wire for connecting reinforcing bars and wooden panels of formwork walls.
For your information. If you have a small bathroom, it is best to place the structure between two opposite walls so that the three load-bearing walls of the room are already part of the font and you only have to build the fourth outer wall. This will significantly reduce the time of work and save building material. In the same way, you can arrange a corner font, where the corner of the room will play the role of the inner sides of the bath, and the outer wall will be made of formwork at an oblique angle or in the form of a semicircle.
After the installation site is cleaned to the ground, it must be coated several times with a primer for better adhesion of the concrete to the wall surface. Then we create the future frame of our bath from metal rods, which must be made as a solid structure for the floor and the outer wall. It is also desirable to fix it to the load-bearing walls of the room. An example of such a frame can be seen in the photo below.
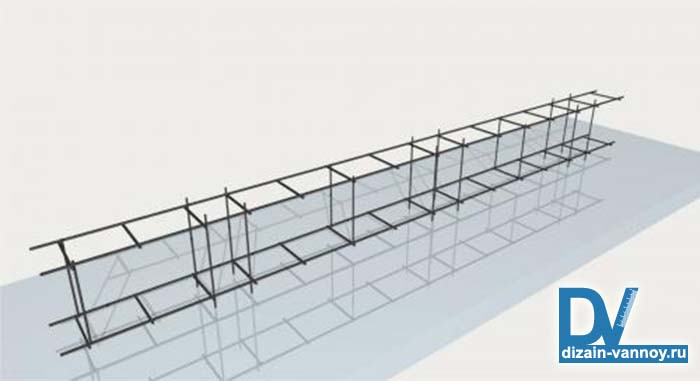
Then for the side walls it is necessary to create a formwork using boards or wooden slabs. Wooden plates are installed on both sides of the frame and are pulled together with a mounting wire as tightly as possible to the frame.
Important. Wooden formwork should not have gaps, as poured concrete will flow through them. It is also desirable to use wooden slabs with the smoothest possible surface so that the mortar does not cling to the slabs and can be easily dismantled. For better tightness, it is recommended to use a construction film.
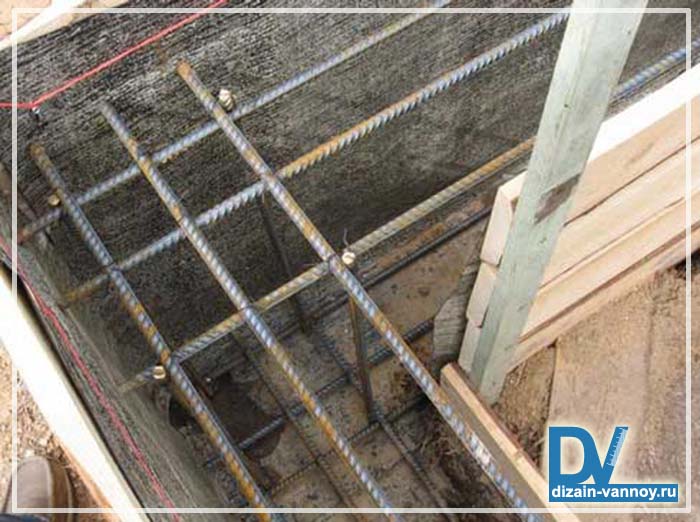
For this, the creation of the formwork can be considered finished and you should get approximately the same design as shown in the photo above. Further, before pouring concrete, it is necessary to provide technological holes for draining the overflow in advance and think over free space for servicing the siphon. For this, plastic pipes of the appropriate diameter are ideal, which are installed and fixed even before concrete is poured. Some in such cases immediately install a plastic siphon, connect it to the sewer and concrete it forever. Of course, this complicates the possibility of cleaning it in case of clogging.
Pouring concrete and finishing plaster
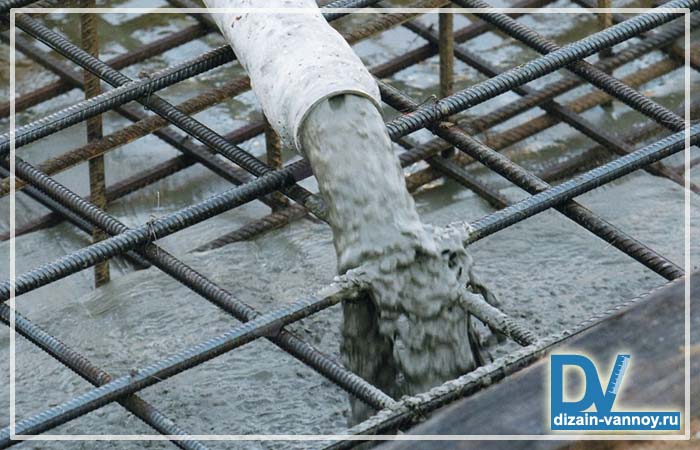
At this stage, the do-it-yourself concrete bathroom being created will already begin to take shape. To create a solution, it is necessary to use cement grade M-400 or higher and mix it in proportions of 1: 3 until a thick sour cream is obtained. Then pour the solution first on the bottom of the bath so that the layer covers the metal frame. Next, we knead the solution with a greater density and fill the wall of the future bath to the level you need. In order for the solution to fill the entire space and not form voids, after pouring it, you need to tap the formwork in different places with a hammer. The vibration created will help the solution to distribute evenly.
Important. It is necessary to pour the bath form without interruptions, preventing the layers from drying out. In this case, you need to either invite a partner to speed up the process, or rent a concrete mixer.
After the form is filled, we leave the product for three days. Of course, this is not enough for complete drying, but the concrete will already acquire the necessary strength for further processing. After that, carefully remove the formwork and proceed to the finishing plaster. The purpose of this event is the final formation of the future shape of the font and the alignment of straight surfaces. At this stage, you can already form straight or rounded corners of the inside using a trowel and a small rule. At the end of the plastering, the bathtub will be ready for priming and facing with a finishing material, but for this it is necessary to wait at least 7-10 days for the concrete to dry completely.
Facing the surface of the font
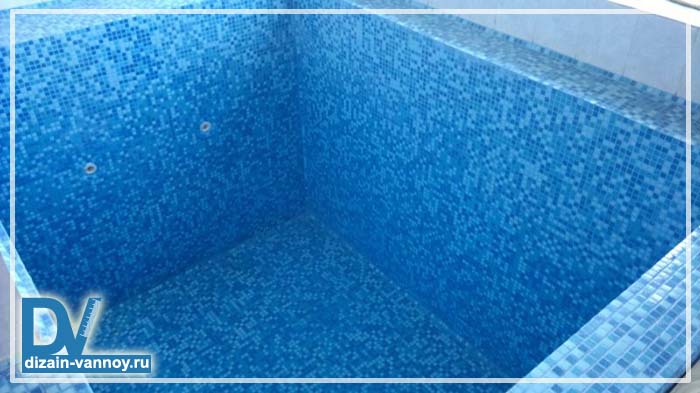
After complete drying, the entire concrete surface must be primed in several layers and allowed to dry. Then you can start lining with the selected material. If your tub has rounded edges, it is best to use a mosaic that is attached to a fiberglass mesh, this will provide more grip and allow you to lay out the surface evenly. Apply tile adhesive to the surface of the bath with a notched trowel, apply a strip of mosaic and press in a little.
This process, of course, is very long, requiring special responsibility and creativity, but as a result, the created concrete bathtub with your own hands turns out to be very beautiful. After the tile is laid, we grout the joints with special mixtures that have a large number of colors and can be matched exactly to the color of the tile. On this, the work can be considered completed, then we put things in order and enjoy the result.


