How to properly tile a bathtub
Looking for the best material to finish the bathroom, then the best choice for you will be a tile. It always looks impressive and beautiful. In addition, tiles are considered one of the most reliable, durable and most stable materials.
The great advantage of the material is that you can easily cover both floors and walls with it. Facing can be done on the bathroom. Of course, you will first need to prepare it. We are talking about the fact that you have to build a screen for facing. If you are afraid to make a mistake, then this work can be entrusted to professional craftsmen. Their services are not cheap, so it's better to try to do everything yourself.
So, let's try to figure out how to tile the bath with your own hands. If you take a little time to understand the technology, then the process will no longer seem so complicated to you.
Tiling the bathtub
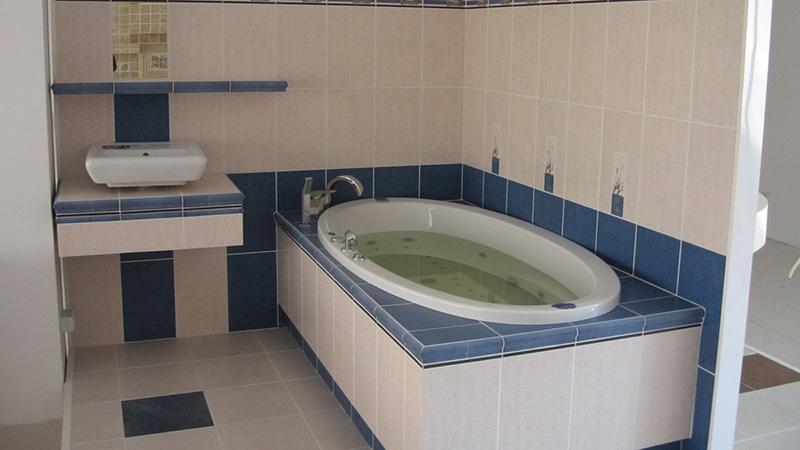
It does not matter what material the bath is made of, or what shape it has, any model can be tiled. This way of finishing will allow you to transform the interior, make it simple, but elegant. It is worth noting that such a bath will be more stable and will last you a long time.
How to properly tile a bathtub? The photos presented on our resource will easily help you understand the technology. A step-by-step instruction is presented that even a beginner will understand.
Tiled cladding: main advantages
If the bath is installed on the frame, then a small space remains under it. It does not look the most attractive way, sometimes it even “cuts the eye”. It's a shame when a large amount of money was paid for the repair, but the shortcomings still remained. It is in this situation that tiled cladding is used. The decorative screen perfectly hides defects, and the bath takes on a completely different look.
The main advantages of the presented cladding method:
- tile is incredibly easy to care for;
- the material is absolutely safe from an environmental point of view;
- looks neat;
- tiles are practical and durable.
Nuances that are important to know:
- the tile must be attached to some kind of base (foam blocks, drywall, brick);
- be sure to provide for the presence of ventilation and an inspection hatch;
- it is desirable to arrange the screen from the same material from which the walls were made.
Preliminary preparation
Before you start lining the bathroom, it is imperative to carefully prepare the surface on which the tiles will soon be attached. The most common screen is made of brick, but drywall is sometimes used. This material is also durable, but costs a little less.
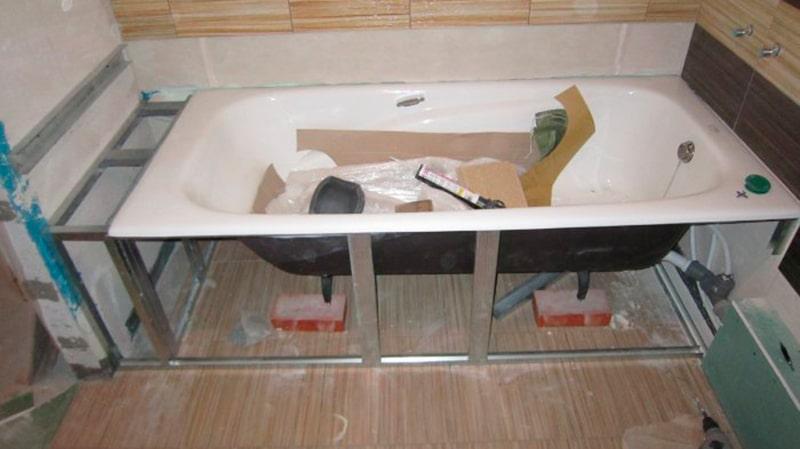
Installation of metal profiles
At the initial stage, there are no special nuances. The bathroom is installed on the prepared place, then it is connected to the sewer. Be sure to install in level so that there is no slope towards the drain.
Advice! All models of baths of modern production already have a slope, so there is no need to do this additionally. It should only be installed horizontally.
Making a brick screen
Brick should be laid out around the perimeter of the entire bath. Sometimes you have to do this either only on the longer side, or on the ends and the longest side. It all depends on the size of the tub and how you set it up.
Be sure to pre-mark the perimeter, so it will be more convenient for you. The side should protrude slightly, and the partition itself is located 2 cm deeper.
Advice! If it turns out that the side will protrude a little by a large amount, then there is nothing to worry about - it's even more convenient. There is enough space left so that the brickwork can be plastered.
Unfortunately, there are no special bricks for sale, which initially have a small width, you will have to split the material yourself.
Advice! It will be most convenient to split the brick with the help of diamond discs, or with an ordinary grinder. There is a part that will break into small pieces, then they can also be used in the construction of the screen. If you are making a blank screen, then do not forget to leave a small hole in order to carry out maintenance of the bath siphon.
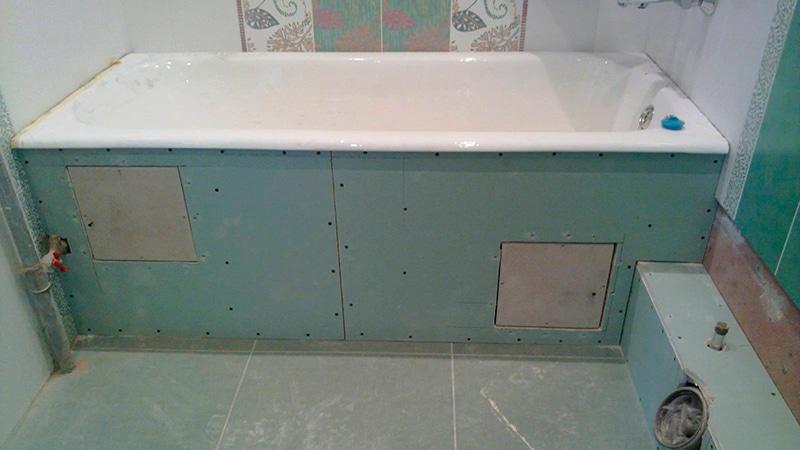
Screen made of drywall
The first thing to do before starting work is to markup. Take a level and mark the vertical marks. This should be done around the edges, but close to the side of the bathroom. Marks are also made on the floor. This is required in order to clearly see where the border of the finished screen with the installed tiles will be.
Installing the drywall frame
To prevent the tile from coming forward, you need to slightly shift the marking line a little deeper. To calculate exactly how many centimeters you have to give in, you need to know the thickness of the drywall sheet used, the thickness of the intended adhesive layer and the tile itself. We add all the values \u200b\u200bintogether and get the required number of centimeters for the indent. Next, we draw another level - this will be the line on which the outer edge of the UD profile will lie. This profile must be well fixed to the floor and walls. This can be done using a regular dowel.
After the work listed above is completed, you can install the CD profile. Cut off pieces of it to the length you need, then insert it into the UD profile and secure it well with self-tapping screws.
When the frame is ready, it can already be sheathed with drywall sheets. It is imperative that the material is moisture resistant, otherwise this design will not be enough for you for a long time. Be sure to treat the ends with a mastic that pulls moisture away.
Advice! You can easily use other building materials to make a cladding screen. It can be moisture-resistant plywood, which is also very stable, or foam blocks.
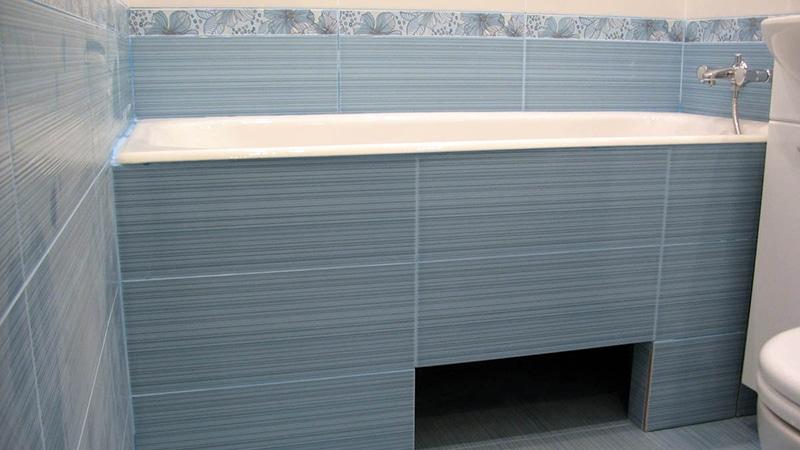
We make facing
Before you start lining the bath, decide which tile you will use for this. Of course, it will look more aesthetically pleasing if the material is the same as on the walls.
How to tile a bath
You already know how to tile your bathtub and want to get started. The surface for this must be well prepared:
- if we are talking about brickwork, then it is advisable to start with light plaster, and when it dries, apply primer;
- if it is a surface made of drywall, then you can immediately proceed to the primer, but use a water-repellent material;
- if it is planned to lay tiles on chipboard, then it is necessary to install a reinforcing metal mesh, then it is covered with glue on top.
Choosing the optimal layout scheme
The height and width of the screen should be a multiple of the size of the tile itself - this is ideal. In this situation, the layout schemes will look very simple. However, it often happens that everything does not work out perfectly, so the tile has to be cut. It's not worth worrying. Here you can beat everything in such a way that defects will not be visible. Place the cut tile in places where it is least noticeable. The horizontal row will fit perfectly from below. But the vertical row for cut tiles should be selected depending on how large the gaps are. It is best to place it in the corners, where the pieces will not be very conspicuous.
Description of the tiling process
Main steps:
- The first step is to prepare the tile adhesive. Such material can be found commercially in powder form. It is diluted with water (preferably at room temperature). The proportions must be indicated on the packaging, so when buying, be sure to pay attention to the package so that the letters are not erased. If the instruction is not visible, ask the seller for advice, or choose another package. The finished composition is carefully applied to the surface of the screen. Work gradually, treat a small area first. On the surface, the glue is leveled with a special spatula, which has teeth.
- Tiles are installed on the prepared area. Do not forget about the markup, everything must be done strictly according to it. If you can see that the tile is installed correctly, then slightly press it in all. Do the cladding in the same way.
- Tile adhesive must dry for several days. Then you need to do the grouting. This is necessary in order for the coating to have greater tightness. If desired, the seams can be further processed with silicone sealant. It is sold in bottles that are convenient to use.
Now you know how to close the bathtub with tiles with your own hands quickly and accurately. This method will help to update the interior, give it more harmony and external aesthetics. In addition, with the help of finishing you can hide the sewer pipes located under the bathroom from your eyes. If you have any questions about the lining, try to review our video material and photos again. We are sure that you will definitely be able to find answers that you previously missed.


