Do-it-yourself steel bath installation
The bathroom is almost the main room in the house, well, at least one of the main ones. Each homeowner strives to create a cozy atmosphere for a comfortable stay in it. To achieve this goal, it is necessary to periodically make repairs and update plumbing. The most difficult task is to replace the cuvette. How to install a steel bath with your own hands and will be discussed further.
Steel bathtubs are very comfortable and inexpensive, they have, like everything around them, their advantages and disadvantages. But the fact is that their advantages are quite significant, and the disadvantages are easily eliminated. Let's take a closer look at the main advantages:
Enamel coating never peels off from well-made steel bathtubs, because conscientious manufacturers apply it at high temperatures, literally “baking” into the metal surface. After such a procedure, the steel itself acquires special strength;
steel baths remain snow-white and shiny even after many years of use;
steel is a more ductile material than the rest, so you can find a large selection of different shapes and modifications in stores;
steel tubs are easy to transport due to their light weight. They weigh several times less than, for example, cast iron;
among steel baths, it is easier to find a model of non-standard sizes than among baths made from other materials.
Some disadvantages:
inexpensive models of steel baths can be deformed under heavy loads. This will lead to the appearance of cracks in the enamel coating. In order to avoid this, it is better to purchase more expensive models with thick walls (from 3 mm);
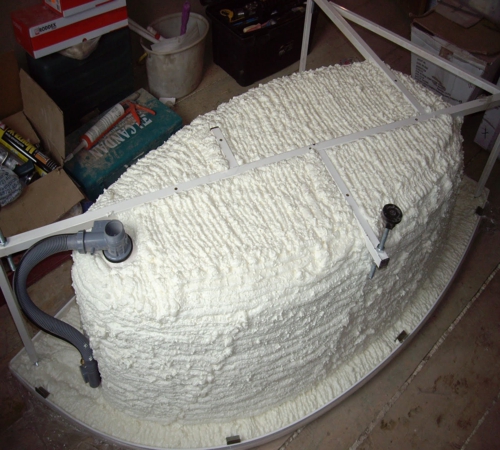
Steel does not retain heat well, and therefore the water can cool quickly. To solve this problem, when installing a bath, cover it on the reverse side with mounting foam;
when the bath is filled with water, a strong hum is heard. To reduce it, as in the previous case, polyurethane foam is useful.
Tools and materials required for installation
wrench;
sealant;
insulating tape;
mounting foam;
waterproof paint;
building level;
corrugated pipe;
draining equipment;
bath strap.
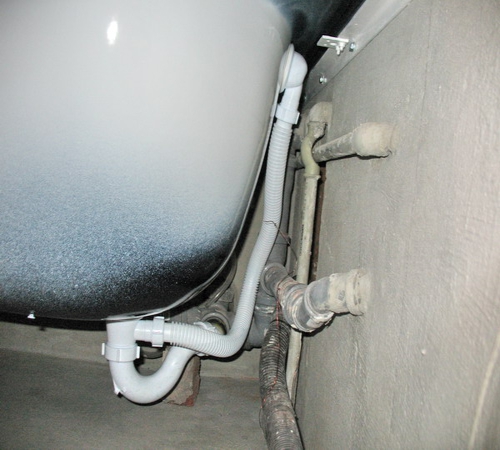
Before starting installation work, it is advisable to check the condition of the sewer system and, if necessary, fix it, otherwise, after the installation is completed, problems will arise and everything will have to be dismantled again.
You need to install the bath in such a way that it is easy to connect to the water supply, connect the taps. It is necessary to attach a siphon, an overflow funnel, pipes for the outflow of water, a tee to the communications. After we proceed to the assembly of the strapping, usually guided by the attached instructions, and process the joints with a sealant.
Which siphon to choose
There are many different types of bath siphons available. There are semi-automatic ones that make it possible to drain the water without diving into it with your hand and without rummaging along the bottom, but by turning a special washer fixed above the water. In this case, the cork will rise by itself, and the water will begin to leave.

Such siphons are much more expensive than conventional ones and it is worth overpaying for them only when the installed bath is very large. In average homes with small bathrooms, a simple plastic appliance will do just fine and will last for years and require less effort to install yourself.
Some siphons have metal outlets that are bolted to the overflow and siphon. They are easier to install than plastic ones, and their appearance is much more beautiful. But there are also disadvantages in the presence of metal: sometimes manufacturers, especially Chinese ones, replace stainless steel with nickel-plated iron, due to which metal parts begin to rust over time. Fasteners are also very often made of a material subject to corrosion. After a couple of years, they stick to each other so that it is almost impossible to unscrew them.
Steel bath installation
Installation of a steel bath must be carried out in the sequence described in detail below:
first of all, the area that will be occupied by the bath should be brought into proper condition, i.e. make a screed, put tiles on the floor;
Next you need to think about the supports. It is advisable to install a steel bath on the corners of 2.5 cm. We drill holes in them in advance and make markings on the wall. We attach corners to it with self-tapping screws and dowels. When performing work, it is necessary to ensure that the corners are in the same plane, while remembering the height of the legs of the bath and the slope that should be observed during installation;
now we bring in the bath and put it on its side on the place intended for it, exposing the bottom towards the wall. The hole through which water will exit should be located on the side of the drain pipe left in the floor;
at the next stage, it is necessary to fix two reliable legs in the upper side at the bottom of the bath. You need to tighten the bolts with moderate force, because with a lot of pressure you can break the nut. Next, install the rest of the legs, turning the bath on the second side. Usually adjustable legs come with a bathtub;
at the next stage, after checking the strength of the fastening, you need to adjust its height using the adjustment mechanism. In order for the water to quickly and without residue go into the drain hole, it is necessary to install the bathtub with a slight inclination towards it;
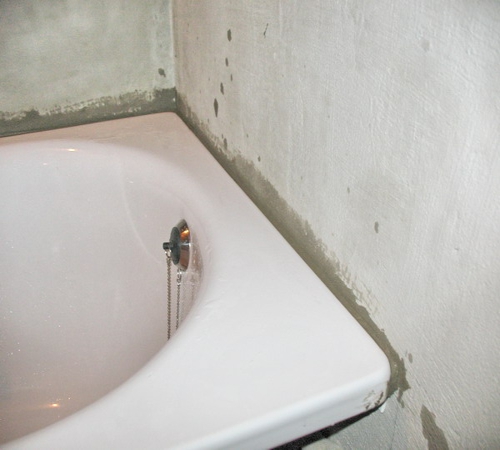
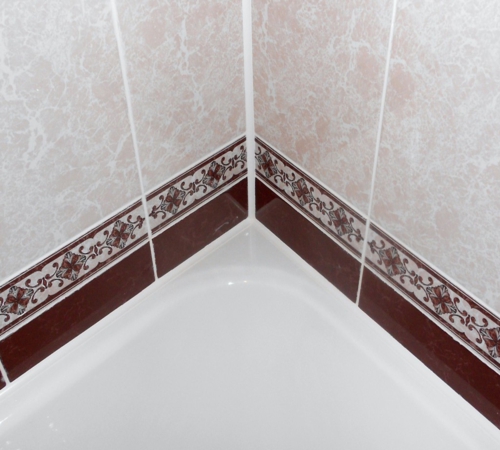
this is followed by installing a steel bath on legs and eliminating the gap between it and the wall with mounting foam, sealant or tile adhesive. This is necessary, firstly, so that during bathing, moisture does not flow into the gap between the side of the bathtub and the wall, and secondly, so that it does not turn over if there is a load on one edge. To give a beautiful appearance to the junction, it should be painted with a water-repellent dye or tiled. It can also be decorated using a plastic tile corner by gluing it to the sealant;
now you need to connect the corrugated pipe and the strapping through the gasket, laying it with a cone in the direction of the strapping, tightening the nut;
to check if everything is properly connected, you need to draw water into the bath and see if it leaks anywhere. If the plug is closed, and the junction of the pipe and the bath is leaking, this means that you have installed the gasket incorrectly. If there is no leakage, it is necessary to check the connection of the piping by draining the collected water. If you are sure that you acted exactly according to the instructions, and the water still leaked, then the nut is not tightened enough, therefore, it needs to be tightened;
after all errors have been corrected, the floor under the drain pipe and all connections must be wiped dry and toilet paper placed under the pipe. This is for one more check. Half fill the bath with hot water, then open the cork. If by the time it is empty, the paper remains dry, then the installation was done correctly.
During operation, be aware of grounding. It is done as follows: the wire is attached at one end to the metal structure, and the other - to the bath. It must not be overlooked that it is not allowed to ground to the water supply or heating.
Fixing a bathtub to brick supports
Above, we looked at how to install a bathtub on adjustable legs. However, many experts argue that it is much more reliable to install a steel bath on bricks. In their opinion, only standing on brick supports, she will be absolutely motionless.
Immobility must be ensured, firstly, to achieve maximum comfort during use, and secondly, to avoid cracks in the places where the sides are attached to the walls. During bathing, water can flow into these cracks, which will not dry out due to dampness. This can promote the growth of fungus or mold.
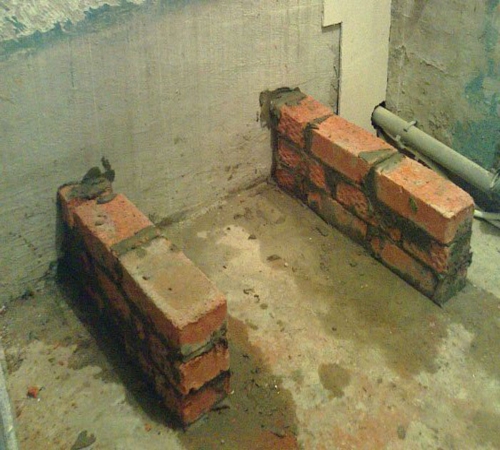
To form the brick supports, you will need a red brick. They should have such a height that when a bathtub stands on them, its side is 60 cm from the floor. The number of racks is selected depending on the length of the bathtub. The distance between them should be about half a meter.
The installation process consists of the following steps:
prepare everything you need. Under a bath of standard length, two supports with a height of 2-3 rows will suffice. This will require approximately 20 bricks. To make a recess under the bottom, along the edges you will need to put another half of the brick. The height of the back support should exceed the height of the front support by 2 cm to ensure the slope mentioned above, but here you should not forget that many modern bath models already have a small angle in their design;
to make a mortar, one part of cement is mixed with four parts of sand, mixing water with them. After the supports are laid out, it is advisable to let them stand for about a day so that the bricks adhere to the cement as reliably as possible;
before installing the bath on the supports, it is necessary to carry out the work on arranging the drain system described above;
installation and fastening of a steel bath on bricks should be done very carefully. It is best to give it stability on supports with a tape sealant. You need to move the bath to the wall as tightly as possible, fix it on it better with tile glue, sometimes metal profiles, self-tapping screws and dowels are used;
after installation, connect it to the sewer, install taps, close it with a decorative screen.
So that you can easily install a steel bath yourself, a video with visual instructions is posted on this page.


