Choosing and installing a bath with your own hands
The bathroom is an essential attribute of a modern person. Here you can not only cleanse your body of the dirt accumulated during the day, but also relax after work, plunging into your thoughts for a while. That is why it is worth taking very seriously the choice of a bath, as well as its installation, since not only the appearance of the bathroom, but also the morale of the homeowners will depend on these two factors.
Do not forget about savings, since installing such a product is a costly business, and sometimes it is better to do all the work yourself.
The very first step in replacing a bathtub is choosing the type that will be installed. It is from the choice of material from which the product is made that the durability, appearance and practicality of use will depend. Especially if a boiler is installed as a heater. At the moment, the market offers several types of baths, which differ in material:
1. Steel- an ideal option for those who want to save as much as possible, but due to their low cost, it has a number of disadvantages: metal deformation (deflections) under weight, noise when water is collected. This type is quite easy to install, since a man of average build can handle the weight of the product. To reduce the likelihood of deformation and damage to the enamel during operation, you need to choose the bath itself of such dimensions that it contacts and is attached to three walls.
Steel baths have a high level of heat transfer. In order to fill a bath of a standard volume, you need about 50 liters of water with a temperature of at least 80 degrees. The only plus is that the metal heats up quickly.
2. Cast iron- With proper use and care, it can last for several generations. It is unrealistic to cope with the weight of the product yourself, so several people will have to deal with the installation. If a steel bath can be connected to an already installed siphon, then a cast-iron product can break part of the communications due to one awkward movement. Another disadvantage is the level adjustment of the installed product. If the bathtub is equipped with legs of fixed sizes, you will have to take a lot of trouble with its leveling. Adjustable legs in cast iron baths can also be found, but they are rather flimsy and can break with a certain amount of force.
In order to take a cast-iron bath, you need about 100 liters of hot water. The metal heats up for a very long time and quickly gives off heat. From the point of view of economy, one reception will cost one and a half times more than in a steel bath.
3. Acrylic bath- light, easy to install, durable (15-20 years). You will need at least two people to install. The product does not tolerate aggressive detergents and is intended only for bathing (you can forget about a large wash with old ones - with good methods). At a price, such bathtubs are cheaper than cast-iron ones, but they can still hit your pocket great.
The most economical type of bathroom in terms of operation for its intended purpose. The material gives off heat very slowly and warms up quickly, and 50 liters of hot water with a temperature of 40 degrees is enough for one dose.
Acrylic bathtubs have recently become very popular, despite the fact that their price sometimes exceeds all possible limits. Such popularity is due to the presence of a large assortment, as well as the simplicity of its installation. Also, the buyer can choose not only a classic rectangular bowl, but also corner options, which expands the possibilities in interior decoration.
Preparing the bathroom for installation
Wall covering
It is best to install the bathtub directly during the renovation of the room, but before the cladding is done. Since at this moment you can achieve maximum aesthetic and practical qualities, and during the laying of tiles, you can effectively process all the cracks that can let water through and create an ideal environment for the development of mold and bacteria.
If we are only talking about replacing the bath itself, you should make sure that the height of the product is 1.5-2 cm higher than the previous one. That part of the tile with which the old container came into contact did not burn out, and could also accumulate a fair amount of dirt on its surface and wash it out, in most cases it is simply unrealistic.
Floor work
Before installing the bathtub, you need to make sure once again that the floor is perfectly flat and solid, especially when it comes to installing a cast-iron bathtub, which is heavy even when empty. Tile under a heavy bath should be laid using the indentation method, which allows you to get rid of voids under the material. It is because of them that the tile can crack.
To distribute the load that the bath will create when filled, you can use wooden logs. The most suitable tree is larch. Logs are pre-treated with antiseptic and antibacterial agents, then impregnated with drying oil or PVA putty.
Such logs will distribute the load and solve the issue of height. By the way, the latter will help solve not only the problem of appearance, but also allow you to install a siphon with a deeper knee, which prevents the penetration of sewage waste in the opposite direction. Also, due to the additional rise of the bath, less waste in the form of hair, etc. will accumulate in the siphon.
Drain valve
When choosing a drain fitting, you need to pay attention to the following characteristics:
1. Material. Products made of polyvinyl chloride (PVC) and polyisopropylene are on the market. The second option is more durable, but it will also cost more, but a number of advantages fully pays for the product:
- the material is several times harder than PVC, which significantly reduces the likelihood of mechanical damage during installation of the bath;
- does not lose its strength characteristics over time;
- has a smoother surface, which reduces the likelihood of contamination;
- has a higher efficiency, since the friction of water on the pipe walls is much less.
2. Drain. Most drains on the market come from China and use a bolt during the installation process. Over time, these bolts corrode, rust and oxidize regardless of the material. Even if you separately purchase a stainless steel bolt, as a result of its contact with the grid, a soldering is formed, which will reduce the likelihood of successful disassembly during repairs to zero.
3. Mesh drain. The most economical option is a grid consisting of two crossbars forming a cross. This look is the perfect hair catcher. A more practical look in which round holes are located around the perimeter. The most expensive and reliable type - the holes in the grid are oblique, profiled.
4. Cork chain- it is advisable not to use those products that come with drain nets, but to purchase a separate one. The best option is to use a chain designed for fishing, and covered with a layer of paint on top. The latter protects against the negative effects of water.
5. Overflow pipe. While most old tubs use rigid tubing, it is best to use corrugated tubing, which has a larger capacity and diameter. These two indicators reduce the likelihood of water overflowing over the edge.
Bath dimensions - nuances
The dimensions of the bath will directly depend on the size of the room where the product will be located, as well as on those who will use it. Before buying the container itself, it is necessary to carefully measure the place where it will be located, and also take into account the availability of additional equipment, such as washing machines, dryers and boilers. It is worth remembering that bathtubs that are identical in appearance can have a different volume.
The most common sizes for different types of baths:
1. Steel: length 150-180 cm, height 65 cm, width 70-85 cm.
2. Cast iron are available in several standardized sizes:
- small-sized: length - 120-130 cm, width 70 cm;
- European standard: length 140-150 cm, width 70 cm;
- large-sized: length 170-180 cm, width 70-85 cm.
3. Acrylic bathtubs are available on the market in the widest range, from 120 to 190 cm in length and 70 to 170 cm in width.
Small-sized bathtubs are suitable for small spaces, but the process of bathing does not cause any pleasure at all. Also, do not count on a lower cost, since compactness is a need and in order to satisfy it, you need to spend a little money.
If the bathroom is quite spacious, it is worth stopping at a cast-iron or acrylic product. It is the assortment of the latter that is the most diverse: angular, with decorative trim, rectangular, square, polygonal, etc.
When you do not want to spend money on an acrylic bath, you can purchase a plastic product. As a rule, they are purchased from Chinese manufacturers and are not of particular quality, and installation requires additional effort and observance of subtleties.
Do-it-yourself bath installation: a step-by-step guide
Installation of all types of baths is carried out in several stages, but special tools and materials may be required in the process.
- The rule is a flat bar, the length of which is equal to the diagonal of the bath. As such a tool, you can use any long and even bar on which the level is placed.
- Fork wrench - necessary for tightening drain mechanisms, which are most often made of plastic.
- Rubber mallet - can be useful when shrinking the legs of the tub. The use of metal products may choose to deform the surface of the product, as well as damage the enamel.
Additional materials: silicone-based sealant and "rag" electrical tape. The latter is needed only when installing an acrylic bath.
Bathtub leveling and sewer connection
The leveling of the bathtub is carried out using a level, and the basic principle is to raise the lowered part, and not vice versa, since the height of the installed product is important to us.
A complete connection to the sewer is carried out after the complete installation of the bath, as the siphon can be damaged in the process. When choosing a drain fitting, first of all, you need to pay attention to the width of the outlet pipe. With its sufficient width, you can do without a cuff, and simply fill the gap with silicone or silicone-based sealant. There are two ways to level the bathtub: diagonally and along the sides.
In the first case, you need to put the rule on opposite corners, and set the level from above. After the level shows a satisfactory result, it is necessary to shift the rule to other angles and repeat the twisting of the legs. At the end, repeat the procedure again.
In the second case, the level is placed on the side of the bathroom, the legs of one side are adjusted, then we move on to the other. Alignment along the sides is carried out several times, since the side opposite to the measured one can go astray. The method of leveling along the sides is more laborious, and especially in cases where the floor has a number of irregularities.
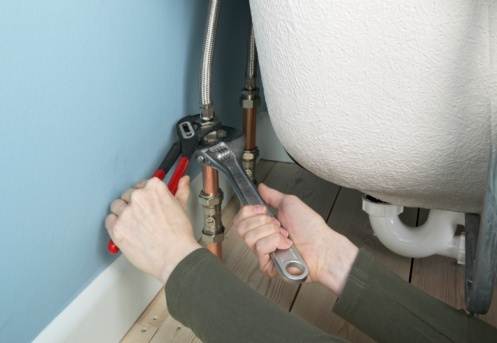
We prepare the sewer
First you need to make sure that the sewer pipe pipe and the pipe itself are completely dry. This will achieve maximum sealing when connected. It is best to turn off the water supply throughout the housing, and if possible, completely stop the water supply at the riser. The main thing is not to forget to warn the neighbors that there will be no water on the span for several hours. Next, make sure that there is no moisture not only from the inside, but also from the outside of the pipe. To do this, you can use a regular cosmetic hair dryer.
After the workplace is prepared, it's time to move on to the actual installation. Let's start with a bathtub made of acrylic.
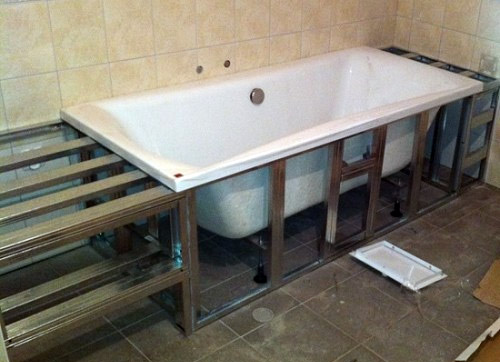
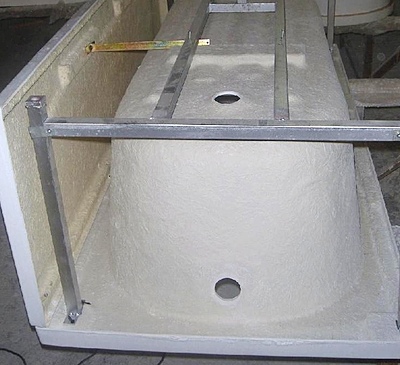
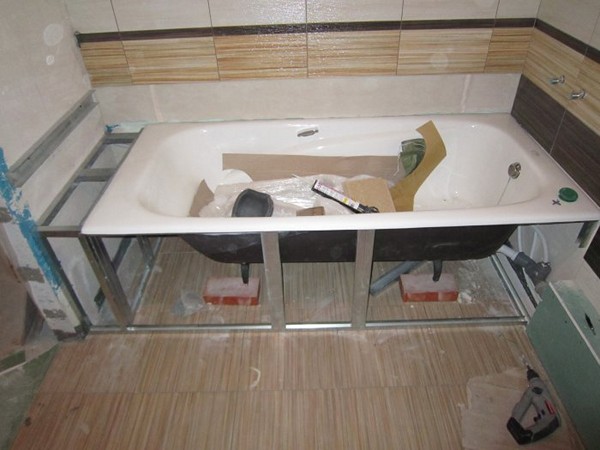
Installing an acrylic bath
In the kit of each such product there are special guides, on which the legs are subsequently attached. They are installed across the tub tank. The legs are screwed into the lodgements (the correct name of the guides).
The guides themselves are attached to the bathroom using special screws, which can also be found in the kit. So that the self-tapping screws do not damage the integrity of the shell, you need to pre-drill holes for them. It is necessary to use a drill with a limiter, and the depth of the hole should not exceed 3/4 of the length of the self-tapping screw.
After the guides are installed, you need to turn the bath on its side and connect the drain fittings. Before installing it, all gaskets that will be used must be treated with silicone. Remember that the drain gasket is installed only from the outside! Otherwise, get ready to pay your neighbors to repair the ceiling.
All threaded connections must not be tightly tightened, as there is a possibility of damage to the structure during installation.
During installation, place the bath against all walls, at the same time, make sure that the bath outlet is connected to the sewer pipe. Next, level the bath using a rule (level) and seal the connection to the sewer with a sealant.
While the sealant is curing, use a fork wrench to tighten all screw connections that were in a semi-relaxed state.
When the sealant has completely hardened, check all joints for the possibility of leakage, and if none are found, you can treat the gaps between the bathroom and the walls with the same sealant.
Steel bath installation
A steel bath is installed similarly to an acrylic one. The only difference is in the way the legs are attached. They are fastened with bolts, studs or wedges. Tighten the bolts gradually and alternately. Do not immediately be zealous and twist them to the limit, as in the future there may be a need for additional, fine adjustment.
To make the bathtub make a less loud sound when filling, you can place a piece of automotive rubber between the leg mount and the surface of the bathtub.
The subtleties of installing a cast-iron bath
Recall that cast iron products have simply incredible weight and a bathtub made from this material is no exception. It is desirable to carry out all work on connection and adjustment in the bathroom. Moving the product from room to room is fraught with unforeseen consequences in the form of damage to doorways and other interior elements.
Products with decorative legs deserve special attention. This type is selected specifically for the interior and the use of linings as the level is adjusted will nullify the entire aesthetic component. Decorative legs should be filed at the base, but this is a job for the masters of their craft.
For the installation of a drain, unlike the previous types, it is advisable not to turn the cast iron bathtub once again to one side. It will be enough to raise the front part so that additional space appears, and fix it in this state with the help of bars.
All work must be carried out very carefully and once again do not pull the bath.
Installing a plastic bath
We did not separate this type into a separate category, since plastic bathtubs are a cheaper substitute for acrylic products, and the installation process is almost identical. The only difference is the need to create an additional pillow, which will remove the load from the bottom of the product. The pillow can be made both from the same larch and from cement. Plastic bathtubs also require special care and careful operation. Otherwise, the need to replace the product will appear in 5-7 years. These products do not tolerate aggressive detergents.
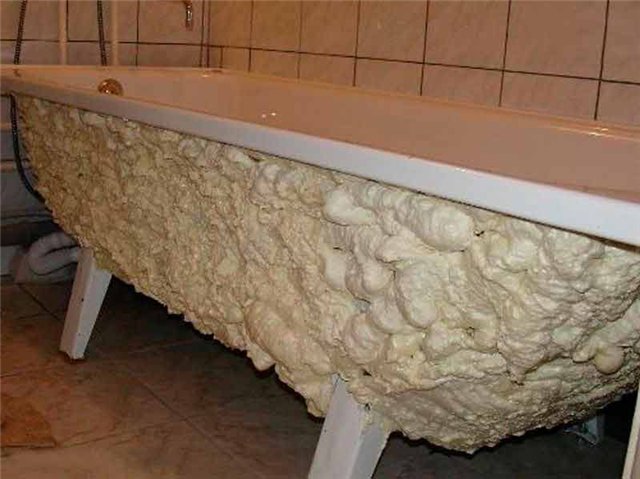
Bathroom screen
There are a wide variety of screens for the bathroom. Moreover, you can not be limited to buying a finished product, but do everything with your own hands. Perhaps this approach will not be the most correct, but the most economical - for sure.
Installing a bath without the help of specialists is a rather difficult task, which not everyone can do. Here you need to have not only the ability to work with various tools, but also to know all the subtleties of the process. You should also be especially careful when working with cast iron products - they are heavy and you can easily damage your limbs during the transfer process.
Video lesson: Installing a bath. Important Points
If you doubt your abilities, invite specialists to help, who will perform all the work according to the standards and your desires. In addition, installation companies or firms are required to provide guarantees for the work performed, as well as for additional materials that were purchased directly through them.


