Do-it-yourself warm floor in the bathroom - details about the methods
Often the question arises how to make the tiles on the floor in the bathroom warm, because when you swim and step on a cold tile, you experience not very pleasant sensations. If you are planning to make repairs, then the solution to the problem will be a warm floor in the bathroom, which you can do yourself.
At the moment, you will have several options to choose from, each of which will certainly have its positive and negative qualities, and the difference lies precisely in the type of heating elements that are used in the floor heating system. The description will allow you to get acquainted with their main characteristics and make a choice in favor of any of the options if you have not made your choice yet.
Underfloor heating in the bathroom with a water heating system
This system is a system of flexible plastic pipes through which hot water circulates, due to which the surface is heated. It is this warm floor in the bathroom that has an undeniable advantage in price both during installation and maintenance, relative to other options, and in this case there will be no electromagnetic radiation.
But there are also negative sides:
- This system is quite difficult to mount;
- The temperature is regulated only with the help of an inlet valve that regulates the supply of hot water to the system, and you can only focus on your own feelings - you changed the supply and wait for the result, if it does not suit you, then repeat the procedure;
- Quite a thick layer of screed.
Cable, electric underfloor heating in the bathroom
This option is very convenient, since you can make an electric heated floor in the bathroom from cables on your own, because installation is not associated with any difficulties. Installation is done under the tile, just keep in mind that this option is usually designed for small rooms.
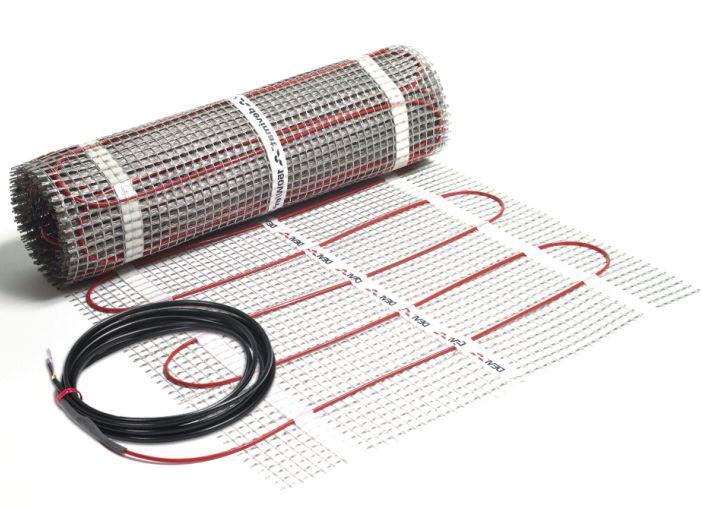
Of the negative aspects, the following can be noted:
- Quite a large consumption of electricity during operation;
- During operation, a small electromagnetic radiation is generated;
- If a cable break occurs in any section, the entire system will fail.
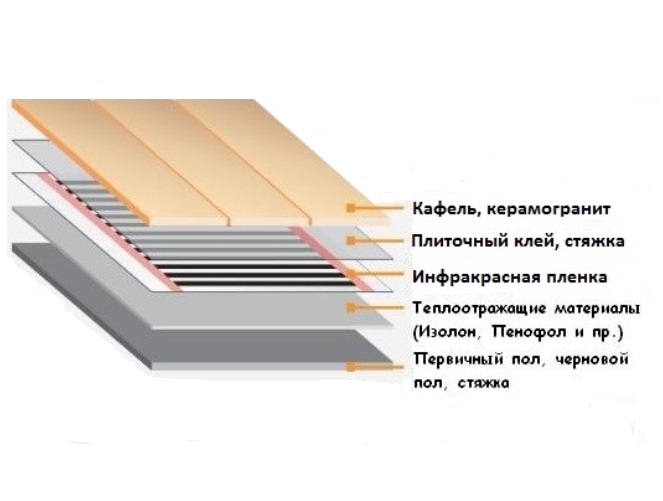
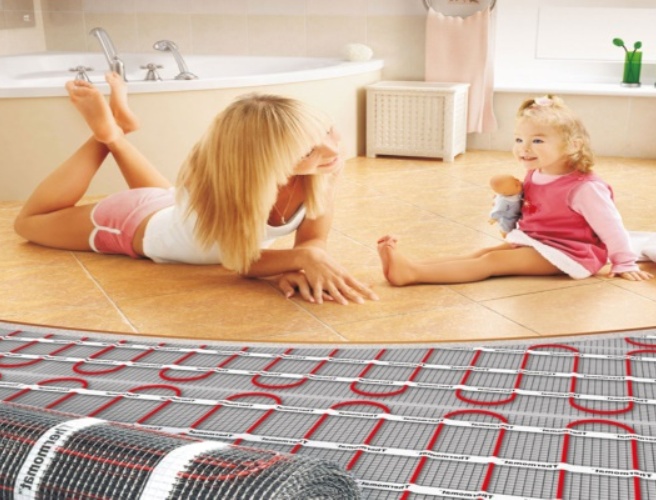
Floor heating in the bathroom infrared, film system
This is a very convenient option, since it is possible to lay such a system under any coating, while the film with infrared emitters has a very small thickness, so there is no need to make a screed during installation. The films are connected to each other in parallel, which causes the operation of the system as a whole, even if any section fails. You can adjust the floor heating in the bathroom using a special thermostat and set exactly the temperature at which you will be comfortable.
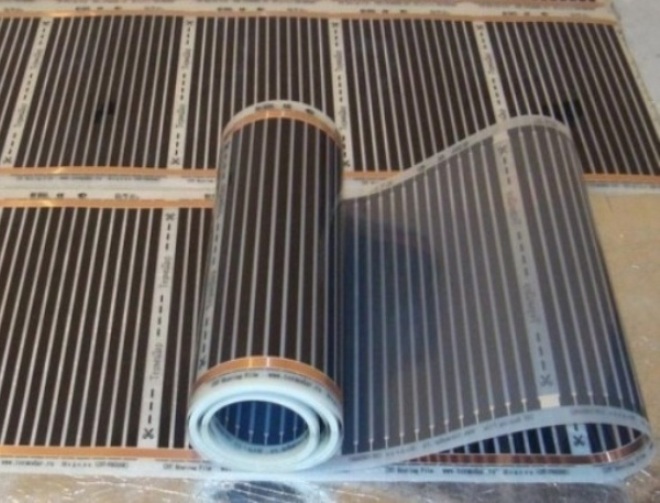
The negative aspects include:
- Quite high cost;
- Electricity consumption will be significantly increased.
How to make a warm floor in the bathroom with your own hands with a water heating system
So, let's figure out how to make a warm floor in the bathroom with your own hands, using a water heating system:
To begin with, you will need to make a plan for laying out pipes in the room, as well as plan the location of a cabinet with a collector that connects to a source of hot water and transfers it through the contours of the pipes of the water heating system. The manifold has several outputs for different circuits - it is due to this that the temperature in the room will be adjusted, i.e. you can turn on all or turn off any circuits by adjusting the temperature in the bathroom.
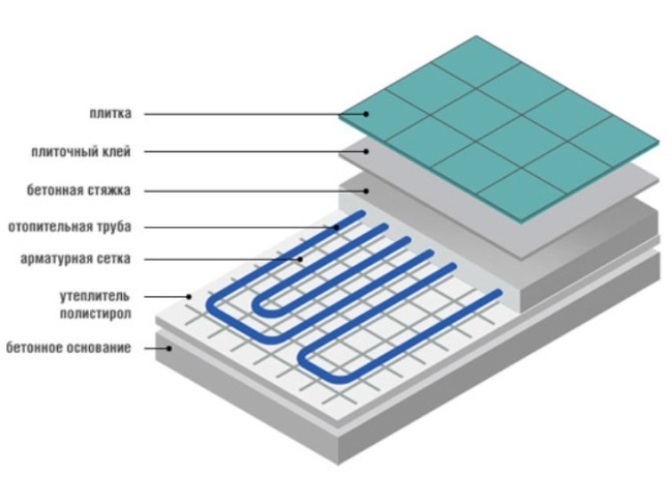
For the collector, it is necessary to provide two pipes - heated water will be supplied through one, and the liquid that has passed through the entire system will be drained through the second.
Now is the time to make an excellent and reliable waterproofing, if it has not already been done. If rolled waterproofing material was used, then it is necessary to properly weld the overlap points with a building hair dryer or soldering iron.
The turn of the rough screed has come, and it must immediately be taken into account that its level should be below the level of the clean floor mark, taking into account the tiles, by about 7 cm. At this stage, small differences in height are acceptable.
For several days it is necessary to “care” for the screed, constantly wetting it, so that the solution gains strength.
Now you need to cover the entire surface with foil - this will create an additional screen that reflects infrared waves, directing them back into the room. Glue the foil joints with adhesive tape, it is desirable that it be special - aluminum.
It was the turn for the laying of polyethylene pipes, according to the plan drawn up earlier. The pipes must be fixed directly to the screed, while the distance between the pipes must be at least 150 mm. Often, for the convenience of fixing pipes, a metal mesh is placed on the floor, to which a flexible hose can be screwed with ordinary wire. Next, connect one end of the pipe to the supply manifold of the collector, and the other to the return.
The pipes are installed and now you are making a final, finishing screed, and it is you who need to do it as evenly as possible, since the laying of ceramic tiles will be the final finish.
Installation of electrical, cable system
First you need to provide a location for the thermostat and sensor, as well as take care of entering the power supply for the cables - these elements are usually located on the wall, it is most convenient to place them next to the outlet, having previously drilled a hole for their installation. Typically, the regulator is installed at a height of about one meter from the floor level.
Now is the time to start planning the location of the heating elements, and you need to maintain the minimum distance between the turns of the cables, which are indicated in the recommendations from the manufacturer.
Do not forget that it is necessary to provide reliable waterproofing for the bathroom, and if it has not been done yet, then now is the time to address this issue.
After waterproofing, a layer of thermal insulation is arranged, and if there is no reflective layer on the basis of thermal insulation, then cover the floors with foil before thermal insulation, gluing the joints with aluminum tape. If the surface has irregularities, then at this stage this will not create any special problems and it is not necessary to pay attention to them.
The cable is attached to a metal mesh - this will not only ensure the position of the turns according to the plan, but also prevent the heating elements from falling into the thermal insulation layer. Coils of cable on a metal mesh are laid parallel to each other, they cannot be crossed. The laying of heating elements is carried out exclusively on the “working” area, because it makes no sense to do heating under the bathroom and sink.
Install the regulator in a pre-prepared hole, and also place the sensor in a special corrugated tube and position it in such a way that it is above the level of the screed.
Using a tester, check the entire system - this will show if the cable was damaged during installation.
Now it's the turn of the screed, and keep in mind that its thickness should be about 30-50 mm. It is advisable to perform a screed along the beacons, as this will achieve maximum horizontality, and keep in mind that there should be no voids, as they can cause overheating of certain parts of the system, which will lead to a malfunction of the heating elements.
After - again check the integrity of the system with a tester and if the cable was not broken anywhere during operation - leave the screed solution to gain strength.
It is undesirable to turn on the system earlier than 27-30 days have passed, as this can cause cracks in the screed or violate the integrity of the cables themselves.
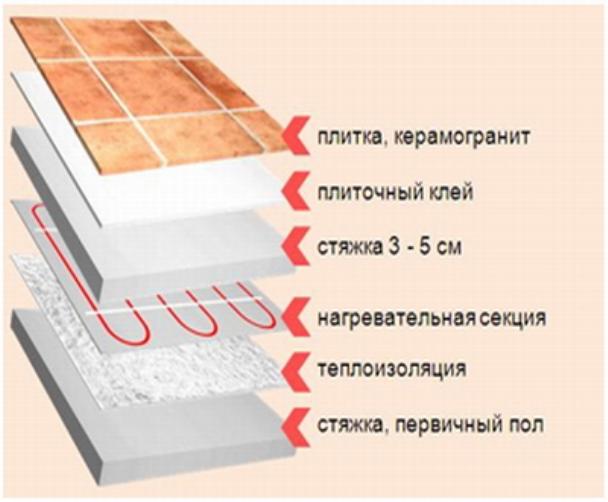
Installation of infrared, film heating system
This system is the easiest to install, although here you have to do something to ensure maximum efficiency.
First, take care of the presence of waterproofing.
A rough screed is made, which eliminates the main irregularities. After it gains strength, you can proceed to the next step.
Drill a hole at a level of 1 m from the level of the finished floor - a thermostat will be installed here, and you also make a strobe in advance for laying electrical wires to connect mats.
Now you need to lay a layer of thermal insulation with a reflective film - this will create the maximum reflective effect, while the heat emitted by the mats will return to your room. The optimal thickness of the heat insulator with a reflective layer is 3 mm, and the thermal insulation should have a low shrinkage rate, for this a technical cork in rolls of 2-3 mm, foil isol or isolon is suitable.
You cut the heat-insulating substrate along the width of the heating film, the layout is done at a distance of 10-15 cm from the walls, and also with a distance of a couple of cm between each strip - this is done in order to ensure maximum adhesion of the finishing screed to the rough one. It should be noted that under the tile there is a special perforated film with holes - it is these holes that provide a large adhesion area for the finishing screed or tile adhesive with a rough screed. Therefore, where there are holes in the heating mats, make holes in the substrate to ensure that the mortar has access to the rough screed.
Please note that infrared mats are very sensitive to overheating, so they should not be placed under furniture, in our case, these are various plumbing fixtures and maybe a washing machine.
Now is the time to connect the entire system and check its performance. Connect the thermostat and sensor. If everything works, then you can proceed to the final stage.
The final screed is made with a thickness of about 5 mm, and it is desirable to make it with tile adhesive, since this solution has increased adhesion rates.
After the screed has gained strength, you can proceed to the final tiling.
Understanding whether you need underfloor heating in the bathroom
To answer the question of whether you need a warm floor in the bathroom, you need to decide whether the comfort is worth the significantly increased repair costs, however, after you swim, it will be much more pleasant to stand on the warm floor, and given that the final finish is tiles, then in the cold season, such a surface will create sensitive discomfort.


