How to independently connect the bath to the sewer and avoid annoying mistakes
Buying a bath and installing it in its intended place is only half the battle. The main task is to correctly connect it to the sewer system. This is easy to do: no special skills are required for the job. You can solve the problem yourself. But connecting the bath to the sewer requires compliance with certain rules. The provided instructions will help to understand the nuances of this case.
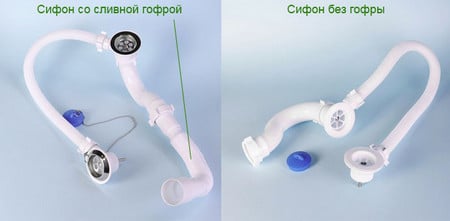
- To connect the bath to the sewer pipe, you should purchase a special siphon. This device is equipped with devices designed for hermetic connection of plumbing to the drain.
- Corrugated pipes should only be used when absolutely necessary. Such a connection between the bathtub and the sewage system is not ideal for the following reasons: the folds trap debris and, as a result, dirt accumulates, it is very difficult to clean such pipes, and during operation they have increased hydraulic resistance.
Corrugated pipe for connecting the bath to the sewer should be used as a last resort
The connection of the bath to the sewer will be correct if the outlet of the siphon is located above the sewer pipe. The height difference should provide a quick and unhindered flow of water. Violation of this rule will lead to stagnation of water and blockages.
- The system needs to be cleaned periodically. To access the siphon, you should purchase an inspection hatch and install it on the screen.

Access to the siphon will provide an inspection hatch
Pipes for supplying sewage to the bath are selected according to the following principle:
- it is advisable to install the sewerage system in the bathroom with rigid plastic pipes, even if you have to use several knee elements;
- if the sewerage in the bathroom has a complex configuration and does not fit with the siphon outlet, you will have to use a corrugation.
The right choice of siphon is the key to system reliability
Pipes for connecting a siphon to a sewer pipe can be as follows:
- from flexible smooth (pipe diameter - 40 mm) or from hard plastic;
- if the sewerage is made with pipes with a diameter of 50 mm, it is necessary to use a special rubber adapter 50/40 mm;
- if the sewerage in the bathroom is made of cast iron, a 73/40 mm adapter is required.
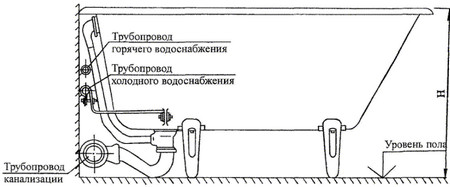
Installation position of the bath
How to connect a bath to the sewer: a sequence of actions
The process can be conditionally divided into several stages.
- They study the instructions supplied by the manufacturer with the siphon, and, according to the recommendations, assemble it. All rubber or silicone gaskets should be in place.
Connection of siphon parts
- All parts of the siphon made of plastic are connected exclusively by hand. The use of gas and open-end wrenches is unacceptable. Plastic threads require careful handling.
- After installing the device, its corresponding end is inserted into the sewer pipe, and the other part is connected to the bathroom drain hole, not forgetting to use sealing gaskets. The overflow pipe must also be connected to the bath.

Installing a gasket on the siphon to the bath
- Do-it-yourself sewerage in the bathroom is assembled in such a way that all joints are airtight. Silicone cannot replace sealing gaskets: they can only additionally protect the joints.
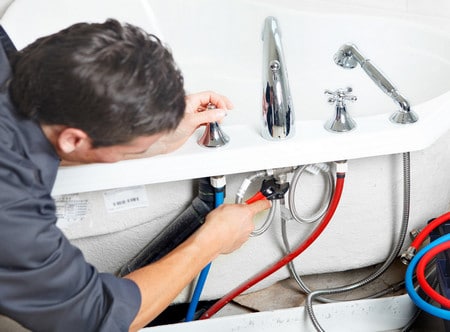
How to connect the bath to the water supply and check the tightness of the connections
After the bath has been connected to the sewer, it is necessary to check the tightness of the connections and the quality of the drain. To do this, you need to connect plumbing to the water supply. The process technology is as follows.
- There must be a stopcock in front of the connecting fittings on the pipes of cold and hot water supply: it is necessary to repair or replace the mixer.
- Eccentrics are attached to the fittings. In order for the connections to be airtight, they use tow with paint (“grandfather's” method) or fum-tape. Eccentrics are useful in order to properly dock water pipes with connecting nuts.
- Decorative chrome-plated nozzles will help to hide unpresentable-looking eccentrics.
- Rubber gaskets are placed in the middle of the connecting nuts. They will ensure the tightness of the system (fum tape is not used in this case).
- The mixer is screwed: both nuts must be tightened to prevent distortion. Under the wrench, you need to put a rag so as not to damage the chrome surface. You don't need to put in too much effort.
- After connection, it is necessary to check the system for leaks: open both taps and check for leaks. It is also necessary to observe the junctions of pipes and plumbing after the water is shut off by the mixer tap: a leak may form under pressure.
- If leaks are found, the leaky assembly should be redone. The reason may be a poor-quality or incorrectly laid gasket.
After connecting the bath to the sewer, you need to connect the water supply and check the system for leaks
It is highly undesirable to use reinforced hoses for plumbing - they are unreliable. It is better to use corrugated stainless steel tubes.
Video: two important points for installing a bathroom
At the end of the work, you need to open the taps and check the tightness of the connection between the bath and the sewer. If no problems are identified within a few minutes, then everything is done correctly. If you doubt that you can cope with the task on your own, invite an experienced specialist to help. His salary will be several times less than compensation to neighbors in the event of an accident.


