How to lay tiles in the bathroom: tips and cautions for beginners
Repair is always accompanied by an anticipation of joy and change for the better. What can cheer you up like an updated interior, especially when it comes to the bathroom? New sparkling plumbing, trendy lamps, stylish cabinets, walls covered with bright tiles - after visiting such a room, you feel an unprecedented burst of energy. However, initial enthusiasm does not always mean an excellent result.
Many, trying to save money, decide to lay the tiles in the bathroom on their own. Nevertheless, there are so many nuances in this work that even after reading various instructions and manuals for working with tiles or consulting with professionals, it is very difficult to cope with "excellent". The result of this amateur performance can be very deplorable: crooked rows, uneven or too wide seams, or even worse - obvious inconsistencies at the corners and tiles crumbling in a month or two. And the worst thing is that you can fix it only by knocking down all the tiles and putting it again. To prevent this from happening, you can hire professionals - or take into account how to properly lay tiles in the bathroom. First of all, you need to understand what mistakes can be made at various stages of installation and try to avoid them.
The most common mistakes
Laying tiles in the toilet and bathroom is quite difficult: the work can go to waste due to the slightest error. If the tile lies unevenly, crumbles or does not fit, this may be due to the following errors:
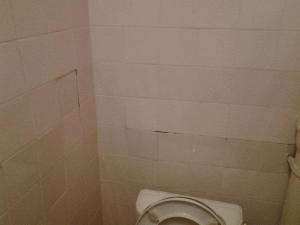
Attention. Another common mistake is trying to start laying by measuring from the tiles already laid on the floor. If the floor has not been pre-leveled, the curvature will go to the walls.
It’s actually not difficult to avoid the mistakes listed above: it’s enough to be conscientious about the repair and take into account every little thing.
Working by the rules: important points when lining the bathroom
Despite the apparent complexity, it is quite possible to lay tiles in the bathroom yourself, and it is not forbidden to use step-by-step instructions for this. However, no matter what walls and materials you have to work with, you should definitely follow fairly simple rules.
Rule number 1 Quality materials - the key to success
Saving on tile or adhesive is not a good idea. Let the tile and building materials cost a little more, but the beauty and strength will remain for many years.
Rule number 2 Careful surface preparation - do not ignore!
Need a perfect result? It is possible only on a flat wall. Therefore, it is worth taking the time and properly primed, and if necessary, putty the walls or even make a concrete floor screed. You can start work only after all the materials applied to the floor and walls have dried.
Rule #3 Level, level and again level
Accuracy is the most important condition when working with tiles. In order for the tile to lay perfectly, you must use the level. It will be required constantly when:
- Checking the angle between wall and floor;
- Evaluation of surface evenness;
- Checking the quality of laying to prevent "collapse of the wall";
- Flawless fit when cutting and joining corners.
A laser level capable of measuring in two planes will save a lot of time, but for a single work, a regular bubble level is also quite suitable. The main thing is to take measurements regularly.
Rule #4 Only up
Professional masters have no questions whether to start laying tiles from above or below: they do an excellent job in both cases. Those who are far from the title of guru do not have to choose: the tiles should be laid strictly from the bottom up, and in the following sequence:
- Measure the level of the angle between the wall and the floor;
- Measure between the wall and the floor a distance equal to about half the tile;
- Mark this gap along the entire wall by drawing a line with a marker or attaching a wooden rail at the selected level;
- Lay out a row of tiles with the bottom edge along the marked line;
- Lay out the bottommost row of tiles, trimming them according to the curvature of the floor.
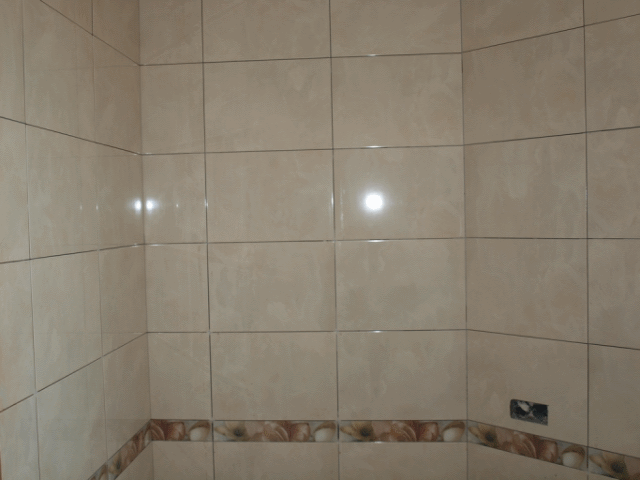
With this method of laying, the visible rows of tiles will look perfectly even, and the possible unevenness of the bottom row will easily hide behind the baseboard or plumbing.
Advice. To maintain an even seam, use plastic crosses. They come in different sizes - millimeter ones are suitable for thin seams, wide ones will be obtained using 2.5 mm crosses.
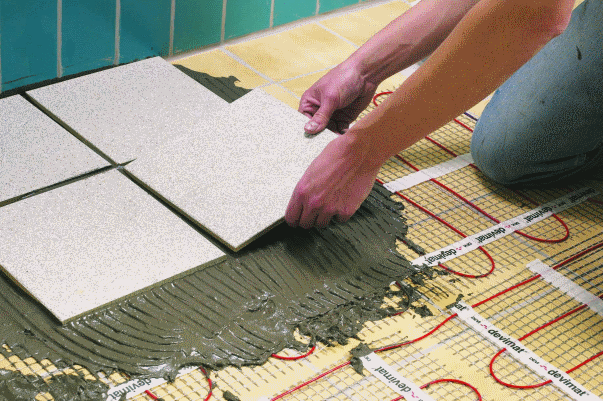
Rule number 5 Angle - any. The floor is perfect
As mentioned above, the floor under the tiles must be perfectly flat. When all the work on leveling the surface has been carried out, it remains to determine how to properly lay the tiles on the floor: if the reference angle does not play a special role for professionals, then when laying it yourself, it is important to do the following:
- Carefully measure the perpendicularity of the walls and floor;
- Draw the floor into squares and calculate the sequence of laying tiles;
- Start laying tiles from the most visible corner, gradually moving towards the center of the room;
- When the floor is completely laid out, mask the small gaps between the wall and the floor by inserting trimmed tiles.
Thus, a beautiful pattern will be obtained on the visible part of the floor, and the corners will be carefully masked.
Rule No. 6 An even angle is good, but an uneven one is bad!
To avoid ugly joints that can spoil the whole look of the bathroom, adjust the tiles in the corners as follows:
- Start laying from the most visible wall;
- Lay out the corners of adjoining walls with trimmed tiles;
- Carefully remove the seam under the profile or grout.
If the laying started from the side wall, it is best to cut the tiles symmetrically on both sides to meet the visible corners.
Rule number 7 Glue - do not be sorry!
To make the tile stand as firmly as possible, it is advisable to apply glue with a notched trowel around the entire perimeter of the tile and properly coat the center. When laying on a wooden floor, it is also desirable to apply a layer of glue on its surface.
Attention. The amount of glue applied should be carefully controlled: too thin a layer will lead to the formation of voids, too thick - will not allow the tile to adhere firmly to the surface.
Rule #8 One, two, three - three, three, three!
Beautiful seams will make the wall decoration neat and attractive. But for this it is important to consider the following nuances:
- The grout will lie better on the slightly moistened edges of the tile;
- Before grouting, tiles must be perfectly clean;
- Diluted material can only be used for the first 20 minutes;
- When grouting, the spatula or float is held at an angle of 90 °;
- The seams should be filled as tightly as possible;
- Best of all, excess grout is washed off 5-7 minutes after application.
The main thing is not to try to embrace the immensity. Overwrite the tiles should be slowly, in small areas - in this case, the result will be much better.
Obviously, the correct laying of tiles in the bathroom is not so much difficult as painstaking work. However, all efforts will certainly be rewarded: evenly laid tiles will delight the eye with a bright pattern, neat seams and exceptional strength for more than one year.
We offer you to watch the video of Anatoly Aristov:


