How to grow orchids from seeds? Unusual orchids from China - how to grow a beautiful flower from seeds at home? How to grow an indoor orchid from seeds.
It is difficult to find an amateur gardener who is indifferent to orchids. This is a masterpiece created by nature itself. They are deservedly called “aristocrats of the plant world.” Flowers simply fascinate with their tenderness and elegance, as well as their variety of shapes, colors and aromas. They can resemble tropical butterflies, birds, ballerinas, even slippers and lizards. Despite the fact that orchids are demanding to care for and are rather reluctant to propagate at home, very few gardeners are willing to give up their pets. Until recently, it was believed that it was impossible in principle to grow them from seeds, but now there are chances, although the technology is complex and the procedure requires strict adherence to it. But even in this case, success is not guaranteed.
How orchids grow
Orchids or Orchids (Orchidaceae) are a family of herbaceous perennials. They can be found everywhere, from the tropics to the forest-tundra, but, of course, the brightest varieties, captivating with their exotic coloring and the shape of large flowers, live in tropical forests. It is impossible to calculate the exact number of representatives of the family - at the moment, about 35,000 different orchids are known, including natural hybrids (plants have the ability to cross, including interspecific ones) and varieties bred through selective breeding. The eight hundred genera included in the family make up approximately 10% of all plants in the world.
Humanity has been familiar with orchids for a long time. They were first “domesticated” by the Chinese around 2000 BC. e. The name comes from the Greek orchis (“testicle”). The plant owes them the characteristic shape of thickened stems. The Greeks own beautiful legends about the appearance of orchids on Earth. According to one of them, these are fragments of a rainbow that fell from the sky. According to another version, the first orchid grew where Aphrodite dropped her shoe.
Orchids obtain the necessary moisture and nutrients from the atmosphere, absorbing them using a developed system of aerial roots covered with a thick layer of special tissue - velamen.
Based on their growth characteristics, they are divided into two groups:
- Monopodial orchids. The growth point is the apical bud of the shoot. It persists throughout the life of the plant, disappearing only when it ages or dies. Such varieties stretch upward, peduncles and side shoots are formed from buds “hiding” in the axils of the leaves. Most often, adult plants resemble vines or their leaves gradually gather into a rosette.
- Sympodial orchids. As soon as the youngest shoot is recognized by the plant as sufficiently developed, having reached a certain size, the growth point at its top dies. At its base, the rhizome forms a new one, from which another shoot or peduncle appears. These orchids only grow in one direction.
Orchid flowers vary greatly in size (from a few centimeters to almost a meter in diameter) and color (the expression “all the colors of the rainbow” does not even come close to describing this variety of shades and tones), but their structure is approximately the same. The upper part consists of three sepals, which often grow together to form one “petal”. The lower one consists of two true petals of a smaller size, between which there is a third one - the so-called lip, which sharply contrasts in color with the overall color of the flower. It contains a nectary. In shape it resembles a bag, a shoe or an elongated gramophone horn. Often the flowers are collected in inflorescences (each with an average of 4–16 buds).
When can you collect seeds?
If pollination is successful, fruits ripen - boxes or pods filled with seeds. They are so light that they do not fall to the ground, but glide, caught by wind currents. In order for the seeds to germinate when they reach the soil, it is necessary to have a mycelium in this place, which will provide them with the necessary nutrition.
Orchids have simple, monocotyledonous leaves, most often a rich dark green color. There are no petioles. On each stem thickened at the base (tuberidia, more often called pseudobulbs), from one to three leaves are formed. The shape of pseudobulbs resembles cylinders, spindles, and eggs. Orchids store moisture and nutrients in them.
Video: popular varieties of orchids for growing
What you need to germinate orchids at home
Mostly at home, orchids reproduce vegetatively. Until recently, it was believed that they could only be grown from seeds in laboratories with special equipment. But now an amateur florist can try it, thereby gaining a unique experience. Success, of course, is difficult to achieve, but if the instructions are followed exactly, it is quite possible.
Collect seeds
To carry out manual pollination, you will need two orchids blooming at the same time. Pollen from the stamens of one of them is collected with a soft brush or cotton pad and transferred to the pistil of the other. A pollinated flower will fade, this is normal. If it falls off, it means the procedure was not successful. Otherwise, after about 1.5–2 weeks, positive changes will be noticeable - the fetus will begin to form.
Each orchid pod or capsule contains more than a million seeds. Accordingly, they are very small. It is impossible to see them with the naked eye, only through a microscope. The contents of the fruit resemble dust. Collecting seeds at home is problematic, although under the condition of artificial pollination (including interspecific pollination), pods and boxes set quite easily. Therefore, most often seeds are purchased from online stores. The main supplier is China.
It is quite difficult to create not just greenhouse, but “super-greenhouse” conditions and absolute sterility at home, without special equipment. In addition, to see the result of your own work, you will have to be patient. Orchids grown from seeds bloom in at least 4–5 years.
Equipment for propagation of orchids
Regular pots or containers are absolutely not suitable for germinating orchid seeds. You will need transparent glass flasks specially designed for this purpose, or containers for chemical reagents with a narrow neck with a volume of approximately 200-300 ml. A conical Erlenmeyer flask, for example, would work well. If you don’t have any of this, you can use regular glass jars with screw-on lids.
Containers must be closed absolutely hermetically. Stoppers are most often included with flasks. If you don't have any, you can make them yourself by twisting a very tight cotton or gauze swab and wrapping it in several layers of aluminum foil. Be sure to check how tightly the homemade stopper fits to the neck. It is necessary to drill 3-4 holes with a diameter of several mm in the lids of the jars and hammer them tightly with the same cotton wool.
Nutrient substrate for sowing seeds
Ordinary soil, even one specially designed for growing orchids, is completely unsuitable for seeds. Some gardeners recommend sowing them in moist, finely chopped sphagnum moss, but it is better to use a special nutrient mixture (moss is very difficult to maintain complete sterility, the necessary acidity and at the same time provide nutritional value).
It is based on agar-agar, a mixture of polysaccharides obtained from certain varieties of brown and red seaweed. After extraction it is a white or yellowish powder, but when dissolved in hot water it turns into a jelly-like mass. The best option for an amateur gardener is the so-called Lewis Knudson nutrient medium. The same “substrate” is used by those who grow orchids on an industrial scale. It allows you to grow flowers without creating a symbiosis with fungi.
If it is not possible to purchase it, prepare the mixture yourself. Each flask should be filled approximately halfway. Required components:
- distilled water (200 ml);
- agar-agar (10–15 g);
- glucose and fructose (10 g each);
- solution of potassium carbonate or potash;
- orthophosphoric acid.
The last two ingredients are used to ensure that the medium acquires the necessary acidity. The optimal pH for orchid seeds is 4.8–5.2. You can find out the initial value using special indicator strips made of litmus paper. They are easy to purchase at any chemical store. Acid and alkali are added a few drops at a time and after each operation the acidity of the mixture is checked again.
She prepares like this:
- Pour agar-agar into a glass of plain water. Leave for several hours to swell.
- Boil distilled water, add glucose, fructose and agar-agar. Stir constantly in one direction (clockwise or counterclockwise).
- Continue heating over low heat or in a double boiler until all the powder has dissolved and the mixture has a jelly-like consistency.
If there are a lot of seeds and you want to experiment, you can try to germinate them in a more exotic “substrate” (the ingredients are calculated per liter of distilled water):
- 0.5 kg of fresh tomato puree (peel, grind in a blender, squeeze out the juice), 0.5 liters of coconut water (not milk), 1-2 ml of liquid fertilizer for orchids, 20 g of agar-agar or 200 g of potato starch;
- 450 ml of freshly squeezed potato juice, 40 g of powdered sugar, 7 ml of orchid fertilizer, a teaspoon of lemon juice, 15–20 g of agar-agar;
- 10 g each of brown sugar and honey, 1 ml of orchid fertilizer, 5 g of agar-agar;
- 200 g of peeled potatoes crushed in a blender into a pulp, 15 g of granulated sugar, 1–2 ml of orchid fertilizer, 1–2 g of peptone (hydrolyzed protein obtained from milk or animal meat) 10 g of agar-agar;
- 10 g of sugar and honey, 200 g of starch, 3 tablets of activated carbon, ground into powder, 70 g of banana puree, 2-3 ml of fertilizer for orchids.
When preparing such mixtures, half of the water is used to make agar-agar jelly. The remaining ingredients are placed in hot, but not boiling water (temperature about 95ºC). Stir well for 2-3 minutes and pour the mixture into the jelly. The components of Knudson's medium are added to it in the order in which they are located in the package.
Video: preparing nutrient substrate
Preliminary preparation
The main preliminary preparation is to create complete and absolute sterility. The dishes, the nutrient mixture, and the seeds themselves are disinfected.
In laboratory conditions, special autoclaves are used to sterilize dishes; at home, you can get by with a regular oven or pressure cooker. Flasks and jars are heated for at least half an hour at a temperature of 130–150ºС. Homemade plugs must first be heated by immersing them in boiling water.
Then the containers are sterilized again, along with the contents. 30–40 g of hot nutrient mixture per 100 ml of total volume is poured into each of them and closed tightly. The second procedure will take about the same time. When pouring it into a container, make sure that it does not get on the walls - this way you will create a nutrient medium not for orchid seeds, but for bacteria.
You can also place the vessels in a pan of boiling water and keep in a water bath for about 20 minutes. Allow the vessels to cool, repeat the procedure twice at intervals of 24 hours.
The finished jars are left closed for 4–5 days to check the quality of sterilization. If during this time the nutrient mixture does not become moldy, the disinfection was successful. The plugs need to be additionally wrapped with a layer of foil. Do not tilt the container until the jelly has set. If there are no seeds, the vessels can be stored in the refrigerator for 2–3 months. To make the jelly liquid again, it is melted in a water bath.
The seeds are sterilized in a solution of calcium hypochloride, also known as bleach (10 g of the substance per 100 ml of distilled water). They are left in the liquid for 10–15 minutes, continuously shaking the vessel. Then they are sown immediately.
Step-by-step instruction
Compared to everything else, sowing itself is a relatively simple procedure. But even here it is necessary to maintain complete sterility. The time for emergence of seedlings, depending on the type of orchid, varies from a week or one and a half to 6–9 months.
At all stages of cultivation, the required conditions do not change. Orchids are provided with bright diffused light, placing its source approximately 30 cm above the plantings at a slight angle, daylight hours of at least 14 hours, a temperature of 25–28ºС without sudden changes and humidity of at least 70%.
- Place a wire rack or mesh over a wide pan of boiling water. Securely fix the vessel with the nutrient mixture on it. The lid from it should be located here, above the steam.
- Using a sterile syringe or a special chemical pipette, remove the seeds in small portions from the solution in which they were sterilized and distribute them over the surface of the substrate without touching it. Everything needs to be done as quickly as possible.
- Gently rock the flasks to distribute the seeds more evenly. Close the containers tightly and place in the chosen location. A home mini-greenhouse, florarium or homemade “greenhouse” is suitable for them.
- First, tiny green “balls” should appear. They then form hair-like rhizoids (to absorb nutrients). Next, leaves appear and, lastly, roots (when the plant has 2–3 true leaves).
- After about a year, remove the seedlings from the jar using tongs in a circular motion, as if twisting, and carefully wash off the nutrient mixture from them. An alternative is to pour some warm water into the container and shake lightly in a circular motion. Pour the mixture with the sprouts into a shallow, wide container, add 2–3 ml of a 0.5% Fundazol solution. Let stand for 10–15 minutes and remove the seedlings with a soft, thin brush.
- Fill plastic cups with drainage material. The height of the container should approximately coincide with the diameter of the roots. It is better if they are transparent - this will make it possible to control the condition of the root system.
- Transplant the orchids into a substrate of crushed sphagnum moss, fern rhizomes and pine roots (1:1:1). The more uniform it turns out, the better. To prevent the development of mold, add activated carbon crushed into powder (10 tablets per liter of the finished mixture). First, all components of the substrate must be poured with boiling water and left for half an hour.
- Do not water the seedlings, but regularly spray them with soft water warmed to room temperature. Do not let the substrate dry out completely.
- After about 4–6 months, replant the stronger orchids into soil for adult plants and care for them as usual.
Photo gallery: germination of orchid seeds
At first, the germinating seeds look like green balls. Last of all, the orchid seedlings develop leaves and roots. Such orchids are ready for transplanting into the ground
Some orchidists recommend plucking seedlings after the appearance of the first and each subsequent leaf, and when the plant forms four, planting them in individual containers. But with such frequent transplants, it is difficult to maintain the necessary sterility.
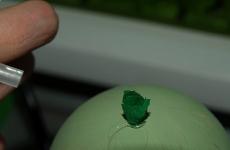
If you have not the seeds themselves, but the fruits of orchids, and they have not yet burst, wash them thoroughly in hot water and soap and cut them with a sharp, disinfected scalpel over steam. There should also be a ready-made flask into which you can sow the contents of the “box”.
When the fruit has already cracked, pour its contents into a sterile container and fill with distilled water. Add a few drops of hydrogen peroxide and shake vigorously for 10 to 15 minutes. Then remove them with a syringe or pipette and sow them immediately.
Video: sowing orchid seeds
Possible problems
An attempt to grow orchids from seeds at home ends in failure much more often than in success. The first problems may arise already at the stage of purchasing planting material. Since it is most often ordered directly from China, no instructions in Russian are included. Sometimes it is not clear whether the seeds are collected (germination lasts no more than a year), or the type of plant, or even whether they are orchids or lawn grass.
- Prepare a new agar-agar jelly.
- Add some warm water to the flask and shake the liquid.
- Pour the contents of the vessel into a shallow bowl, add 2-3 drops of a 1% solution of any fungicide (Fundazol, Skor, Abiga-Pik), hydrogen peroxide and biostimulator.
- After 10–15 minutes, remove the seedlings and place them in fresh substrate as described above.
When young orchids are already transplanted into the ground, they are often exposed to a pathogenic fungus that provokes the development of rot. Often the grower himself is to blame for this, because he is overly zealous with watering. If the room is also quite cool, it is almost impossible to avoid the appearance of pathogenic microflora.
Rot is treatable, but at the earliest stage of the disease. You need to start acting as soon as you notice the first black-brown spots on the roots and leaves. If they have already blurred, the soil is covered with mold and spreads an unpleasant putrid smell, the orchid can only be thrown away.
- Remove the plant from the pot, clean the roots from the substrate.
- Inspect them carefully, cut off all areas affected by rot to healthy tissue with a sharp, disinfected knife. Do the same with the leaves.
- Soak the roots for half an hour in a bright pink solution of potassium permanganate or any fungicide (5-7 ml per liter of water). Sprinkle the “wounds” on the leaves with crushed activated carbon, chalk, colloidal sulfur or cinnamon.
- Sterilize the pot and prepare a new substrate. Disinfect it too.
- Replant the orchid by adding Glyocladin and Trichodermin granules to the soil when replanting.
- Water it for 2–3 months, alternating regular water and a solution of Baikal-EM, Alirin-B, Maxim. The dosage of the drug is reduced by half compared to that recommended by the manufacturer.
Before planning to purchase orchid seeds for growing them at home, you need to soberly assess your own strengths and capabilities. This is a painstaking and time-consuming procedure that requires care, accuracy and strict compliance with all conditions. The result, and especially the flowering of new plants, will have to wait a long time. On the other hand, all the inconveniences and difficulties are more than compensated by the satisfaction of success, because it is so nice to realize that you succeeded in what many did not succeed in, and to be the owner of a truly unique flower.
orchids by seeds- not an easy task for beginners.
It requires special knowledge, certain skills and a lot of patience.
If you have the desire and perseverance, then, ultimately, the reward will be the appearance of sprouts of this exotic plant, and after a few years, their extraordinary flowering.
phalaenopsis extremely small and more like dust. In natural conditions they have very low germination percentage, so the plant produces up to a million seeds per season.
Almost all of them lacking reserve nutrients. For the embryo to begin to develop, it is necessary fungal infection, forming mycorrhiza.
He grows inside the embryo and provides the sprout with water and essential minerals.

Phalaenopsis seeds are extremely small and more like dust.
For a long time this was an obstacle to artificial orchids from seeds.
The problem was resolved only after the American biologist L. Knudson developed the composition of a mineral nutrient medium with sucrose, on which it was possible for the first time germinate orchid seeds.
This method was a revolution in breeding phalaenopsis and the creation of numerous hybrid forms that are now widely available in stores.
Possible difficulties
Reproduction of phalaenopsis at home- a rather complex and time-consuming process:
- Seeds are highly susceptible to microbial contamination;
- For storage and then planting, sterile conditions are required, which are quite difficult to achieve in an apartment;
- The formation of seedlings on an artificial medium lasts for at least 9 months.
Attention! Strict adherence to the rules of sterilization and sowing technology is the basis for successful propagation of orchids from seeds at home.
In order to sow orchid seeds, first carry out preparatory work.
Preparation of glassware, related instruments and reagents
Before starting work, you should prepare dishes and related equipment:
- Test tubes or 100-gram glass flasks, which can be replaced with 100-gram jars with airtight lids;
- Cotton-gauze plugs;
- Test tube rack if you decide to use test tubes;
- Litmus test;
- Hydrogen peroxide, 2%;
- Sterile syringe or microbiological pipette.
If you have chosen jars with screw-on lids for your work, then they should make a hole, into which you need to insert a small piece of glass tube.
A piece of cotton wool is placed in it, then air can pass inside the jar, and cotton wool will trap dust and bacteria.
Preparation of nutrient medium
For cultivation of phalaenopsis from seeds use Knudson agar medium or modified Cherevchenko medium.
They can buy it in the store or make it yourself if the necessary components are available.
From the ready mix
The recipe for ready-made mixtures, in addition to the necessary salts and sugar, includes agar-agar, a polysaccharide that derived from seaweed.
It is better to prepare such mixtures with distilled water, strictly following the instructions. After that they can pour into dishes and sterilize.
Independent
For this it is necessary purchase components included in the formulation of one of the nutrient media:
Knudson's nutrient medium (g/l):
- Calcium nitrate - 1.0;
- Ammonium sulfate - 0.50;
- Potassium monophosphate - 0.25;
- Magnesium sulfate - 0.25;
- Ferric sulfate - 0.025;
- Manganese sulfate - 0.0075;
- Sucrose 20.0;
- Agar - 15.0.
Modified Cherevchenko nutrient medium, (g/l):
- Calcium nitrate - 1.0;
- Potassium monophosphate – 0.25;
- Magnesium sulfate - 0.25;
- Ammonium sulfate – 0.50;
- Iron chelate – 0.05;
- Sodium humate – 0.05;
- Activated carbon – 1.0;
- Sucrose – 20.0;
- Agar - 10.0.
Prepare nutritional mixtures following the sequence of actions:

The nutrient medium should be poured into the prepared container in a layer of about 2-3 cm and close with a tightly rolled cotton plug covered with gauze or a lid with a glass tube. Now she ready for sterilization.
Sterilization
For sterilization of dishes, growing medium and equipment at home, the following are most suitable:
- Double boiler;
- Oven with temperature regulator.
The pipette is tightly wrapped in paper. Closed containers with spilled medium are installed in a vertical position.
If it's a pressure cooker, go to the bottom lay a special grid. Sterilization time at 120℃ is 45 minutes.
Taking into account the heating of the steamer or oven increase by another 15-20 minutes.
So the total duration sterilization should be at least 60 minutes.
After this, the nutrient medium cool to room temperature.
Important! Refrigerated formula should not be solid or very liquid. Its consistency should resemble jelly.
If the density of the nutrient medium does not meet the recommendations, the pH value should be adjusted and the medium should be re-sterilized.
How to plant?
To avoid infection, all manipulations are carried out extremely quickly over steam.
To do this, place a wide pan of boiling water on the fire. It is better to secure a wire rack above it on which you can place dishes.
Immediately before sowing the surface of the seeds is sterilized:

For 7 days on the surface of the agar medium colonies of microorganisms may form.
If this does not happen, this means the seed planting was successful.
Seedling care
Vessels with seeds are placed in diffused light at a temperature of 20-23℃. Daylight hours should last at least 12 hours.
Depending on the type of orchid, time Germination can vary from 4-5 weeks to 7-9 months:
- First from seed small green balls with rhizoids are formed– filamentous outgrowths, thanks to which phalaenopsis attaches to the surface and absorbs water with dissolved minerals;
- Over time, the seedling the first leaves are formed, and then - real.
After 10-12 months the young plants in sterilized (steamed) soil, which contains crushed coniferous bark, sphagnum moss, fern rhizomes in a ratio of 1:1:1.
Add crushed activated carbon to the mixture (10 tablets per liter of soil): 
- Plastic cups filled with drainage material, then with the prepared substrate;
- Sprouts carefully, in a circular motion, remove from the container and wash the roots. Another way is to pour a little water into a container, then pour it along with the seedlings into a wide vessel. Add a 0.5% solution of Fundazol (2 ml), leave for 10 minutes, then carefully sprouts are extracted using a brush;
- Planted plants are not... They must be regularly sprayed with soft water at room temperature. The substrate must always remain moist;
- In six months the young plant is replanted in standard soil for orchids.
If you overcome all difficulties growing phalaenopsis from seeds, then this exotic plant will delight you at home for many years.
Seeds from China: possible problems
Usually, orchid seeds received through an online store from China.
In this case, a number of difficulties may arise:

Advice! It is better to place the orchid on a window on the east or west side of the apartment, so as not to cause the leaves to burn from direct sunlight. If it grows in the back of the room, the plant will need additional lighting.
Useful video
The video shows a gardener's advice on how to grow phalaenopsis from seeds:
Video recipe for preparing a nutrient medium for sowing phalaenopsis orchid seeds:
Video tips for caring for seedlings:
Look at the video, phalaenopsis orchid seeds from China:
Conclusion
Compared to other indoor plants, growing phalaenopsis from seeds is much more difficult.
However, this experience will give new impressions, and hand grown flower will bring a lot of joy.
In contact with
Many housewives want to grow an orchid from seeds. The reason for this decision is the cost of planting material. The price of orchids in pots is much more expensive than seeds, which are profitable to order through online stores. Flower growers receive seeds of rare varieties of orchids, ordering them even from China. How to grow an orchid from seeds at home? A step-by-step video guide will help you complete the task successfully.
Growing orchids at home from seeds is a fascinating but labor-intensive activity.
Growing Orchids from Seeds: Step-by-Step Guides O
Growing orchids at home from seeds is a fascinating, but labor-intensive activity. Although this work takes a long time, the end result is guaranteed to please family members and guests. It is known that an adult orchid does not require careful and tedious care. A flower grown from seeds is no worse than one bought in a pot. However, the entire process takes more than one year, which must be taken into account in advance. An orchid grown from seeds at home blooms in 4-5 years!

The photo shows orchid seeds before sowing on a nutrient medium
According to gardeners, the most important steps when planting orchid seeds are preparing the nutrient substrate and choosing high-quality planting material. You can make a solution for orchids yourself, or you can buy a ready-made substrate. The latter option is more profitable and flower growers recommend giving it preference. Orchid seeds do not contain any nutrient reserves. All necessary grain will be taken from the outside, namely from the substrate. A specialized store sells balanced hydrogels, which contain everything an orchid needs for normal growth.
Preparation of medium for planting orchid seeds, video:
How to collect orchid seeds at home:
How to grow an orchid from seeds at home from China, video:
Want to know how to grow an orchid from seeds at home? After watching the video, many will come to the conclusion that growing an orchid from seeds is too long and difficult. And it is true. No wonder a flower in a store is expensive. The most patient housewives who are not afraid of difficulties will be able to grow an orchid at home. Did you manage to cope with this work? Leave your comments on the article.
An orchid is a very beautiful, but at the same time, finicky plant. To grow an orchid from seeds, you will have to make a lot of effort at all stages of its development, monitor every millimeter of soil in which it grows, and accurately measure the amount of water and fertilizer applied. But the result is worth it: if you care carefully enough, you will end up with a healthy and lush flower. It will delight both the gardener and everyone around him.
Let's start with the choice of seed. Several types of these plants are suitable for the home indoor “climate,” but the phalaenopsis orchid varieties are the most common and are well adapted to our natural conditions. Gardeners also choose the seeds of vanda, cymbidium, zygopatelum, and dendrobium.
To choose high-quality material on the Internet, you can focus on the degree of recognition and scale of the manufacturing company. This, of course, is not a 100% indicator, but large enterprises are less likely to risk selling counterfeits. The best option is to consult with other gardeners who will suggest reliable companies. Flower growers often purchase flowers from China through special websites. This method is more reliable and less expensive.
Although in reality the seed looks more like dust, after special processing it looks like ordinary garden seeds. In this regard, many dishonest market sellers can sell you ordinary grass for the price of orchids. To avoid getting fake or low-quality raw materials, you need to carefully choose a flower shop and, preferably, one with a good reputation. You can also consult with other florists. In terms of reliability and price, this method is not much inferior to the first. In our country, unfortunately, Orchid seeds are very expensive, but the quality often does not correspond to the price.
Preparation of sterile substrate and primer
Before growing orchids from seeds, you need to buy or prepare special sterile soil. Only such a nutrient medium is suitable for germinating the seeds of a delicate plant.
So, to prepare the soil for germination of Orchids, you need to take simple components: agar-agar (8 g), glucose (10 g), fructose (10 g), activated carbon (1 g), nitrogen-phosphate-potassium fertilizers (1.5 d), root stimulator (5 drops), distilled water (1 l). All components are purchased at gardening stores and pharmacies.
The soil recipe for planting orchids at home begins with boiling 0.5 liters of distilled water. Next, glucose, fructose and agar-agar are added. Cook everything together until the agar-agar is completely dissolved.
Next, take another half liter of water, boil it and remove from heat. Add a phytostimulant, fertilizer and coal. Stir and combine the two liquids. Now you need to check the pH, since the orchid only grows in an environment with a pH of 4.8–5.2.
Having brought the pH level to the desired level, pour the hot solution into sterile flasks, 30 ml each. After this, everything needs to be sterilized again and sealed with a special lid (a piece of cotton wool wrapped in several layers of sterile gauze). Before planting orchid seeds in flasks, it is necessary to carry out a 4-5-day check - if mold appears, then this material is unsuitable for growing orchids there.
Choosing a pot
Before planting an orchid, you need to choose a good place for its germination. A small glass flask or jar with a narrow neck is well suited for these purposes. It is important that this vessel can be sterilized and that it can be conveniently closed with a cotton lid.
After this, it is best to use clay pots of different sizes, corresponding to the parameters of the plant and root system. During growth, the flower is regularly planted in a larger container, as this promotes its normal development.
To know that a grown orchid is running out of space in its current pot, you need to look at the hole at the bottom. If the roots are already showing decently, then perhaps it’s time to find a larger habitat. The main thing in choosing a pot is to make the orchid comfortable.
Preparing and sowing seeds
Planting orchids begins with preparing the seeds. The first and most important thing is sterilization. Before sowing, all future plants are treated with a bleach solution. Liquid is poured into the container, seeds are added and shaken gently for 10 minutes.
Also, before planting orchid seeds, you need to first prepare the tools. A pressure cooker works great, and a regular gas stove will do.
First you need to boil water and place a flask (jar) with a hot substrate in it and sterilize it at high temperature. Then the treated seeds are sown in the resulting disinfected solution. This should be done with sterile instruments, for example, a pipette. Then the solution with the seeds is mixed and the jar is sealed with cotton wool in gauze.
In about a week, inflorescences, leaves and roots of orchids will begin to appear.
Seedling care
Growing from seeds is a rather labor-intensive process, but the result is worth it. Especially when it comes to orchids. After the seedlings have grown sufficiently in the flasks (and this will not happen earlier than in a year), they are moved to the ground. But before that, the sprouts need to be prepared.
The seedlings are carefully removed from the flask and washed from the substrate with water. This also helps separate the plants from one another. Then add 2-3 drops of foundationazole, mix again and plant with a brush in the prepared soil.
Soil that is suitable for orchids of this age can be prepared from such combinations of elements as: charcoal and pine bark; coal, sphagnum, pine chips; coal, pine bark, peat, humus. If moss is used, it must first be soaked for a day so that the insects float off. The bark and peat must be crushed, doused with boiling water and dried.
Breeding orchids cannot take place without observing a certain “climate”: humidity 60%, daylight 12–14 hours, temperature 18–23 degrees. At first, it is necessary to strictly observe such measures, since fragile orchid sprouts cannot yet adequately cope with any fluctuations in environmental conditions.
Growing difficulties
Growing orchids from seeds at home is always accompanied by some difficulties. And the first is the need to keep everything in sterile (without exaggeration) conditions. Everything must be disinfected: flasks, seeds, tools, substrate. Therefore, before growing an orchid from seeds at home, you need to prepare well and efficiently.
Video “Growing orchids at home”
From this video you will learn how to properly grow orchids at home.
Reference! There are more than 30,000 varieties of this magnificent plant in the world, 300 of which were selected in China.
These varieties not only have a variety of shades and shapes, but also have a subtle, unique aroma. The most popular and in demand are:
- dendrobium (Dendrobium);
- cymbidium (Cymbidium);
- Vanda.
This plant grows in nature in hard-to-reach places, impassable thickets and secluded valleys, far from people. Therefore, in China this flower is a symbol of moderation, solitude and modesty.
Is it possible to grow a flower from it?
If you become the happy owner of real orchid seeds purchased on a Chinese website, then, according to theory, you can grow a flower from them.
But it is worth understanding that growing orchids from seeds is a very long and labor-intensive process. You will have to buy the necessary material and equipment, maintain optimal temperature and sterility. You’ll have to set up a real laboratory at home, as experienced flower growers jokingly call the process of seed germination. In this case, you will have to be patient, since you will have to wait a very long time for the seedlings. The seeds will turn into real flowering plants only after 4-6 years.
For more information on whether it is possible to use seeds to cultivate orchids, read.
Features to consider
Not all Chinese sellers are conscientious, and you can often encounter the problem that instead of orchid seeds you may receive planting material, for example, lawn grass or weeds. After such deception, many become disappointed and stop trying to grow the seeds of this exotic plant.
Attention! The seeds are not expensive, so don’t stop trying and order on another site. If you receive real planting material and grow an exotic beauty from it, then your satisfaction and joy will know no bounds.
What does it look like?
Orchid seeds resemble dust- they are so small. If you compare an orchid seed with a grain of wheat, it is 15,000 times smaller. In addition, they have practically no supply of nutrients for germination. The question arises: how does an orchid reproduce by seeds in nature? The answer is simple - the number of seeds. One plant can produce up to 5 million seeds, which are quickly dispersed by the wind and settle on trees, but only a few subsequently germinate - this is harsh natural selection.
Photo
In the photo you can see the orchid seeds themselves, as well as what grew from them.
This is what the seeds look like:

And this is an adult plant: 


Where and at what price can I buy it?
You can order on the Chinese website in the “seeds” or “for the garden” section; one bag costs around 35 rubles.
How to check for authenticity?
After receiving the package, open the package and carefully examine its contents before planting seeds at home. Real seeds must be:
- very fine - like dust. The size of one seed is from 0.35 to 3 mm in length and 0.08-0.3 mm in width;
- beige, cream or light brown;
- the shape is narrow and elongated.
Important! If the package contains seeds of a different shape, color or size, then you are out of luck; this planting material will grow anything but an orchid.
Very often, flower growers make a purchase after reading positive reviews on the seller’s website and looking at the high rating. But reviews in most cases talk about the speed of delivery or packaging. Photos of plants are usually not included, since growing them takes a lot of time.
Sometimes flower lovers receive large seeds in the mail and hope that it is a seed pod. But it should be green, no more than 3 cm long, and shaped like a grain of wheat. Besides,<как только семена в коробочке созревают, она раскрывается, поэтому получить по почте ее в закрытом виде невозможно.
Step-by-step instructions on how to plant correctly
Inventory
Before you start sowing, you need to prepare equipment and appropriate utensils:

If you chose simple jars with lids, then make a hole in them and insert a small glass tube. Subsequently, you need to place a small piece of cotton wool in it, then air will pass into the jar unhindered, and bacteria and dust will settle on the cotton wool.
Sterilization
To sterilize dishes, use:
- steamer;
- oven with thermostat;
- microwave oven.
Actions:
- The containers are sterilized immediately with the nutrient medium in a tightly closed state in an upright position.
- Sterilization is carried out at a temperature of 120 degrees for at least 45 minutes. It is worth taking into account the heating of the oven or steamer, so add 20 minutes to the original time.
- Then cool the containers with the medium to room temperature.
Preparation of the nutrient medium
Attention! Creating a nutrient medium for planting orchid seeds is a very labor-intensive process, but it can be purchased at a specialty store.
If you want to go the whole difficult way of growing a beautiful plant from seeds, then prepare the mixture yourself.
So, you will need:

Algorithm of actions during preparation:
- Add glucose, fructose, agar-agar to half a liter of boiling distilled water. Cook the mixture over low heat until the last ingredient has dissolved.
- In the next half liter of heated water, add coal, fertilizer and phytostimulant, mix well.
- Combine both compositions.
- Bring the acidity of the composition to a certain level. If the pH is high, use a solution of potash; if the pH is low, use orthophosphoric acid. Seeds will germinate only in an environment of 4.8-5.2 pH.
The nutrient medium should be like jelly. Pour 30 mg of the composition into each jar and close tightly. Sterilize the jars with the medium as described earlier. Then we leave the sterilized nutrient medium for 5 days; if mold has appeared in it during this time, we throw away the substrate and start all over again.
A video detailing how to prepare a growing medium for orchid seeds:
Sowing
How to sow correctly:
- Before placing the seeds in the nutrient mixture, they need to be sterilized. Dilute bleach in water in a ratio of 10%. After prolonged shaking, the solution should be filtered well. Soak the seeds in a chlorine solution for 10 minutes and plant immediately.
- Sterilized seeds are pulled out of the solution with a sterile syringe and placed into the nutrient mixture through tubes that are covered with sterile cotton wool.
You can put the seeds for germination. In this case, the air temperature should be 18-23 degrees. Daylight hours are 12-14 hours.
Reference! Germination can last from a week to several months. But it is worth remembering that the sprouts should not be touched for a year, as there is a possibility of infecting the fragile plant with an infection. As soon as the orchid seedlings are strong enough, you can proceed to the next stage.
We invite you to watch a video on how to properly sow orchid seeds at home:
Read more about how to plant an orchid.
Aftercare
Once the seeds are sown, it is enough to simply maintain the optimal temperature and daylight hours.
Problems and difficulties
 The physiology of seeds is such that often these factors become a barrier to sowing at home:
- the seeds are very small;
- they do not have endosperm, which allows them to draw and absorb nutrients from the soil;
- even a slight external influence can destroy the material;
- seeds are very susceptible to pathogenic microorganisms.
Conclusion
As you can see, the process of growing an orchid from seeds is quite labor-intensive and time-consuming, but very exciting. If you do everything correctly and according to the instructions, the result will be positive. Be patient and after a while you will have a large number of magnificent, exotic flowers.
If you find an error, please highlight a piece of text and click Ctrl+Enter.